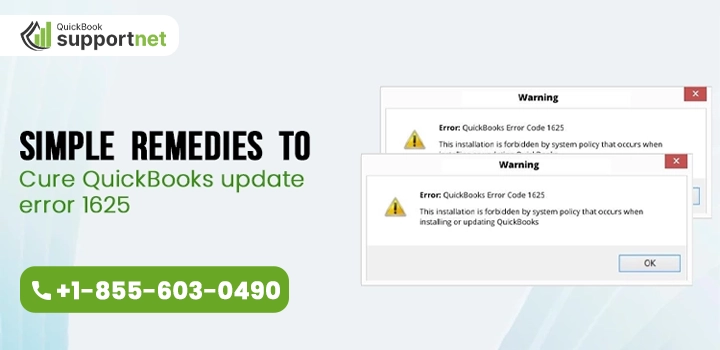
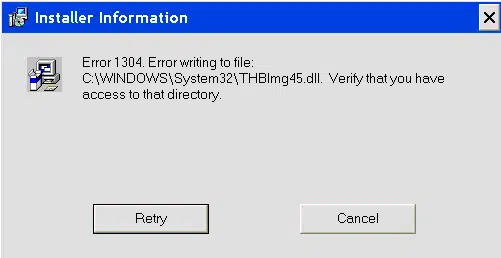
Author: admin

Home > Articles by: admin

It is crucial to resolve QuickBooks error 15215 as it can obstruct an ongoing update process in QuickBooks. Users who are trying to get the most recent update for their QuickBooks payroll service may find this error really annoying. They just can’t move ahead with their QuickBooks update process, which kills their time and affects their operations as well.

You just can’t skip the error, as an outdated QuickBooks payroll service can cause various discrepancies in your payroll processes. In case you are trying hard to get rid of the QuickBooks error code 15215 but fail every time, this post can offer you an ultimate guide for the error resolution.

Meaning of QuickBooks Error Message 15215

When the error prevents users from installing the latest payroll updates, an error message accompanies this issue. You may notice the following error text on your screen:

QuickBooks Error 15215: Unable to Verify the Digital Signature.

When updating the QuickBooks payroll service or desktop version of the program, this error message can occur due to the system’s junk files. It is not the only factor, but there are several possible reasons that can promote error 15215 in QuickBooks. Here, we will discuss them all with their suitable solutions.

Main Factors That Give Rise To QuickBooks Payroll Update Error 15215

Some of the most common reasons that can make QuickBooks error 15215 disturb an update process are:

Misconfigured Internet Explorer

Internet Explorer is the supported internet browser from Intuit. To support Intuit’s processes, it is crucial that the Internet Explorer settings are configured correctly. If not, It can result in the error code 15215 in QuickBooks.

Improper QuickBooks Installation 

When QuickBooks installation remains incomplete or gets damaged/corrupt, downloading the latest updates on it won’t be possible.

Virus/Malware Infection 

A hovering threat of malicious applications on the QuickBooks data file of the program can also hinder the QuickBooks payroll update process. 

Damaged QuickBooks Software

In case the QuickBooks Desktop software is damaged, update errors like QuickBooks error 15215 can come into existence. 

Background Applications 

Sometimes, the applications that are running in the background can interfere with the QuickBooks update, thereby causing various update error codes. 

Does QuickBooks Desktop Error 15215 Show Some Signs/Symptoms?

Yes! When the error occurs, you may notice various signs or symptoms that can give you an idea about the nature of the error. These signs are:

  • An error message that explains what has happened actually, wherein you can also notice the error code 15215.
  • Soon after the error occurs, it crashes the Window active on your screen.
  • Hanging Desktop, which is showing no response towards the inputs provided to it.
  • QuickBooks becomes corrupted with the error code 15215.
  • Desktop, mouse or keyboard inputs, Windows, and the application all become suddenly sluggish.

How Should I Act When QuickBooks Desktop Update Error 15215 Occurs?

After gaining the information explained above, you will find yourself in a more aware state regarding the payroll update error 15215 in QuickBooks. Thereafter, you can implement the following solutions to eliminate the persisting issue:

Initial Method: Reboot Your Computer Having QuickBooks Installed On

Rebooting your system is one of the most basic yet effective solutions for resolving a wide range of technical issues. Therefore, you should try this as well in the beginning before you move to the next solution. Simply click on the Restart button and wait for it. Thereon, you can try updating the QuickBooks application and check the error. If you are still seeing it, move to the next method.

Second Method: Install The Pending Updates Manually

If you are having trouble installing the latest updates, you can go with the manual process for updating the QuickBooks Desktop application. You need to follow these steps for an update:

  • Navigate the QuickBooks Desktop software to reach out to the Update QuickBooks option and confirm that the product is chosen.
  • Next, click the change tab, choose QB product, and choose the update option.
  • Advancing in the procedure, select the location to save the download file.
  • Once the location is confirmed, choose the Save option and look for the file you have downloaded.
  • Thereon, your next action should be clicking on the Install the Update tab twice.
  • You can now restart your Windows and move to your accounting program to check if the latest QuickBooks updates are downloaded or not.

Third Method: Run QuickBooks As Windows Administrator Using Relevant Credentials

When you run QuickBooks with admin credentials, it gives QuickBooks the authority to Windows to run its tasks smoothly. Besides, it lets QuickBooks utilize the necessary resources as needed, thereby preventing QuickBooks error 15215. Here are the steps:

  • Before you start, make sure that QuickBooks is closed. If not, do it yourself before jumping to the next step.
  • Next, right-click on the QuickBooks icon, and then a drop-down list will roll out.
  • From the drop-down menu, select option at the top, Run as administrator.
  • Moving ahead, you will face a choice – Do you want to allow this program to make changes to the computer?
  • Click Yes to confirm, and it will provide QuickBooks with the required permissions.

Try updating QuickBooks with the added permissions, and if it does not resolve the QuickBooks error 15215, move to the next solution.

Fourth Method: Configure Settings in Internet Explorer To Fix 15215

If you are having trouble installing the QuickBooks application, it may be due to the improperly configured Internet Explorer settings. To fix it, you need to apply the following changes:

  • Before you initiate this procedure, close the QuickBooks application.
  • After that, go to the Internet Explorer browser to start the configuration.
  • Here, you need to click on the Tools option to locate the required settings.
  • Thereafter, select the Internet Options icon, followed by clicking on the Advanced option.
  • Next, click on Advanced Settings to open the settings you need to modify.
  • Here, you may locate the options, such as Use TLS 1.0, Use 1.1, and Use TLS 1.2. If not, you might be using an outdated Internet Explorer, and you need to update it.
  • Now, you need to checkmark the box for the Use TLS 1.0 option. Make sure that all the rest of the options are unchecked.
  • After confirming, click OK, and the modified settings will be saved, and you may now quit the Internet Explorer Internet options window.
  • After applying these settings, restart your system and try updating the available updates.

Now, after setting up Internet Explorer, check if the QuickBooks error code 15215 is fixed or not.

Fifth Method: Restart Microsoft Windows In Selective Startup Mode

Users struggling with the payroll update error 15215 in QuickBooks may find this procedure useful. It prevents the third-party applications (conflicting with the update process) from running, thus ensuring that the updates are installed without facing any hurdles. Below is how you can switch to this mode:

  • Before you initiate the actual procedure, close the QuickBooks Desktop window.
  • Now, on your Windows 8 or 10, press the Windows + R keys simultaneously.
  • Click inside the Run box and thereafter, type MSConfig in it.
  • Make sure that you have typed it correctly, and then click the OK button.
  • It will open the System Configuration Utility.
  • You need to allow the configuration window to open, and here, you can choose the Selective Startup mode.
  • Check and confirm that all the boxes for Load Startup are not marked.
  • Once you are done with these settings, click the Save button and hit OK.
  • Now restart your computer and open QuickBooks by double-clicking on its icon.
  • Here, you can download the latest payroll tax table to resolve the QuickBooks error 15215.
  • Once done, you can switch back to the Normal Startup mode and restart your computer to finish.
Winding Up!

This post elaborates on different solutions to fix QuickBooks error 15215 based on their different causes. Hope you have resolved this update error till now by implementing them accurately. However, if you are unable to make these solutions work due to technical difficulties, connect with us to avail of the required help.

FAQ's

Ans. To avoid the payroll update error like 15215, make sure that you have an active payroll subscription. Besides, ensure that you are connected to a stable Internet, and QuickBooks is updated to the latest release. Also, check your Firewall settings to make sure that they won’t interfere with an update process.

Ans. An outdated version of the QuickBooks application can cause several other discrepancies in the program. Besides, you won’t be able to run your payroll processes accurately. Therefore, you need to look into the matter and respond swiftly.

Ans. You may reach out to the professionals by choosing any of our chat, email, or helpline numbers. It will connect you with a trained technician who can guide you with the relevant solutions and that too in a prompt manner.

In today’s time, where most people prefer working remotely, online banking plays a crucial role for businesses. Moreover, it helps organizations accomplish their bank-related tasks online instead of visiting the banks. No matter whether online banking comes with several benefits, it also has certain flaws. Similarly, while using the online banking feature in QuickBooks, users might encounter QuickBooks Error 323. You might be wondering why it happens. This error mainly occurs when the users include the same account twice in your product. 

However, you no longer have to worry if you are on the same page and getting Error 323 QuickBooks. This guide will help you understand all the factors responsible for the error. Alongside simple tricks to overcome this banking error so that you can regain access to online banking. 

Is QuickBooks Error 323 getting problematic for you and preventing you from doing online banking? Contact us at +1-855-603-0490 and obtain expert tips to overcome the issue instantly. 

Get A Detailed Insight Into QuickBooks Error Code 323 

There might be certain instances when the users result in QuickBooks Error Code 323 because of using login credentials that aren’t approved by the financial institution’s website. It could happen when the users make typing mistakes while adding the credentials. Otherwise, it may trigger due to some browser-related issues. 

As a result, this error might obstruct the users from processing any transaction and lead to payment delays. Therefore, fixing this error at the right time is important before it gets too late with the correct methods explained further. But before fixing the error, let’s first look into the root causes behind the issue. So, let’s get started!!

Why Does Banking Error 323 in QuickBooks Online Flashes On the User Screen?

The users might receive Error 323 in QuickBooks Online while using the wrong login credentials to use online banking. However, it could also be caused due to multiple other factors. Therefore, we have specified some below to update you on all such factors. 

  • Your financial institution may have transferred their account details to another server.
  • Sometimes, QuickBooks Error 323 may trigger when you have picked the same name for two distinct accounts in QBO. 
  • You are trying to open an account that has been closed by your financial institution.
  • In other instances, it may happen when you are accessing two accounts having the same account name and number. 

Advisory Tips Before Resolving QuickBooks Banking Error 323

Remember the following points to fix the QuickBooks Banking Error 323 smoothly. 

  1. The very first thing is that you must check the stability of your internet connection. 
  2. Another important thing is to cross-check your login credentials while signing into online banking in QBO. 
  3. If you cannot log into your bank account, even using the correct login credentials, try to login via another web browser. 
  4. Make sure that your financial institution has yet to make any recent changes. 

Simple Tactics to Troubleshoot Error 323 QuickBooks Effortlessly

We understand it gets quite annoying when making payments via online banking; users suddenly encounter Error 323 QuickBooks. Therefore, follow the steps outlined below to fix the error efficiently without making much effort. 

First Troubleshooting Method: Give a New Name to the Account On Your Bank’s Website

  1. In the first place, go to the Banking option and pick the account you wish to rename.
    1. After this, click the Edit button followed by the Edit Account Information
  2. Consequently, you will get an Account Window on your computer screen. 
  3. In the next step, find and hit the “Disconnect the account on Save” option. 
  4. Conclude the process by clicking the Save button to restore all the changes made to the account name. 

Second Troubleshooting Method:- Remove Any Of the Repeated Account

There might be instances when the users make the same account in QBO twice. As a result, it may give rise to QuickBooks Error 323 and stop them from accessing online banking. So, it is a must to remove any account to avoid any further discrepancies using the steps below. 

  1. Before initiating the process, you must review the side effects of deleting accounts. Once done, you must go ahead. 
  2. After this, find and click on the highlighted Gear icon.
  3. Thereon, select the Charts of Accounts (COA) option and search for the account you wish to remove. 
  4. Once you get the account, tap the Delete button and then the Confirm tab

Third Troubleshooting Method:- Get the Required Transactions Downloaded

  • Initially, you must launch the Settings menu in the QuickBooks Online application. 
  • Afterwards, choose Setting Up a Transaction and click My bank is not listed option.
  • Eventually, you will observe that the latest date will be shown after the list is refreshed. 
  • In the next step, hit the Show List option from the menu and include the name of your financial institution. Alongside this, you must add the login details to proceed further. 
  • Consequently, you will see the screen containing the list of all accounts along with the bank details. 
  • End the process by connecting every account with the appropriate one. 

Fourth Troubleshooting Method:- Bank Statements Must Be Downloaded 

  1. Choose the Charts of Accounts option from the menu list in the first step. 
  2. After this, pick the bank account you have chosen to conduct the online banking. 
  3. Thereon, hover your cursor over the Download Bank Statement option. 
  4. In the next step, hit the Add option from the View In appearing window of the Online Banking Centre
  5. In the end, you must choose the option to download the statement. 

Fifth Troubleshooting Method:- Importing and Exporting Charts of Accounts

You must follow the instructions below to import and export the charts of accounts in QuickBooks Online. 

Steps For Exporting the Charts of Accounts

  • Primarily, go to the QuickBooks File menu and hit the Utilities option
  • After this, navigate to the Lists to IIF files beneath the Export option
  • Now, all you need to do is to save the file to the desktop after picking the Charts of Accounts
  • End the process by generating a new file

Steps For Importing the Charts Of Accounts 

  1. Begin the process by choosing the QuickBooks File menu followed by Utilities
  2. Thereon, you must hit the Import option and then move to the next step. 
  3. Next, select the highlighted “IIF Files” below the Import option.
  4. Afterwards, search for the Charts of Accounts and save the IIF file to your desktop. 

Let’s Wrap It Up!!

With this, we conclude this entire post and hope that the methods explained in this post will help you fix QuickBooks error 323. If you still can’t use online banking due to this issue, consult our professionals for sure-shot solutions. You can get in touch with our experts via live chat or email them explaining your query. 

FAQ's

Ans. Users who confront QuickBooks Error 323 might experience the following outcomes on their screen. 

  • You may experience a sudden freeze or crashing of your Windows operating system. 
  • At the onset of this error, the users fail to link their bank account with QBO and thus fail to access online banking.
  • Your system may start working slowly. 
  • The users won’t be able to pay their customers as it prevents access to online banking. 

Ans. Go through the following instructions to connect your bank account with the QuickBooks Online application. 

  • Firstly, move to Transactions > Bank Transactions > Link Account option.
  • You must include your bank’s URL or name and select the bank.
  • Thereon, mention the login details accurately and hit the Continue button. 
  • Pick the account you wish to connect and date. Also, choose the account type and hit Next. 

Ans. You must reach out to the official website of your financial institution or consult with their help desk to test the bank server. 

Ans. The inadequate internet settings could be one of the reasons behind the QuickBooks Error Code 323. Therefore, it is important to review and repair the internet settings if there is any issue. Thus, it would help the users overcome the error and regain access to online banking. 

Ans. Here, we have listed some of the possible factors responsible for the QuickBooks banking errors like QuickBooks Error 323, 324, 350, etc. 

  • Issues with the bank server are one of the reasons that cause this issue. 
  • Another reason may be using the wrong bank login credentials.
  • In other instances, it may happen when using an inadequate internet connection. 
  • Sometimes, it may happen when you use the incorrect URL to reach the bank website.  

There’s good news for all business owners using QuickBooks. Intuit, the leading accounting application provider, returned with the upgraded version of QuickBooks Desktop 2024 on Sept 20, 2024. You can now get access to the avant-garde and enhanced functionalities to make your accounting process easier. 

However, if you also want to get your hands on the newly launched QuickBooks Edition 2024, hurry up and don’t miss out on highlighting this date on your calendar. Furthermore, read this entire post properly to get in-depth details about the newly launched product. 

“Can’t update the QuickBooks Desktop 2024? Ring us up on +1(855) 603-0490 to get rid of your snags.“

What is the Significance of Upgrading to QuickBooks Desktop 2024?

With the update in technology, Intuit also comes up with several updates and upgrades on time. However, switching to QuickBooks Desktop 2024 will help small and medium-sized businesses handle their accounting tasks efficiently. Below are some benefits you can grab after upgrading to the newly launched version. Let’s have a look at them. 

  1. Advanced Security:-

With the advancement of technology, the risk of cyber threats is also rising rapidly. So, keeping your business accounting data safe and secure has become much more crucial. The QuickBooks Desktop 2024 has developed updated features like two-factor authentication and data encryption to safeguard your data. 

  1. Better Performance:-

The best thing about QuickBooks 2024 is that it is designed to enhance your performance. In short, it means you can now easily handle all your business finance-related tasks without investing much time. Thus, you can safeguard your data from sudden crashes or other issues. 

  1. Newly Added Features:-

QuickBooks 2024 has developed several new features that can help you save both your money and time. You can now place all your employee’s payroll data in one place without any issues. Moreover, you may also customize invoices and reports to fulfill the requirements.

  1. More Simple Upgrade Process:-

Now, you can easily upgrade to the QuickBooks 2024 and get your hands on the QuickBooks Auto Data Recovery feature. With the help of this feature, you can automatically generate a backup of the data, so you don’t have to think much about losing crucial data while upgrading to the new version. 

What’s Newly Added in the QuickBooks Desktop 2024?

Does the question arise in your mind regarding what’s new in QuickBooks Desktop 2024? Well, in that case, you are not alone in this situation. Below, we have provided detailed information about the new features added to the new QuickBooks product. 

  1. In the QuickBooks 2024 edition, you can get two new features: Cash Flow and Organization. 
  2. The cash flow features mainly represent the amount of money coming in and out of your company. In short, it will provide clear insight into the company’s financial status. 
  3. Moreover, it becomes easier to track products by getting complete details regarding product details, pricing, information, and product images.
  4. Using Automated calculations, it allows its users to combine different reports into a single dashboard. Thus, it helps the users to monitor the cash inflows and outflows. 
  5. In addition, the best part is that it is a cost-efficient software that helps businesses record transactions. 
  6. Monitoring your bills and expenses using the Bill Tracker feature has become much easier. This feature provides a real-time view of unpaid bills and purchase orders. Thus, it helps businesses handle the cash flow efficiently. 
  7. You can also manage your inventory with the inventory management system so that the businesses can keep track of the stock levels. Apart from that, the companies can also generate purchase orders and streamline inventory management tasks. 

Downloading Procedure of the QuickBooks Desktop 2024

Before downloading the QuickBooks Desktop 2024 on your device, check that the software is compatible with your operating system. 

  1. To initiate the download of QuickBooks Desktop 2024, move to the Downloads & Updates page. Then, pick the version that you are presently using. For that, you will get two different options, which are as follows:
  • Sign In As Proadvisor:- You can easily sign-in to the QuickBooks ProAdvisor Center to get the QuickBooks software on your device. 
  • Login As Accountant:- If you are accessing the Accountant version, sign into the Customer Account Management Portal and download the software.
  1. Now, carry on with the following process to download the installation file.
  • Head towards the official website of Intuit and pick the QuickBooks version you wish to install. 
  • Then, you have to pick between the QuickBooks Desktop, Enterprise, Pro, or Premier from the official website. 
  • You are supposed to click on the product you wish to download and proceed further by completing the payment process. 
  • Once the payment part is done, you will obtain the License and Product Code
  • As a result, you will obtain the Confirmation Code in your email from Intuit. 
  • Click on the QuickBooks tab and pick the appropriate location to restore your file. 
  • Thereon hit the Save button, and it will initiate the QuickBooks download process. 
  • End the procedure and then proceed further with the installation process. 

Installation Procedure Of QuickBooks Desktop 2024

Once you have successfully downloaded the QuickBooks Desktop 2024, the next step is to proceed with the installation process. 

Stage 1: Acquire Your QuickBooks Product and License Number 

  • After downloading the QuickBooks Desktop 2024, save the file to where you can find it easily. 
  • Thereon, ensure that you have the product and license key in your hand. 

Stage 2: Installation Of the QuickBooks Desktop 2024 

  1. Initially, launch the QuickBooks.exe file by double-clicking on the downloaded setup file. 
  2. Afterwards, go through the instructions displayed on the screen. 
  3. Thereon, accept the Terms and Conditions in the License Agreement and hit the Next button. 
  4. Now, include the Product and the License Numbers within the required search field. Later on, hit the highlighted Next button to complete the process. 

Stage 3: Pick the Right Installation Type According To Your Preference 

Express Install 

You can pick the best installation type if it matches any of the following circumstances. 

  1. You are running the QuickBooks Desktop for the first time. 
  2. Installing the QuickBooks Desktop again on your device. 
  3. If you are accessing the application on a single computer and not being a part of any network. 
Follow the Steps to Install the QuickBooks Desktop 
  1. Initially, hover your cursor over the Express option and then hit the Next tab. 
  2. Afterwards, choose the highlighted Install tab and then move further. 
  3. Select the Open QuickBooks option once the installation is over and begin using the QuickBooks application. 
Custom and Network Install 

You can choose this installation type in any of the following cases. 

  1. You are going to host the company file on the server. 
  2. When you are installing the QuickBooks Desktop on the server instead of the respective device. 
  3. In case you are setting up the multi-user mode. 

Go through the following steps to install the QuickBooks Desktop. 

  1. Begin the procedure by hitting the Custom and Network Options and the Next button
  2. Afterwards, pick the option that uses QuickBooks according to your requirements. 
  3. In the next step, hit the highlighted Change the Install Location option
  4. Move further by clicking the Browse to the Folder option and move to the folder that carries your QuickBooks files. 
  5. Hit the Next button and carry on with the installation process. 

Activate the QuickBooks Desktop Using the Simple Steps 

  1. Launch the QuickBooks Desktop application and hit the F2 key by hitting the Product Information window. 
  2. After this, move to the Help menu and choose the highlighted Activate QuickBooks Desktop
  3. Access the Product Information window and look at the Registration status as well as the License Number. 
  4. If you spot that the status shows Activated, it signifies that you are ready to use the QuickBooks software. 
  5. Otherwise, you may also click the Help menu and choose the Activate QB tab
  6. As a result, it will show instructions on your computer screen; follow it, and update the software appropriately.
  7. At last, conclude the process and start using the QuickBooks software.

Related Enquiry: How to Update QuickBooks to Latest Version

To Summarize the Above!!

Through this post’s help, we hope you have gained immense knowledge about QuickBooks Desktop 2024. However, we suggest you consult with our QuickBooks professionals if there are any other queries related to this QuickBooks version. You can consult them via live chat, and they will help you in the best possible manner within the least time applicable. 

Most often, the users might experience QuickBooks Error 6000 77 while trying to launch the data file. Are you also confronting the same issue and hampering your workflow? If yes, Worry Not!! It is the most common company file error that users usually confront due to incorrect folder permissions or inappropriate firewall configuration.

However, the users can’t ignore the QuickBooks Error Code 6000 77, as it may cause a severe loss to the company data. So, hurry up and use this informative guide to resolve your issue quickly.

Are you unable to figure out QuickBooks Error 6000 777 and need an expert’s supervision? Connect with our professionals at @+1-855-603-0490 and obtain a simple resolution to your query.

A Quick Glimpse on QuickBooks Error 6000 77

The users often end up with QuickBooks Error 6000 77 when they fail to open the data file when QuickBooks can’t read its file location. On the occurrence of this error, the users witnessed the following error message indicating: “We’re Sorry. QuickBooks encountered a problem. Error Codes: (-6000,-77).”

The users might also encounter Error 6000 77 in QuickBooks when they don’t have enough permissions to open the data file. However, several other reasons trigger this error. We have explained all such causes in this blog, along with the symptoms and troubleshooting methods.

Why am I struggling with QuickBooks Error Code 6000 77?

Knowing the root causes of QuickBooks Error Code 6000 77 will help resolve the error efficiently. So, to get you updated regarding this issue’s possible factors, we have discussed a few of them below. Let’s begin exploring them.

  1. Operating the incompatible version of the QuickBooks Desktop is one reason that triggers the error.
  2. Sometimes, it might be evoked when trying to access the data file placed on external storage instead of storing it on the local drive.
  3. The users might get QuickBooks Error 6000 77 when the Windows Firewall interrupts the network connectivity with the data file.
  4. Another reason may be that the company file name contains more than the required characters.
  5. Damage or corruption in the QuickBooks data file may also be responsible.

What are the After-effects of Getting QuickBooks Desktop Error 6000 77?

Following are the outcomes that the users will notice at the arrival of QuickBooks Desktop Error 6000 77.

  1. You won’t be able to open the QuickBooks company file, which might affect your ongoing business data.
  2. In other instances, users may spot an abrupt shutdown of the Windows device.
  3. The sudden freezing or crashing of the QuickBooks application.
  4. Sometimes, you may spot that your Windows OS starts performing sluggishly.

Best Ways To Troubleshoot QuickBooks Company File Error 6000 77

To help you rectify QuickBooks Company File Error 6000 77, we have mentioned some of the tried and tested solutions below. Ensure that you follow the stepwise instructions in the same manner as outlined below.

Troubleshooting Way 1: Reconstruction of the Damaged Folder

As discussed above, the damage or corruption in the QuickBooks folder is one reason that results in QuickBooks Error Code 6000 77. So, to fix the issue, you must recreate the damaged folder using the steps below.

  1. Initially, construct a new folder on your local C: drive.
  2. After this, navigate to the folder that contains your QuickBooks data file.
  3. Once you get the file “.qbw,” right-click on it and choose the Copy option.
  4. Soon after this, launch the new folder you recently generated and Paste the file into it.
  5. Thereon, you must set the Windows Access Permissions to share the data files.
  6. Finally, open the QuickBooks Desktop and launch the file through the new location to verify whether the issue is resolved.

Troubleshooting Way 2: Utilize the UNC Path In Place of A Mapped Drive

  1. Begin the process by right-clicking the QuickBooks icon on your desktop.
  2. After this, press and hold the Ctrl key to choose the Run as Administrator option.
  3. Moreover, hold down the Ctrl Key until you see the No Company Open Window on the screen.
  4. In the next step, navigate to the File menu > Open or Restore Company > Open a Company File > Next option.
  5. Subsequently, pick the Network option and browse to the location of the data file.
  6. At last, choose the data file and hit the Open button to conclude the process.

Troubleshooting Way 3: Modify the Name of .ND and .TLG File

Sometimes, the corrupted or damaged .ND and .TLG files might generate issues while accessing the data file. Giving a new name to both these files won’t cause any loss to your data as they are automatically generated while opening the file. Perform the steps illustrated below to change the name of these configuration files.

  1. Primarily, access the folder that contains your data file using the following path “C: >> Users >> Public >> Public Documents >> Intuit >> QuickBooks >> Company Files.
  2. After this, look for the files having the same name as your data file but having the .ND and .TLG file extensions.
  3. In the next step, right-click on the .ND and .TLG one by one and pick the Rename option. Then, you must mention “.OLD” at the end of the file name and hit the Enter key.
  4. Finally, open the QuickBooks data file and see whether the issue persists.

Troubleshooting Way 4: Delete the Unwanted Blank Spaces From File Name

If there are any extra blank spaces in the name of your QuickBooks company file, it might lead to Error 6000 77 in QuickBooks. Thus, to resolve the issue, you must remove the blank spaces or extra characters from the file name using the steps below.

  1. Initially, users must sign out from the QuickBooks Desktop application if it’s already open on their device.
  2. Afterwards, you must navigate to the QuickBooks data file and launch it on your desktop.
  3. Thereon, right-click on the data file and pick the Rename option.
  4. You are supposed to pick the company file name and then edit it. Ensure that there is no extra space. However, if you spot that there is any extra space, remove it between the file extensions.
  5. Lastly, launch the QuickBooks data file and verify it is opening properly.

Troubleshooting Way 5: Take Help of the QuickBooks File Doctor

  1. To fix the damage in the QuickBooks company file, you must use the QuickBooks File Doctor Tool. You need to get the newly launched version of the QuickBooks Tool Hub.
  2. Once you have downloaded the QuickBooks Tool Hub, double-tap on the file to open it.
  3. Now, navigate to the Company File Issues tab > Run QuickBooks File Doctor menu.
  4. You are supposed to launch your data file by clicking the drop-down menu. If you fail to find your file, pick the Browse and Search to locate the file option.
  5. Moving further, browse to the Check Your File option > Continue.
  6. Add your QuickBooks admin password accurately and hit the Next option.
  7. Wait until the File Doctor Tool scans and fixes the issue.
  8. At last, once the scanning is over, launch the QuickBooks and the data file on your device.

Troubleshooting Way 6: Setting up the Access Permissions of Data File Folder to Share Company

The users might often end up with QuickBooks Error 6000 77 when they don’t have enough folder permissions to share the data file with other workstations. So, giving enough permission to share the data file folder will help you fix the error. Perform the steps elaborated below to do the same.

  1. Shut down the QuickBooks application and open the Start menu.
  2. Afterwards, tap on File Explorer and access the folder that contains your data file.
  3. Thereon, right-click on the folder and pick the Properties option.
  4. In the next step, navigate to the Security tab and hit the Advanced tab.
  5. Subsequently, select the QBDataServiceUserXX and hover your cursor over the Edit menu.
  6. From the below-given settings, set the Permissions as “Allowed”.
    • Write Extended Attributes
    • Read Extended Attributes
    • List Folder/ Read Data
    • Create Folder/ Append Data
    • Read Attributes
    • Write Attributes
    • Read Permissions
    • Transverse Folder/ Execute File
    • Create Folder / Write Data
  7. However, if the permissions aren’t set properly, configure it using the steps below.
    • Return to the folder with your data file and pick the Properties option.
    • Next, go to the Edit menu located beneath the Security tab.
    • Thereon, navigate to the QBDataServiceUserXX and pick the Full Control menu.
    • Now, hover your cursor over the Allow and then the Apply button.
    • Finally, hit the OK button to close the window.

Taking Everything Into Account!!

We hope applying the resolution methods discussed above will help you with QuickBooks Error 6000 77. Thus, it helps you regain access to your crucial QuickBooks company file data. However, connect with our professionals directly if you get stuck while performing any of these troubleshooting methods. You can either connect via live chat or email support facility and get all your doubts clarified for hassle-free error resolution.

Commonly Asked Questions:-

Ques 1: What Should I do to prevent QuickBooks Error 6000 77 from occurring?

Ans. Yes, it is possible to avoid QuickBooks Error 6000 77 from occurring in the future using the following precautions.

  • Don’t miss to take the regular backups of your QuickBooks data file.
  • Remember to install the up-to-date version of the QuickBooks application.
  • Ensure proper installation of the QuickBooks application.

Ques 2: How many characters must be included in the QuickBooks File name to fix QuickBooks Error Code 6000 77?

Ans. The users must ensure that the company file name doesn’t contain more than 64 characters and should have only one alphanumeric character. Also, the file name mustn’t contain any extra space or special characters.

Ques 3: Does the incorrect Firewall settings lead to QuickBooks Desktop Error 6000 77?

Ans. Yes, the users might end up with QuickBooks Desktop Error 6000 77 when the Windows Firewall blocks access to the data file. Therefore, to fix the issue, it is necessary to configure the Windows Firewall settings and get access to a data file.

Ques 4: How often must you generate the backup of your QuickBooks company data?

Ans. Creating the backup data file regularly is mandatory to avoid data loss on issues like QuickBooks Error 6000 77.

Ques 5: What would happen on the arrival of Error 6000 77 in QuickBooks?

Ans. Whenever the users end up with Error 6000 77 in QuickBooks, they will be restricted from accessing their data files. Thus, it might stop the users from resuming their ongoing work, which would cause a loss to the company.

Users often witness QuickBooks Online Login Problems on Chrome while using the wrong login credentials. In other instances, it might pop up when the browser settings are not configured properly. Whenever the error appears, it stops the users from opening QuickBooks Online in the Chrome web browser.

Consequently, it could affect the ongoing business tasks and put the ongoing work at a halt. So, it is crucial to get it fixed as soon as possible using the correct troubleshooting methods. Further, go through this entire post to understand the error properly and how to troubleshoot QuickBooks Online login problems on Chrome.

Encountering QuickBooks Online Login Problems on Chrome and unable to figure it out on your own? Call us at @+1855-603-0490 and connect with our professionals for a quick resolution.

What Give Rise to QuickBooks Online Login Problem on Chrome? 

Knowing the possible reasons behind the error can make the troubleshooting smoother for you. Find them below:

  • When you forget to sign out of the previous QuickBooks Online session appropriately, the login issue can occur when you try to sing-in the next time.
  • There might be the possibility that someone else has signed into your QBO account from a different system with the same login details.
  • If a user is already logged into the same credential you are using to log into your QBO account on Chrome.
  • Sometimes, it is your antivirus program that can block access to the QuickBooks software.
  • Also, it might evoke when the old history or cache files are affecting the performance of the Chrome browser.

What are The Different Types of QuickBooks Online Chrome Errors?

Here, we have mentioned all such errors that might arise while accessing QuickBooks Online on Chrome.

  • QuickBooks Online does not load correctly.
  • Unable to load the QuickBooks Online login page.
  • Blank or black screen after signing into QuickBooks Online.
  • The unexpected failure of Google Chrome while opening QuickBooks Online.
  • QuickBooks Online does not respond after you log in to your account.
  • QuickBooks Online is not working with Chrome.

How to Eliminate QuickBooks Online Login Problems on Chrome?

Now that you know the apparent reasons behind the QuickBooks Online login issues, let’s discuss some of the most relevant and effective solutions that can keep the error at bay:

Solution 1: Try to Login Using A Different Browser

If you are getting an error when signing in on your Chrome browser, try a different browser to get back into your QuickBooks Online account. Sometimes, an erroneous browser can bring forth the error; therefore, switching the browser can resolve this problem. Internet Explorer is one of the most preferred browsers you can use to access your QuickBooks Online account.

Solution 2: Use Chrome in The Incognito Window

As an alternative method, you can open Chrome in an incognito window and then open the login page of QuickBooks Online. The incognito mode has none of the cookies saved; therefore, it keeps the login issues at bay. Below are the steps to get the job done:

  • Launch the Chrome browser in the first place.
  • Thereafter, you need to click on the customize and control icon located on the upper right of the screen.
  • Now choose the New incognito window (Ctrl + Shift + N).
  • When the incognito mode opens, visit the QBO login page and enter the accurate login credentials to get back into your account.

Solution 3: Clear Your Browser’s Cache/History

The sluggish performance of your Chrome browser can also be one of the main reasons behind the error. Here, you need to clean the cache or your browsing history to fix the error. Below are the steps you need:

  • First of all, open your Chrome browser.
  • Next, click on the Customize and control icon and then select Settings.
  • Thereafter, click on the History tab and then click on the Clear Browsing Data button.
  • Here you can checkmark the boxes against the options, you want to delete or keep.
  • Wait until the browsing history/cache gets deleted completely.
  • Now try to perform the same step you were receiving an error with.

Solution 4: Create an Additional User on Chrome

You can also create an additional Chrome user to work with QuickBooks Online. Follow the below-given steps:

  • Before proceeding any further, launch Chrome Browser and select the Settings tab located on the left.
  • Thereafter, you can locate the Users section near the bottom section of the page.
  • Now click on the Add New user button.
  • Select the icon, then enter the new user name, and click the Create button.

Once done, you will see a new user icon on the top left corner of your browser. You may now switch between the users to access your QuickBooks Online account.

Advanced Troubleshooting

If the solutions described in the above section don’t resolve your QuickBooks Online login problem, then you need to perform the advanced troubleshooting procedures. Internet Explorer supports the QuickBooks application; therefore, the below-given steps will elaborate on the advanced settings of the IE browser. Follow the below-given steps:

1: Correct the SSL Settings on Internet Explorer

To correct the SSL settings:

  • Hit the Start button and open the Run window (Windows + R).
  • Next, type “inetcpl.cpl” in the open box and then hit the OK button.
  • Here, Internet Properties opens on your screen and you will have to click on the Advanced tab.
  • Make sure that SSL 2.0 and SSL3.0 checkboxes are marked and press OK. 
  • Now open your browser and access your QuickBooks Online account.

2: Change Privacy Settings

To configure the privacy settings of Internet Explorer so that it favors the access to the QuickBooks Online account, perform the below-stated steps:

  • Make sure that the privacy setting is set to lower or medium. High privacy will block a lot of the weblinks.
  • Now manually type and access https://qbo.intuit.com while cookies must be enabled.
  • Next, go to https://qbo.intuit.com and try to open your QuickBooks Online account.
  • Thereafter, open the Run window by pressing Windows + R keys together and type inetcpl.cpl in the specified area.
  • Next, select the OK tab.
  • Now go to Advanced Tab and then navigate to the Security option.
  • Uncheck the box for the Do not save encrypted pages option.
Summing Up!

This is all about this post, and we hope you find it beneficial in resolving QuickBooks Online Login problems on Chrome. However, if you still need help with this error, you can consult with our experts through the live chat facility.

FAQ's

Solution: There could be several reasons for login issues. Start by checking your internet connection and ensuring that you are entering the correct login credentials. If the problem persists, try clearing your browser cache and cookies, disabling browser extensions that may interfere with the login process, or using a different browser to see if the issue is specific to Chrome.

Solution: This issue may be caused by a browser extension or a cached page. Try opening Chrome in Incognito mode (Ctrl+Shift+N) to rule out any extensions. If you can log in successfully in Incognito mode, it’s likely that an extension is causing the problem. Disable extensions one by one to identify the culprit. If the issue persists, try clearing your browser cache and cookies.

Solution: A blank white screen can indicate a compatibility issue or a problem with the browser itself. Ensure that you are using the latest version of Chrome. If you are, try opening QuickBooks Online in a different browser to see if it loads correctly. Additionally, disabling hardware acceleration in Chrome (Settings > Advanced > System) might help resolve this issue.

Solution: This error can be due to network issues. First, check your internet connection to ensure it’s stable. If the problem persists, try accessing QuickBooks Online from a different device or network to see if it’s specific to your current setup. You may also want to contact QuickBooks support for assistance if the problem continues.

Solution: On the QuickBooks Online login page, click on the “I forgot my user ID or password” link. Follow the prompts to reset your password or recover your username. You may need to answer security questions or provide the email associated with your account. Ensure that you have access to the email address on file for account recovery.

The QuickBooks error 6000 80 is very common in the program and most often occurs when opening a company file. These errors can affect QuickBooks in both multi-user and single-user modes, and most errors occur for several common reasons, which can be confusing during troubleshooting.

If you do not take prompt action, QuickBooks error 6000 80 may harm your QuickBooks data. We recommend that you follow all the troubleshooting steps in this article to eliminate the risk of losing important business data. If you’re new to Windows troubleshooting, you can also consult a QuickBooks Certified Desktop Expert.

What is QuickBooks Error 6000 80?

Similar to QuickBooks Error 6000 80, most 6000 series errors are related to company files and occur when you try to open a company file in QuickBooks.

QuickBooks Error 6000 80 (error message)

When an error occurs, the error message that appears in Windows says:-

“Error -6000, -80: An error occurred when trying to access a company file from QuickBooks”.

We recommend contacting the expert team for a solution. However, if you are familiar with general Windows troubleshooting, you can easily follow the solutions described in this article without contacting professionals. Follow the solutions in chronological order for the error resolution.

Signs of encountering QuickBooks error 6000 80

  1. The QuickBooks desktop and Windows operating system may crash frequently.
  2. An error message with error code 6000 80 may appear on the screen.
  3. Poor system performance also indicates that a 6000 80 error has occurred.
  4. If you notice that the system freezes without notice.

Why QuickBooks Desktop Error 6000 80?

The most common reason QuickBooks displays a 6000 80 error is a communication error between the host and client computers, which causes a problem in opening a company file.

Below are some other reasons that may trigger QuickBooks error 6000 80:

  1. Performing this task over the network may result in QuickBooks 6000 80, so always convert or restore QuickBooks data to local storage.
  2. Multiple systems on the network host company files.
  3. Due to an erroneous network configuration, the client workstation cannot connect to the server.
  4. The data file of the company you are trying to open is corrupted.
  5. A Windows firewall or a third-party security application is preventing QuickBooks from accessing corporate files on your network.

Solutions to fix QuickBooks company file error 6000 80

Troubleshooting for Single User Mode

Solution 1: Use QuickBooks File Doctor to repair your company’s files.

  1. Follow the link to download QuickBooks Tool Hub.
  2. Go to the Downloads folder and run the Tool Hub program installer file.
  3. Accepting the license agreement and installing the Tool Hub program are done by following the on-screen directions.
  4. Run Tool Hub from the Start menu or double-click the desktop icon.
  5. From the options on the left, go to the Company File Issues tab.
  6. Select QuickBooks File Doctor and select the option to repair data corruption.
  7. If you get an error while fixing data errors, you should restore the latest backup of your corporate files to fix the problem.
  8. For detailed steps to restore backup data, follow the article Step 2 Restore QuickBooks corporate files from QuickBooks Error 61.

Solution 2: Restore and update company files from local storage

  1. If your company files are stored in the cloud or on another computer on your network, copy the files and paste them into your computer’s local storage.
  2. Then open the company file from your system’s local storage.
  3. If you are trying to restore a backup of your QuickBooks data from your online storage or network, copy the backup file from such a location and paste it to your desktop.
  4. Then open QuickBooks and select Open or Restore Company on the File tab.
  5. Select Restore Backup and click Next.
  6. Browse to the backup file on your desktop and click OK.
  7. Then follow the instructions to restore the backup file.

Troubleshooting for Multi-User Mode

Solution 1: Repair corrupted or damaged QuickBooks Company files

  1. Run the QuickBooks Tool Hub application again and go to the Company File Issues tab.
  2. When prompted to choose a repair type, choose only company files in QuickBooks File Doctor.
  3. Select the appropriate option to continue the file repair process.
  4. After the company file error is resolved, visit the file again to see if error 6000 80 has been resolved.

Solution 2: Fix network connection error

  1. Run QuickBooks File Doctor and select the option to repair network errors.
  2. Follow the on-screen instructions to automatically reconfigure your network without delay.

Solution 3: Reset the Windows Firewall configuration

Follow the instructions to remove QuickBooks from the software scan list in error 6094 article for step-by-step guidance on configuring Windows Firewall and third-party security software to let QuickBooks connect to your company’s files.

Conclusion

As demonstrated above, we have listed some tried and tested solutions that you can carry out to resolve the QuickBooks desktop error 6000 80. In case, if you are still facing the error, then you can connect with our experienced QuickBooks experts. Our team is available 24*7 around the clock to provide the best feasible solution for your query. Connect now with our team through chat box or via mail at info@quickbooksupportnet.com.

QuickBooks error 557 is an error in the program that occurs when updating the QuickBooks payroll service. The list of the error codes related to this error in QuickBooks is long. However, they all have their specific causes and symptoms, which makes them distinctive. Therefore, we will discuss this specific error code 557 in this post and also cover its possible causes.

With the possible causes in mind, you can think of the relevant solutions to eliminate this error. However, you have saved your effort by listing the possible causes and their relevant troubleshooting solutions so that you can get rid of the QuickBooks error code 557 easily. Adhere to this post until the end to get the best resolution.

What Does QuickBooks Desktop Payroll Error 557 Indicate?

QuickBooks Payroll update error 557, as the name itself indicates, takes place when updating the payroll service in the program. This error mainly occurs in the older versions of Windows (XP, Vista, 8, 7). However, it doesn’t mean that the newer Windows systems are immune to it. You will see an error message stating that an error has occurred in the program.

This error message mainly occurs due to an inactive QuickBooks Desktop payroll subscription. Some other factors are also responsible for the QuickBooks error message 557. Therefore, we have included the primary reasons behind the error for you.

Why Do You Get Error 557 QuickBooks Desktop?

A faulty Windows is one of the most common reasons behind the error. Some other possible factors responsible for error code 557 are:

  • A damaged QuickBooks company file is a strong reason for error 557 in QuickBooks.
  • Improperly installed QuickBooks application is another reason.
  • Besides, improperly configured QuickBooks software can also result in this error.
  • A crashed window caused by an abrupt/improper system shutdown.
  • The QuickBooks Desktop you are running on your device is outdated (not running in its optimal state).
  • When the system is under the threat of a virus or malware attack.

How Can You Identify The QuickBooks Payroll Update Error 557?

When error 557 in QuickBooks occurs, you can get to know about it by keeping an eye on these signs:

  • QuickBooks error code 557 with a warning text will roll out, and you can notice it on your screen.
  • The tasks on your system become slow when the error occurs.
  • Windows also starts working with a degraded speed and performance.
  • When entered with the mouse or keyboard inputs, you won’t get a prompt response.

How To Perform The Fixing of QuickBooks Update Error 557?

You are here, it means you know the possible causes and symptoms of the error. Now, we are all set to fix the problem. Before we jump to the solutions, let’s check the current status of QuickBooks payroll and related elements:

Things To Keep In Mind:

  • You won’t be able to update the QuickBooks payroll service with an inactive payroll subscription.
  • Make sure that it is active, or it will give the QuickBooks error 557.
  • Backup your QuickBooks company file before it faces the risk of loss or damage during the troubleshooting process.
  • You should have your payroll tax tables updated to the latest release.
  • Moreover, download the latest QuickBooks patch to avoid any further disruption.
  • Also, run QuickBooks with full system requirements to reduce the chances of the QuickBooks payroll update failure.

Solutions To Eliminate The Intuit Error Code 557

The step-by-step solutions to deal with QuickBooks error 557 are discussed in the next sections:

Solution 1: Perform A System Restore in Windows

If an error exists within Windows, system restore can be an effective way to fix the problem. Therefore, we will start with the Windows system restore. Below are the steps to complete the restoration procedure:

  • First things first, log into your computer with the Administrator privileges.
  • Next, click the Start button and then select Accessories.
  • Now, System Tools is the next thing you need to choose so that you can select the System Restore option.
  • Thereafter, select a point to restore the backup (Restore Point). If you haven’t already created it earlier, choose it from the automatically created restore points.
  • After that, select the most recent restore point and then hit the Next button.
  • Now wait for the system restore process to complete and then Restart the Windows.
  • You can now open QuickBooks and perform the update task that was giving the QuickBooks error 557 earlier.

Solution 2: Install The Latest Intuit Release For QuickBooks On Your Computer

To perform this procedure, you need to check if an update is available or not. Let’s move to the steps for update installation without any further ado:

  • Within the QuickBooks application, go to the Help tab and then click the Update QuickBooks Desktop option.
  • Next, you will see the QuickBooks Update window appearing on your screen.
  • Here, you need to navigate to the Update Now tab and hit the Get Updates option.
  • Your action will make QuickBooks download the missing update (if any).
  • Thereafter, you will be prompted to restart the system to install the updates.
  • After restarting, click on the Install Updates option.
  • Finally, after installing the updates, try updating the QuickBooks payroll service and check if it can resolve the QuickBooks error code 557.

Solution Number 3: Make Sure That Your QuickBooks Payroll Subscription Is Active; Resubscribe Otherwise

An inactive Payroll subscription prevents users from downloading the latest payroll updates. Therefore, let’s implement the steps to activate it:

  • Go to the Customer Account Management Portal sign-in page and log into your QuickBooks account.
  • Next, on Manage your QuickBooks page, select the account you want to reactivate.
  • Now, navigate to the Products and Services area and then advance to the Payroll Subscription tab.
  • Here, you can see the status of your QuickBooks payroll subscription.
  • If it shows Canceled, you need to click on the Resubscribe option.
  • Thereafter, verify the information on the screen that follows.
  • After ensuring that all the information on the Reactivate Subscription field is correct, click the Save button.
  • Hit the Continue button next and verify your billing and subscription info.
  • After accomplishing these (above-stated) steps, click Reactivate >> Got it!
  • You will now see that your subscription has been reactivated here.
  • Now, move back to the QuickBooks application and try updating the QuickBooks payroll service without receiving the error code 557.

Solution Number 4: Re-Register QuickBooks Desktop Application

If nothing works and you are still unable to update the QuickBooks payroll service, re-register the QuickBooks application after deleting the EntitlementDataStore.ecml file. Once the file is deleted, run QuickBooks and enter the product information. In the end, install QuickBooks Desktop updates and try installing payroll updates as well.

Taking Everything Into Account!

We hope you have implemented the solutions discussed in this post smoothly to resolve error 557 in QuickBooks. Once the error is fixed, you can run QuickBooks and benefit from its awesome features. However, if the issue is not fixed yet, get professional help to get everything back into the order.

FAQ's

Ans. QuickBooks payroll error mainly occurs due to an inactive payroll subscription. When updating the payroll service, make sure that your subscription is not inactive. Also, make sure that your company file is in good shape and the Internet connection is stable. These are some preventive measures you can take to avoid the error code 557 in QuickBooks.

Ans. Updating QuickBooks payroll is an imperative task. You should keep an eye on the latest updates and install them once they are available. Updating the payroll service is important as it allows you to access the improved features of the program. Also, you can keep everything accurate and prevent several technical issues from taking place.

Ans. Some of the main error code series that are related to the QuickBooks payroll update error are:

  • Payroll update error series 12XXX.
  • QuickBooks error code series 15XXX.
  • PSXXX error code series in QuickBooks.
  • QuickBooks payroll update is not working issue.

Ans.  When payroll errors, such as QuickBooks error 557 occur, you won’t be able to run your payroll processes. It can also hamper your accounting processes and workflow. Furthermore, these errors can also lead to the dissatisfaction of your employees.

Ans. If you want to get the error fixed immediately without putting much effort, contact an expert to get the problem resolved. You can speak one-on-one and explain the existing problem. Thereafter, they will explain the most relevant solutions in an easy-to-understand manner.

QuickBooks conversion tool is one of the many tools from the program that helps users to complete a specific task. This tool helps users to convert the company file from different applications. This tool can be helpful when you have made up your mind to move your data from your old system to the QuickBooks application.

Besides, you can also convert your QuickBooks Pro data into premier or a more advanced version. In this post, we will discuss how to download the QuickBooks converter tool, installation steps, and how you can put this incredible QuickBooks tool to use. Let’s find out!

What Is QuickBooks Data Conversion Tool?

Before understanding the utilization of the tool, let’s understand a few important things about it. QuickBooks conversion tool is devised by Intuit for converting data from across a wide range of applications. It is a safe and effective way of data conversion, which can convert complex data without making it prone to loss or damage. Moreover, all sorts of company data conversion tasks can be accomplished with this application. Above all, you can convert different versions and editions of the QuickBooks application.

What Are The Minimum System Requirements For QuickBooks Converter Tool?

Before you download the QuickBooks data converter, you need to make sure that the system requirements for the tool are fulfilled. It makes the download procedure smooth and prevents various errors:

  • The tool can work well with the following operating systems – Windows 7, 8, 10, Windows Vista, and/or Windows XP.
  • Your processor should be (minimum) 500 MHz.
  • Check and confirm that the system has 512 MB of RAM or higher.
  • Besides, the hard drive should have at least 2.5 GB of free space.
  • The latest version of QuickBooks installation with proper registration (Pro, Premier, or Enterprise 2018).
  • At least a 2.0 version of Microsoft .NET must be installed for a smooth installation of the program.

How To Download the QuickBooks Conversion Tool?

After ensuring that the system requirements are fulfilled, you can download and install the QuickBooks conversion tool and bring it to use. The below-given steps can guide your way through downloading the Intuit conversion tool:

  • Go to Intuit’s official website to download the QuickBooks conversion tool, or simply click on this download link.
  • Once downloaded, browse a convenient location to save the download file.
  • Now, right-click on the QuickBooks conversion tool icon and select Properties from the drop-down list.
  • After that, mark the tick-box for Run this program in compatibility for option, which is located underneath the compatibility mode.
  • Also, select the Windows operating system being used in this download procedure using the drop-down list.
  • After making the selection, hit the OK tab.
  • In the end, right-click on the ConversionToolSetup.exe and then select Run as Administrator option.

How Can I Setup and Use The Data Conversion Tool QuickBooks?

After the tool is downloaded, you need to set it up so that you can finally bring it to use in the data conversion. Here, you need to make sure that the QuickBooks is installed and registered before proceeding any further. The below-stated steps elaborate on how to set up the QuickBooks conversion tool:

  • First things first, double-click on the downloaded Conversion Tool, and it will open in no time.
  • Next, select one among these two options- My Client Company or My own company based on who is performing this procedure.
  • Thereafter, select the application (for which you convert the data) from the drop-down list and hit the Next button.
  • Again, click the Next button after selecting the desired company file.
  • Here, you can choose the QuickBooks product you want to convert your data to.
  • After that, navigate to the location of the company file (folder) and click the Next button.
  • Now, select if you want to convert list and transaction both or list only.
  • Hit the Next button and move ahead.
  • You now need to select the accounting preferences, according to the name and date of the company, and click Next to proceed further.
  • Once you have entered all the required information, double-check them and hit the Start button.
  • After initiating the data conversion process, wait for some time. Once the process is completed, it will reflect the list of converted data on your screen.
  • Finally, click on the Finish button to bring the data conversion procedure to an end.

What Data Can I Convert Using QuickBooks Data Conversion Tool?

Now that you know how to use the QuickBooks converter tool, let’s discuss when to use this tool. In this section, we will discuss what data this tool can convert and what it can’t:

  • If you want to convert account balances, feel free to put this tool to use.
  • The tool can convert paychecks >> Journal entries.
  • QuickBooks conversion tool comes in handy when it comes to converting customer and vendor transactions.
  • Employee profiles and contact information also fall under the convertible data.
  • Also, you can convert Payroll General ledger account balance info.
  • The tool can effectively convert the Employee, Account, Item, Customer, and vendor lists.

Data You Can’t Convert With Intuit Data Conversion Tool

The following data can’t be converted:

  • You won’t be able to convert the year-to-date employee information and payroll transactions.
  • Sales or purchase orders that are partially or fully closed and estimates.
  • Don’t attempt to convert the Fixed Assets from within the tool.
  • Work Tickets are also one of the non-convertible items.
  • Information related to an individual employee’s wage or deduction.
  • Hourly rates, deductions, medical insurance, and other payroll items that are used to calculate paychecks.

Before you think of using the QuickBooks conversion tool, go through this list, as it can help you understand if you should run the tool or not.

What Makes QuickBooks Conversion Tool An Excellent Utility For Data Conversion?

Once you download, install, and set up the converter tool, it can offer multiple advantages to the users. If you are excited to know some excellent advantages of the tool, navigate through the list:

  • You can establish a setup for the conversion of the QuickBooks data file.
  • It provides users with an insight into the current status of their business.
  • The tool creates a log for all the converted data in a comprehensive manner.
  • The conversion of the data occurs in a safe manner without making your crucial data prone to loss or damage.
  • You can manage your import list with several options, such as adding or subtracting the balances and historical transactions in one shot.
  • The conversion tool imports the data from the new QuickBooks company file with the utmost ease.
  • The process of converting the QuickBooks file is simplified to a great extent.

How To Convert Sage 50 File To QuickBooks Desktop Application?

If you want to convert the Sage 50 data into QuickBooks Desktop, follow the below stated steps:

  • In the first place, you need to set up the data access credentials to initiate the procedure.
  • Thereafter, select the Sage company file that you want to convert.
  • Once done, your next step will be converting the company file.
  • Finally, double-check the conversion to confirm that everything is fine before the final data transfer occurs.

Important: Before starting the process, check and ensure that the Sage 50 and QuickBooks Desktop between which the data conversion occurs should be from the same region.

To End Things Off!

This post describes all the important aspects related to the QuickBooks conversion tool. Now that you are on this final section of this post, you might have understood how to download, set up, and use the Intuit conversion tool for data conversion. If you have any doubt, there is nothing to be awkward. Go for professional help using our QuickBooks helpline number.

Frequently Asked Questions:-

1: What are the issues that can cause an error in the data conversion?

When converting data using the tool, make sure that your file is saved locally to avoid the error. Besides, the file name shouldn’t be any special characters. An improper installation of the QuickBooks application can also promote the error.

2: What are the limitations of the QuickBooks conversion tool?

When converting data using the QuickBooks conversion tool, keep in mind that it can’t convert all your financial data. Some of your accounting data is not convertible with this tool. The list may include work tickets, fixed assets, payroll transactions, and several others.

3: Can I convert Quicken data into QuickBooks Desktop?

Yes! You can convert data from Quicken into QuickBooks Desktop. If you are using Quicken 2011 or an earlier version, you can switch to QuickBooks and convert your financial data. When using this tool, you need to make sure that the QuickBooks version is newer than the Quicken.

4: What is the QuickBooks conversion tool not working error?

QuickBooks data conversion tool not working is an erroneous situation when the tool stops working, and you won’t be able to convert data from a different application to QuickBooks. Restrictive settings of the program on the data importation can be one of the most common reasons behind this issue.

5: How to tackle an error related to QuickBooks data converter?

You can take all the preventive measures in the first place to keep the error at bay. However, if the error occurs, getting help from a trained expert can save you time and let you accomplish the desired task.

Inevitably, QuickBooks is a powerful accounting application that comes up with the most amazing features and tools. However, at the same time, the users face various technical glitches and errors that affect their productivity and work efficiency. Though these errors can be easily solved by following expert advice, Intuit develops amazing tools to fix common issues. One such amazing tool is the QuickBooks Component Repair Tool. If you, too, want to know more about the tool, then this blog is meant for you. So, read the complete blog and find out more.

Unleash the power of the QuickBooks Component Repair Tool. Call our Experts @+1-855-603-0490 and Know More. What is a QuickBooks Component Repair Tool?

Let us start by understanding the basic concept of the tool. The developers of Intuit have designed the tool to fix the common .Net framework issues and the other Windows components. Both the components are necessary to run the QuickBooks. With the help of the tool, you can fix the installation, damaged files, or other issues without any help. The best thing about the tool is that you do not need any special configuration to download and install the QuickBooks component repair tool.

The tool is specially designed to fix the MSXML, .Net Framework, Windows installer service, or other Windows component errors.

How to Download and install the QuickBooks component repair tool?

No doubt, you have come across various component errors while downloading or installing QuickBooks. In such scenarios, the repairing tool proves itself to be a magician by easily handling all your component errors. To repair the various component errors with the help of the tool, you need to download and install the tool first on your system. You can download this tool without paying any additional charges.

Our experts have mentioned the downloading and installing process of the tool in an easy manner. Read the below-mentioned steps.

  • Visit the official website of Intuit and search for the QuickBooks components repair tool.
  • To begin downloading, tap on the download button. Ensure you have downloaded the latest available version of the tool.
  • Save the downloaded file at the desired location.
  • Locate the executable file by opening the folder.
  • To finish the installation procedure, double-click the file and adhere to the on-screen instructions.
  • Once the tool has been installed, reboot the system to run the tool.

Ultimate Steps to Use Component Repair Tool in QuickBooks

Once you have installed the QuickBooks component repair tool, you can utilize it to resolve the various component errors or issues. Also, you can easily scan and fix all the issues with the Microsoft components.

To run the tool, you need to perform the below-mentioned steps:

  • Before running the tool, it is advisable to reboot the system.
  • Once you have installed the tool on your system, you need to open it.
  • After that, select the type of repair you want to perform.
  • Further, tap on the Next button to continue the process.
  • The tool will scan and fix the issue automatically. Please wait a while.
  • Once the process is over, you need to restart your system.

Advantages of using QuickBooks Component Repair Tool

Just like any other application, this tool has various benefits that users can enjoy while using it. Below, we have mentioned some benefits of the tool.

Free to Use:-
The Intuit component repair tool is available free of cost. It is an affordable solution widely used by SMEs to fix errors or issues in QuickBooks.

Fixes Multiple Errors:-
The tool is a compact solution to resolve various errors. You can fix multiple errors or issues with the help of the tool, such as MSXML issues, Microsoft Visual C++ errors, .Net framework errors, installation errors, or common errors. So, you do not need to install multiple tools to fix the various errors. Just install one tool and fix multiple errors.

Improves Performance:-
The errors cause the QuickBooks to slow down. The errors affect the performance of the software. At times, in case of technical errors, the chances of crashing application increases. By using the tool, you can easily deal with the various issues that ultimately increase work efficiency and improve work performance.

Saves Time:-
Resolving the various errors manually can be a time-consuming process. It frustrates the users also. The tool diagnoses the problem quickly and automatically fixes it. This saves you precious time that you can utilize in the growth of your business.

Easy to use:-
Using the tool is extremely simple and easy. Anyone can utilize the tool, as no technical knowledge is needed to use it. The user-friendly interface makes it easy for the user to use the various components of the tool with ease.

Issues Fixed by component repair tool in QuickBooks

The QuickBooks component repair tool for Windows XP and Vista 7 is used to fix the various errors and the Microsoft component-based technical glitches. Below, we have mentioned the errors that are easily fixed by the tool.

Update Errors

Other Issues Solved by The Tool

Microsoft MSXML

Steps to Solve the Various Issues with QuickBooks Component Repair Tool

Using the tool is completely easy. Below, we have mentioned the procedure to resolve the different issues with the help of the tool.

To resolve the .Net Framework Issues

The Microsoft .Net framework is an essential vital component for the smooth running of the application. The dysfunctionality of the component creates the havoc. Use the below-mentioned steps to fix the .Net Framework issue:

  • Open the tool to detect any .Net Framework issue.
  • The tool will automatically detect and fix the issue in case there is any.
  • Repairing the issue will take time, so wait till the process is over.

To fix the MSXML manually

Repair the damaged MSXML component with the help of the below-cited steps:

  • Foremost, register the MSXML.dll file.
  • Once the registration process is over, uninstall the MSXML 6.0 component from your system.
  • After that, you need to install it again on your system.
  • Now, you need to uninstall the MSXML 6.0 service pack one and then reinstall it.

To resolve the Microsoft Visual C ++

Follow the below-mentioned steps to uninstall and reinstall the Microsoft Visual C++.

  • Open the control panel of your system and then choose the Programs option.
  • Here, select the Microsoft Visual C++ folder and right-click on it.
  • Pick the uninstall a program option and click on the OK button.
  • Restart the system after removing the programme.
  • Now, to reinstall the system, insert the CD and press the window + E keys together.
  • Go to the D:\ThirdParty\CRT9 or D:\ThirdParty\CRT8 path.
  • Now, double-click on the vcredist_x86.exe and follow the on-screen instructions.
  • Once the installation process is over, a “Successfully installed Microsoft Visual C ++” message will appear on your screen.

For the Installation Issues

You can use the tool to fix the installation issues. At times, the error comes due to using the outdated version of Windows. To resolve the issue, take the help from the below-mentioned steps:

  • Open the settings of your system and pick the “update and security” tab.
  • Further, click on the “Windows update” option to check for the latest updates.
  • Install the updates on your PC after downloading them.
  • Restart the system after the necessary updates are installed on your system.

The Bottom Line

With this, we end our blog; QuickBooks is the ultimate accounting application, having the most advanced finance tools used to streamline financial work. The tool is widely used by the SMEs. However, most of the user faces component errors while installing the application that can be easily solved with the help of the tool. Hopefully, this blog resolves all your queries regarding the QuickBooks Component Repair Tool. However, if you are still having any doubts, do not hesitate to call our QuickBooks experts.

Frequently Asked Questions

1- Which tool fixes the Microsoft components that QuickBooks uses?

A – The QuickBooks component repair tool is used to deal with Microsoft components-related issues. Read the complete blog to know more about the tool.

2 – Can I get support for using the component repair tool in QuickBooks?

A – Yes, our experts are well-trained to resolve any issues related to QuickBooks. They will definitely provide you with advice. All you need is to call on the above-mentioned phone number or send your query to.

3- How can I repair my QuickBooks application?

A – To repair your QuickBooks application, you need to visit the control panel of the system. Select the QuickBooks available under the programs tab. Right-click on it and select “Repair” from the menu. It might take some time to repair the program, so please wait till the repair process is over.

4 – Does QuickBooks provide other tools apart from component repair tools?

A – Yes, QuickBooks offers an array of support tools to fix various issues and error that comes in the application. We’ve included a few of them below.

  • QuickBooks Database Server Manager
  • QuickBooks Clean Install Tool
  • QuickBooks Tool Hub
  • QuickBooks Migration Tool
  • QuickBooks Install Diagnostic Tool

5 – Do I need to pay to use the QuickBooks component repair tool for Windows XP and Vista 7?

A – No, the tool is completely free of cost. There are no fees to be paid.

If you are a regular QuickBooks user, you might have experienced different types of errors while running the program. Well! The QuickBooks error 1904 that we are going to discuss in this post is an install error that can take place all of a sudden while installing the QuickBooks application. You may also experience this error when upgrading QuickBooks to a more advanced version.

There are numerous possible reasons that can result in this error, such as damaged Microsoft components. For a detailed discussion and troubleshooting of error 1904 in QuickBooks, follow this post until the end.

What Does QuickBooks Error Message 1904 Trying To Convey?

While installing the QuickBooks application on my system, I received QuickBooks error 1904. This error code was mentioned in an error message with the text –

QuickBooks Error 1904 Message

“We’re sorry! Something went wrong with your installation. Error 1904. Module C:\Program Files (X86)\QuickBooks 2018\ICWrapper.dll” failed to register.”

This is a commonly reported issue from a QuickBooks user; however, there are many users who encounter this error message when installing the QuickBooks software. This error message indicates that the program installation gets interrupted due to damaged Microsoft Visual C++ files. Some other elements can also result in this problem that needs to be resolved properly to eliminate the QuickBooks error code 1904.

What Possible Reasons Can Give Rise To QuickBooks Error 1904?

Some of the most common reasons for the error 1904 in QuickBooks are mentioned in the following list:

  • The first and foremost reason behind this error is a damaged Microsoft component, such as C++, MSXML, and/or .NET Framework.
  • Sometimes, a damaged QuickBooks installer file also generates the error code 1904.
  • It can be your Windows security application, preventing the installation process from being accomplished.
  • Upgrading QuickBooks Pro to the Premier version is also one of the possible reasons that can cause the error.
  • Insufficient permissions to install QuickBooks application on Windows.
  • A new Windows operating system installed on the device.
  • When you don’t restart your PC after upgrading your operating system.

Symptoms That Can Be Experienced When QuickBooks Desktop Error 1904 Occurs

When QuickBooks Desktop error 1904 occurs, users notice some common signs, which are:

  • You won’t be able to locate some important files in QuickBooks.
  • Automatic updates can’t be accessed on the QuickBooks application.
  • An error message appears with a warning – icwrapper dll failed to register QuickBooks.
  • You won’t be able to upgrade QuickBooks Pro to the Premier version.
  • The installation process of the QuickBooks application is hindered by the error code 1904.
  • The system becomes slow, and all the operations take more time than usual.

Some Common Practices To Follow Before You Start The Error Fixation

Sometimes, the current settings of your Windows operating system or QuickBooks application can interfere with the resolution of QuickBooks error 1904. Therefore, you need to look into these factors before implementing the procedures.

  • Windows must be updated on all computers when working in a multi-user environment. It ensures that all the systems are compatible and are running in their optimal shape.
  • You should keep your LAN and Internet connectivity strong, and before installing the QuickBooks application, refresh them once to check their status.
  • When in multi-user mode, the QuickBooks should be updated to the latest maintenance release, both on the server computer and workstations.
  • Open QuickBooks as an admin user to make sure that the required process is granted for the smooth installation of the program.

How Should I Deal With QuickBooks Installation Error 1904?

After discussing all the crucial aspects of the error code 1904 in QuickBooks, let’s proceed further to the most important section of this post, which is troubleshooting. Hereafter, you will find some easy and efficient ways to resolve the persisting problem:

First Procedure: Install and Utilize QuickBooks Tool Hub To Fix QuickBooks Installation Error

QuickBooks Tool Hub is home to some powerful tools that can resolve the common issues in the program. For instance, the installation issue in the program can be resolved by running the QuickBooks Install Diagnostic Tool, which can be accessed from within the tool hub. Therefore, you need to download and install it on your system so that you can put it to use.

  • Open QuickBooks Tool Hub after agreeing to its terms and conditions.
  • Now, take a look at the screen that shows a list of the QuickBooks issues.
  • Locate QuickBooks Installation Issues and click on it.
QuickBooks Tool Hub
QuickBooks Install Diagnostic Tool
  • Wait for the process to run and detect the common installation issues.
  • Once the issues are detected, the tool will resolve them automatically.

Now, try to perform the procedure that was giving the error. If QuickBooks error 1904 appears again, move to the next solution.

Second Procedure: Enable The Hidden Windows Admin Account To Grant The Installation Process With Full Permission

A hidden Windows admin account enables the User Account Control, thereby imposing certain restrictions on your system. It can also result in QuickBooks error 1904; therefore, you need to unhide the Windows admin account if it is hidden.

  • Click on the Windows Start menu, and when the search box appears, type CMD in it.
  • Next, right-click on CMD when it shows up and choose the Run as Administrator option.
  • Thereafter, you need to add the command – “net user administrator /active: yes” to the Command Prompt.
  • Now, hit Enter and advance to the next step.
  • When the error message appears, you need to enter the command “net user administrator /active” and click Enter to enable the hidden admin account.

This command will let you enable the Windows administrator account so that you can install the QuickBooks application smoothly without getting an error.

Third Procedure: Manually Repair Damaged Windows Components

Damaged Windows Components are one of the possible reasons responsible for the taking place of QuickBooks error 1904. In such a case, you need to repair the Windows components manually. These components are essential for installing or updating an application on Windows OS. Therefore, you need to repair these components to avoid any errors. These components are Microsoft .NET Framework and Microsoft MSXML.

  • First of all, you need to re-install the .NET Framework.
  • Once done, repair the MSXML component.

After repairing these components, you can try installing the QuickBooks application again. If this doesn’t resolve the QuickBooks installation error 1904, move to the next troubleshooting solution.

Fourth Procedure: Repair An Existing QuickBooks Installation If Damaged

If you are experiencing the QuickBooks error 1904 when installing the application, you need to repair the current QuickBooks installation by implementing these steps:

  • Initially, close the QuickBooks application to initiate the process.
  • Next, go to the Control Panel and hit Programs >> Programs and Features.
  • Now, right-click on QuickBooks software and click the Uninstall option.
  • Click the Next button, and it will help you advance in the process.
  • Here comes the step wherein you can repair the data by clicking the radio button on your screen.
  • Click the Next button again and select the Repair option.
  • Now that the repair process is completed click the Finish button.

On A Final Note! 

A cautious implementation of the solutions discussed in this post can help users eliminate the QuickBooks error 1904. If something is not clear to you and you need to speak to an expert, the QuickBooks helpline number can help you connect. Here, you can get your doubts resolved by experts and install QuickBooks software on your PC correctly.

Frequently Asked Questions:-

1: What are some special cases when QuickBooks error 1904 can take place?

There are some special cases wherein QuickBooks installation errors can come into existence. These cases are:

  • If you are using Bitdefender for security purposes, then you need to add QuickBooks to its exception list. 
  • Adobe Flash is recently installed on your system.
  • QbversionTool.dll is mentioned in the error message 1904.

2: What are some preventing steps to follow for error 1904 in QuickBooks?

When experiencing this error, you need to create a backup of your data file to safeguard your data from loss or damage. Also, don’t make any interruptions when QuickBooks software is being installed.

3: How can I deal with the error 1904 when it takes place while upgrading the program?

If you are getting error 1904 in QuickBooks when upgrading the program, stop the process if it is faulty. Also, make sure that you are upgrading the software from a legitimate source. If not, you need to go to Intuit’s official website to upgrade the application.

4: Why do Microsoft components need to be repaired in QuickBooks Desktop error 1904?

Microsoft components are required while installing or updating a program on Windows OS. In such a case, you need to make sure that they are working fine. If not, repair them to eliminate the installation issues in QuickBooks.

5: What can I do if nothing resolves the QuickBooks error code 1904?

If nothing works in resolving the QuickBooks error 1904, you can simply connect with an expert for the error resolution. There are different channels you may utilize for resolving this installation error in the program.

Posts pagination