QuickBooks error 40001 – unable to activate direct deposit is an intimidating error code in the program that can take place when activating direct deposit. If you are wondering what makes the error code show up, there can be multiple reasons behind this error. You may encounter the error when not logged in as an administrator. Whatever the reason, keeping an eye on these reasons can make the resolution easier for you. This blog incorporates some important aspects of the error, such as causes, symptoms, and troubleshooting solutions.
“Dealing with QuickBooks error 40001? Here is a fast help for you at 1855-603-0490.“
What Is QuickBooks Error Message 40001?
When updating your account info, you may encounter an error message on your screen that reads:
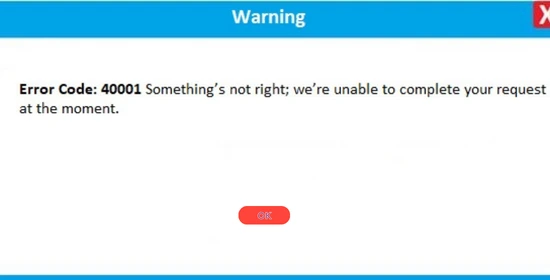
Error Code: 40001 Something’s not right; we’re unable to complete your request at the moment.
When choosing Direct Deposit as your payment method, you need to add some required information. After entering the information, you need to click the Update Now button. It is when the error message can show up on your screen. Intuit’s payroll solution can make your business payroll management an easy task.
However, the error code 40001 in QuickBooks can affect your payroll operations. You may face trouble in tracking the payroll, making payments, and filing taxes. To correct the error, navigate through its possible causes, explained in the next section of the post.
Possible Reasons Behind QuickBooks Error Code 40001
The error often occurs when updating the payroll info, and there are multiple factors that can evoke the QuickBooks error 40001. Check the list:
- When not logged in as an admin, you may lack the permissions required to perform a few crucial tasks that can promote error code 40001.
- QuickBooks company file having data integrity issues.
- The discrepancy between the Realm ID and QuickBooks Payroll account info.
- Check if you are not using the sunsets QuickBooks Desktop version, which can cause QuickBooks error 40001.
- Internet Explorer is not configured as the default browser in QuickBooks.
- When the user fails to get the latest payroll tax table updates for QuickBooks, the error code can come into being.
With these known reasons, you can start the error resolution procedures.
Symptoms of QuickBooks Error 40001
If you are still wondering how to determine the error code 40001 in QuickBooks, you may keep an eye on its common symptoms that are explained below:
- You may not be able to update account info in QuickBooks.
- Payroll processes may not work at their full efficiency.
- An error message will come on your screen with the code 40001.
- Inability to perform important tasks in QuickBooks due to insufficient admin permissions.
- Sluggish performance of the Windows or the program itself.
On experiencing these symptoms, start looking for the relevant solutions to QuickBooks error 40001.
How To Eliminate QuickBooks Payroll Error 40001?
Now that you are fully aware of the important aspects of the error let’s proceed further and follow some tried and tested solutions to troubleshoot the error.
Solution 1: Log Into Your Windows Computer With Admin Credentials
When setting up Direct Deposit as your preferred mode of payment, you need to make sure that you have logged in using Administrator login credentials. If not, follow the below-given steps:
- Go to the QuickBooks Desktop icon, right-click on it, and select Properties from the drop-down menu.
- Now to the Compatibility tab, mark the checkbox for “Run this Programming as Administrator”.
- If the option is already checked, you may click the Apply button.
- In the end, click OK and restart your computer.
This is the most suitable way to start troubleshooting. If it doesn’t eradicate the error, move to the next solution.
Solution 2: Update QuickBooks To The Latest Maintenance Release
If you are relying on QuickBooks, make sure that you are updating the program at regular intervals. Updating QuickBooks not only adds some improved features but also keeps errors at bay. To update:
- Launch QuickBooks Desktop software to start the update procedure.
- Now go to the Help section and click on the Update QuickBooks option located underneath.
- Thereafter, select the Update Now option and wait for the program to install the updates.
- Once all the updates are installed, go to the File menu and click the Exit button.
- Again, open QuickBooks and click YES when the Update Now prompt pops up on your screen.
After updating the program, try to update your account info and check if the QuickBooks error 40001 occurs again. If this occurs, try the next solution.
Solution 3: Put Verify & Rebuild Data Utility To Use
Verify and Rebuilt Data utilities play an important role in determining the damage in data and troubleshooting them. If you suspect integrity issues in the QuickBooks company file, these tools can be very helpful to you. First of all, you need to run the Verify Data utility to check the data damage. Once found, you may run Rebuilt data utility to repair the damaged file. Follow the below-given steps:
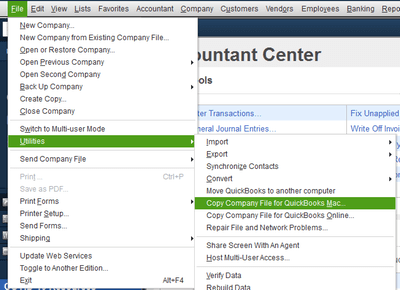
- First things first, launch the QuickBooks application and then move to the File menu.
- Here, click on the Utilities option and then select Verify Data.
- Wait until the Verify Data utility scans the file for possible issues.
- If an issue is diagnosed, utilize the rebuild data utility to repair the company file.
- Again, go to the File menu and select Utility.
- Now click on Verify Data, followed by OK, to reconfirm that the damaged data in QuickBooks is repaired.
- In the end, complete the procedure by following the on-screen prompts.
If the error is resolved, after performing this solution, complete the task that was throwing the error code 40001 in QuickBooks. If not, try the next solution.
Solution 4: Run QuickBooks Install Diagnostic Tool For Error Code 40001
QuickBooks Install Diagnostic Tool is an important utility that resolves the issues, such as partial or damaged installation of the QuickBooks application. If the error is being evoked due to any of these reasons, running a diagnostic tool in QuickBooks can be helpful. To do so, you need to download the QuickBooks Tool Hub in the first place by following the below-explained steps:
- Terminate the QuickBooks application before you start this procedure.
- Next, download the QuickBooks Tool Hub file by paying a visit to Intuit’s official website.
- Now save it to a suitable location, preferably to an easily accessible location like a Desktop.
- Thereafter, run the downloaded file as, i.e., QuickBooksToolHub.exe.
- Moving ahead, complete the installation process by the instructions given on the screen and agree to the terms and conditions.
- Once installed, open QuickBooks Tool Hub to put it to use.
- Within the Tool Hub, select Installation Issues from the given options.
- Here, you will get a chance to run QuickBooks Install Diagnostic Tool.
- It will now look for possible issues and resolve them.
Once the issue is fixed, reopen QuickBooks and check the status for the QuickBooks error 40001.
Ending Words!
If you are having trouble updating your info in QuickBooks, get in touch with experienced QuickBooks professionals. Describe what trouble you are experiencing in detail. Based on what you explain, the professionals will guide you in an easy-to-understand way.