Author: admin

Home > Articles by: admin

Are you looking for the steps you need to follow to start the customer transaction workflow in QuickBooks Desktop? If yes, then this blog post will guide you in this direction. Here, you will find the steps you need to follow while starting off the customer transaction workflows and even different ways to track the transaction.  This workflow can help in organizing cash flow, tracking sales and receivables. However, if you need further assistance, you can reach out to QuickBooks Desktop support to offer the best support service.

Workflow 1 – Invoice -Payment Deposit

You must follow this workflow when provided with a product or service, and your customer plans to pay later. Once your customer has paid, you can easily record QuickBooks’ payment to close the customer’s invoice or even reduce the balance.

Transaction Workflow in QuickBooks
  • The first user should create an invoice
  • Then you need to record the invoice payment
  • At last, deposit the customer’s payment

Workflow 2 – Sales Receipt Deposit

You should go for this workflow when your customer pays you on the spot for any product or service.

Transaction Workflow in QuickBooks
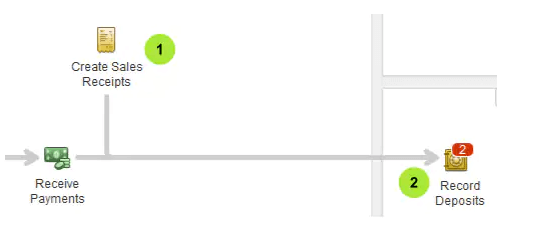
  • First, create a sales receipt
  • Then you need to deposit the customer’s payment

Workflow 3 – Estimate – Invoice – Payment – Deposit

You need to follow this workflow, also called progress invoicing, when working on projects or jobs for the customers. You can use an estimate like the quote, bid, or proposal to track the materials, labor, and additional expenses used in the project. After that, you can invoice your customer once the project is completed.

Transaction Workflow in QuickBooks
  • Here, you need to create and send the project estimate to the customers
  • After that, you should create an invoice from the estimates
  • Also, record the invoice payment
  • At last, you need to deposit the customer’s payment

Workflow 4 Sales Order – Invoice – Payment – Deposit

You should follow this workflow when the customers order an item that is not there in your stock at the moment. This way, you will know what products you have to buy from your vendors to complete the customer’s order on time.

Transaction Workflow in QuickBooks
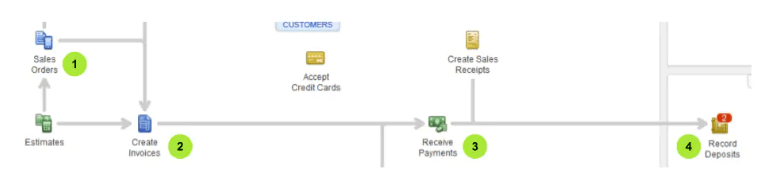
  • You first need to create a sales order for the items that are on the backorder
  • Then you have to create an invoice from the sales order
  • You need to record the invoice payment
  • At last, you need to deposit the customer’s payment

Workflow 5 – Estimate – Sales Order – Invoice – Payment – Deposit

You need to follow this workflow when you need to complete a project but don’t have complete materials on your hand yet. You can create the sales order from the estimate for tracking the items on backorder. Then, create an invoice from the estimate after the completion of the project.

Transaction Workflow in QuickBooks
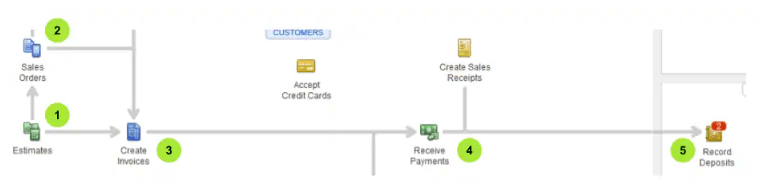
  • You first need to create and send a project estimate to your customer
  • Then create a sales order from that estimate
  • After that, you have to create an invoice using the sales order
  • Now you need to record the invoice payment
  • Deposit the customer’s payment

Workflow 6: Statement Charges – Finance Charges – Statement – Payment – Deposit

You must go with this workflow when you regularly charge your customer for items but are invoicing them periodically. You can skip creating the invoice for each charge, and then your customer can pay their accumulated charges in a total amount.

Transaction Workflow in QuickBooks
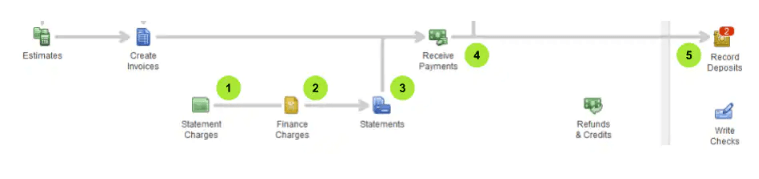
  • You need first to create your customer’s statement charges
  • Then you have to assess the finance charges
  • After that, create and send the billing statement to the customer
  • Then you must record the payment that is received
  • At last, deposit customer’s payment

If you find it challenging to understand this Transaction Workflow in QuickBooks, then you don’t need to think twice before calling QuickBooks technical support to avail their help. You can avail the expert’s guidance of a technical professional to resolve the query faced by QuickBooks users.

Read Also : Quickbooks error H202

Wondering how to import accountant changes in QuickBooks? Navigate through this post until the end to get the relevant help.

If you want your accounting management to be simplified, the QuickBooks Desktop application can be your best bet if it enables users to work with seamless collaborations with the accountants, employees, and other users to establish an efficient workflow.

You can create an accountant’s copy of your business accounting data and send it to your accountant for review. The accountant then reviews your books and makes the required changes to them. Once the changes are made, you can import them to your QuickBooks file. Here, you can find out how to get it done. Let’s start!

What Is An Accountant’s Copy In QuickBooks?

Creating an Accountant’s copy of your QuickBooks company file enables you to send your accounting data to your accountant for review. The accountant then reviews your books and makes sure that it is correct. If not, the accountant will make the required changes that you can import and automatically update in your company file.

There are two ways to implement the changes. Your Accountant can send you an Accountant Changes file, and you can save it to your hard drive. Alternatively, the accountant can use the Accountant’s Copy File Transfer service to send their changes through the web. In this method, the file is saved in the Intuit server, wherein you can make a secured data exchange with your accountant.

See Also – How to Change Tax Rates in QuickBooks

Things You Need To Consider Before Sharing Accountant’s Copy Of Data File 

Before you start this procedure, you need to consider the below-listed points:

  • Make sure that the accountant’s copy of the program is compatible with the QuickBooks Desktop version. 
  • The changes will not be imported to the client’s version of the QuickBooks application if the changes are made using features that are not present in the client’s QuickBooks. 
  • Upgrade your file when opening an Accountant’s copy in the newer version of the QuickBooks application. 
  • When the client and accountant are using the same version of the QuickBooks Desktop application, it makes the best import. 
  • If not the same version, a gap of one year between the versions of QuickBooks also works fine when it comes to importing the Accountant’s changes in QuickBooks. 
  • You need to set the dividing date to define the fiscal period. The accountants can make the modifications only if they fall on or before the dividing date. 
  • Contrarily, the clients can only work on the file that falls after the dividing date to ensure that no overwriting is done on the applied changes. 

How To Import The Accountant’s Changes?

Now that you know these important considerations let’s proceed further and perform the steps to import the accountant’s changes into the QuickBooks application. The below-listed steps can help: 

  • Before beginning the import process, create a backup of your company file to prevent any loss of data due to some unfavorable outcomes. 
  • If you are using the Enterprise version of the QuickBooks Desktop, turn off any Advanced Inventory features you’re currently using. 
  • You can turn it on later once the import procedure is done. 
  • Now, within the QuickBooks Desktop application, navigate to the File menu and select Send Company File. 
  • Thereafter, you need to select Accountant’s Copy and then Client Activities.
  • If the accountant sends the changes in an Accountant’s Changes file, you need to select Import Accountant Changes from the File.
  • Now locate your file using the browse option and make sure that the file has a.QBY extension.

Note: If the Accountant’s Copy File Transfer Service is used by your accountant, you need to select the import Accountant’s Changes from the Web.”

Review The Changes In the Accountant’s Copy Of The QuickBooks

Proceeding further, you need to review the changes your accountant has made to your company file. It is an imperative task to ensure the accuracy of your financial data. When the changes are Import Accountant Changes In QuickBooks, QuickBooks Desktop adds them automatically.

You need to check if it does not cause any conflict with the recent changes you have made. If there is an issue, you need to talk to your accountant. Review the changes by following the below-given steps:

  • Now that you are all set to import the changes, select Incorporate Accountant’s Changes to start the procedure. 
  • In case you don’t wish to import their changes, just click on the Close button.
  • Moving ahead, select OK to confirm the changes made by your accountant and close any open windows.
  • In the end, select OK and Close again. Here, the program will create another backup of your company file.

To conclude this task, update the closing date and password based on the changes made by your accountant. If you want it to review later, open the folder containing the QuickBooks company file and perform the procedure. You may locate all the changes within a PDF having those changes listed in it.

Issues Related To Accountant’s Changes Import

Sometimes, when Import Accountant Changes in the QuickBooks Desktop application, you may face multi-faceted errors. The list may include the following: 

  • QuickBooks is unable to import the accountant’s changes. 
  • The Import Accountant’s Changes from Web/File option is not available.
  • QuickBooks is not responding. 
  • A different Accountant file is used for data import than the one created for implementing the accountant’s changes import.

In such a condition, you need to follow the below-given solutions: 

Solution 1: Make sure that the company file you have opened is correct and is not upgraded.
  • You need to ensure that the opened company file has the “Accountant’s Changes Pending” option at the top of the screen. 
  • In case the right file is opened but does not have the “Accountant’s Changes Pending” option at the top, apply the changes manually to get the task accomplished. 
  • If an upgraded version of the company file opens, restore the backup saved before the upgrade process. Confirm that the accountant’s changes are still pending. 

Also Read – How To Fix QuickBooks Error QBWC1085?

If the upgrade process using the right company file, which is also not upgraded, is unable to complete, you need to move to the next solution. 

Solution 2: Save the files locally

If you have opened the right company file and that too is the same version of it, you need to copy the Accountant’s Changes file to your local drive from a USB flask or server drive. If you are still experiencing trouble with the file import, try the next solution. 

Solution 3: Send the Accountant’s copy using a different procedure

If none of the above-described procedures help in importing the accountant’s changes, you need to use a different method to get the job done. In case you have used the Accountant’s Copy File Transfer service, you may send the changes using a CD, email attachment, or USB flash drive.

If you are having trouble importing the changes, make sure that your company file is not damaged. 

Final Words!

Navigating through this full blog will help you how to import accountant changes in QuickBooks. Also, you can follow the troubleshooting procedures discussed in this post on having trouble with the import of the accountant’s changes to your data file. However, if you need professional assistance to save time, we have got you covered. Our QuickBooks experienced team can guide you with the relevant steps and get it done with the utmost ease.

Today in this blog we are going to discuss everything about the QuickBooks error 3371, what are the reasons behind this error, and how to get it resolved. So, stay tuned till the end of this blog.

What is QuickBooks Error 3371

QuickBooks being the number one accounting and financial software is helping small and medium-sized business owners to expand their business. Although, none of its competitors can compete with the QuickBooks based on the number of features and benefits.

Apart from that, QuickBooks users also face various errors while using the software. One of the most common and frequent errors is 3371. This error usually occurs when the QuickBooks failed to load the Licensing data of the company or when you try to activate or run the QuickBooks desktop version for the first time. There are three different status codes of QuickBooks Error 3371, which are as follows.

  • Error 3371
  • Error 3371, Status Code – 1
  • Error 3371, Status Code – 11118
Error 3371, Status Code – 11118

All the above-mentioned errors codes are caused when the QuickBooks is not able to run or show the licensing properties.

Reasons Behind QuickBooks Error 3371

As all the QuickBooks Errors are occurred due to a main solid reason, the same applies as well in the case of Error 3371. QB users still have to pinpoint the specific causes that lead to the error. So, here are some of the common reasons why this error occurs.

  • The program didn’t get access due to the antivirus software.
  • The qbregistration.dat file is damaged or corrupted.
  • The Microsoft MSXML file is not working.
  • The license information is not valid or cannot be retrieved.

How to Identify QuickBooks Error 3371

You can easily identify the QuickBooks Error code 3371 by looking for these specific symptoms that you may observe by working on it.

  • QuickBooks Desktop is crashing frequently.
  • Not able to show the licensing information.
  • Your PC is hanging or the window is crashing.

Now, let’s have a look at the methods, which you can follow to get the problem resolved.

How to Resolve QuickBooks Error 3371

QuickBooks error code 3371 can easily be diagnosed by following some simple methods. So, these are the steps that you can follow to get rid of the QuickBooks error 3371.

Method 1: Update your PC’s windows to the latest version

Sometimes, updating windows to the latest version can help you to solve a basic problem. That’s why we have listed this method at the top, as it is less time-consuming and the chances of solving the problems are large.

  • Go to the search option available on the taskbar and type “Windows Update” in the insert box and then press the enter.
  • After that, on the right side of the screen, you will see the “Search for updates” option. Click on that.
  • After that, the windows update will start downloading.
  • Once the downloading ends, restart your PC and relaunch the program to check if the problem is solved or not.

Method 2: Stops all the background running applications

  • First, close your QuickBooks desktop and go to the task manager.
  • Then click on the processes and search there for QBW32.EXE instances. Select all the files with that name.
  • Then click on the end task option.

Method 3: Permanently delete the ECML File

Below mentioned are the steps that you can easily follow to permanently delete the ECML file.

  • First, press the Windows and R keys together.
  • Then in the insert box, type C:\ProgramData\Intuit\Entitlement Client\v8 and click on Ok.
  • Now, you will see the ECML file. Right-click on that file and delete it.
  • After that, close the Windows.
  • At last, run the QuickBooks again and then do the task again which you were initially doing before facing the error. The QuickBooks error 3371 will most probably be resolved.
delete the ECML File

Method 4: Download and Use the QuickBooks tool hub program

  • First, close all the apps, and then download the QuickBooks tool hub program from the official website of QuickBooks.
  • Then run the downloaded file and accept all the terms & conditions and intuit’s license agreement.
  • Once the installation process ends, then click on the finish option.
  • Now, to run the QuickBooks tool hub, double-click on its icon.
  • Then, under the program problems section, click on the “Quick Fix my Program” option.
  • At last, click on the OK tab and then open the QuickBooks and run the licensing file.

This tool can help you automatically solve the license, validation, and registration error in the QuickBooks to recreate the damaged or corrupted file.

Method 5: Manually solve the error

You can follow the below-mentioned steps to get this error resolved.

  • To begin, first of all, recreate the corrupted entitlementDataStore.ecml file and solve the licensing and registration glitches and errors.
  • Now, with the help of the QuickBooks Diagnostic tool, fix the Microsoft.NET framework, MSXML& C++
  • Then install it again and run the reboot.file
  • At last, update your QuickBooks to the latest version.

Summary:

In this blog, we have mentioned all the necessary information about the QuickBooks error Code 3371 and its causes and how to get it resolved. You can follow the above methods to get rid of the error. Also, if you are still facing any issues with the QuickBooks or if you have any specific queries regarding the QuickBooks Error Code 3371, then feel free to reach out to us. Our professional customer care team will be happy to assist you.

Frequently Asked Questions

1.What triggers QuickBooks Error 3371?

QuickBooks error 3371 is an installation problem. There can be quite a few reasons why it hinders your operations on the software:

  • Missing or damaged company files
  • Virus or firewall attack Also, if the Qbregistartion.dat file is corrupted
  • Incomplete or pending Windows update
  • Additionally, damages MSXML component

These are the most common problems that can be behind this error code.

2. Where can I locate my Qbregistration.dat file in my system?

Qbregistration.dat file is located in your QuickBooks file folder. To look for the same, go to File Explorer and type the file name in the search bar, and hit Enter.

Now, if no results are available on your screen, this means you need to display the hidden files too. Here is how that is done:

  • Open File Explorer on your desktop from Windows.
  • Next, from the menu bar, click on View and go through the drop-down list.
  • You will either find the Hidden Items option or go to Show, and then you will see it.
  • Select the option and search again.

3. How to open QuickBooks License properties?

The license properties are stored in the ECML file of QuickBooks. In order to open this file, press the Windows+R keys from your keyboard to open the run command box. After that, in the provided space, type entitlementDataStore.ecml and hit OK. Now, you can find the license properties here. 

4. Suggest some troubleshoots for QuickBooks error 3371.

Here are a few solutions that you can try your hands on to overcome QuickBooks error 3371:

  • Delete ECML file
  • Get the latest Windows version
  • Run QuickBooks Fix my program from QuickBooks Tool Hub
  • Use QuickBooks Install Diagnostic Tool
  • Fix the problem manually 

5. What to do if I want to remove the QuickBooks Desktop installation?

In order to clear your current installation of QuickBooks Desktop, follow the steps below:

  • Firstly, you need to download and run QuickBooks Tool Hub.
  • Now, open the application and click on Installation Issues from the options on the left.
  • Here, you will see Clean Install Tool button; hit that.
  • After that, enter your QuickBooks and product version and select OK. 

These steps will do the job for you. You can now install QuickBooks again. 

QuickBooks Online is an excellent accounting solution that gives the flexibility of handling your business accounting remotely with better-shared access to data and seamless collaborations. Besides, it allows you to record your transactions in the program. However, if you accidentally create a transaction in QuickBooks Online, you have the option to void or delete It. Not sure how to delete transactions in QuickBooks Online?

Well! This blog gives the answer to the same concern of the users when they want to delete transaction in QuickBooks Online. Besides, we will also discuss the other options than deleting an erroneous transaction. Let’s move ahead! 

What To Do When a Transaction is Created Mistakenly? 

When you create a transaction by mistake, you can either void or delete it. These actions stop this undesired transaction from affecting your account balances and reports. Deleting or voiding transactions are two different things. Let’s understand the difference between these two methods of dealing with an accidental transaction in QuickBooks in the first place. 

Voiding a transaction means you will have a record of the transaction, but it won’t affect your account balances or reports. On the other hand, when you delete a transaction, it gets completely vanishes from your books, and it won’t show in any accounts or reports. 

You may delete or void a transaction based on your requirement. The recommended way is to void the transaction as it keeps a record of the transaction. Some of the transaction’s details are recoverable with an audit log in QuickBooks; however, you may not be able to recover the whole transaction. Therefore, it is crucial for you to ensure that the transaction will never be required in the future before you finally delete it.  

When to Void a Transaction?

Setting a transaction to void is a good bookkeeping practice. Having a record of the deleted transaction can help you to keep track of the transaction. Besides, voiding a transaction would not affect your ledger books and other balances. You may not be able to void any payment in QuickBooks, which is already recorded for the invoice. QuickBooks enables you to delete all the transactions, but you can’t void the below-given transactions: 

  • Deposits
  • Estimates
  • Purchase orders
  • bills
  • Delayed charges
  • Vendor credits

Also Read – QuickBooks Not Responding

When to Delete a Transaction? 

When you are unable to void a transaction, you will have to delete it to keep your records accurate. If there is some issue in these transactions, you need to delete them to keep your books correct. You need to make sure that you won’t need to check the transaction before you finally delete it. As we have discussed, you won’t be able to recover a deleted transaction completely.  

Steps To Delete a Transaction in QuickBooks Online

Now that we know what the difference between deleting a check or putting it to void is, let’s find out the steps to delete a transaction: 

Step 1: Navigate To the Expense Menu 

In the first place, you need to launch the QuickBooks application and move to Sales. Alternatively, you may also click on the Expense menu if you can’t find the Sales.

Step 2: Find the Undesired Transaction 

In the next step, you need to find the transaction you want to delete. You may also use the search option to get the job done. Open it once found. 

Step 3: Check If You Need To Void or Delete a Transaction

After opening the transaction, you need to review it to make sure if you want to void this transaction or delete it permanently from your books. 

Step 4: Include a Date for Your Action 

Now that you have made up your mind to delete or void the transaction, you need to include the void or deletion date. To do so, you can add a note in the message or memo section. Once done, move to the next step. 

Step 5: Make the Desired Action and Then Confirm It

After following all the steps with full care and attention, here, you need to click on More from within the Footer section. Now click on Void or delete as needed and click Yes to confirm the action. 

How to Delete Multiple Transactions in QuickBooks Online? 

The above-given solution can help you in deleting a single transaction in QuickBooks Online. If you want to delete multiple transactions, you need to go to the Baking options from the menu. Here, you can find the list of the transactions that take place from within the application. The below-given steps can help you to get the task done:

  • First thing first, go to the Banking option on the homepage menu of QuickBooks.
  • In the second step, click on Bank Feeds.
  • Moving ahead, click the Bank Feeds Center button. 
  • After that, go to the Items Reviewed section and choose the account name.
  • Once done, you have to choose the Items to Delete tab.
  • Thereafter, select the transactions you want to delete from the list.
  • Here, you need to click on Delete Selected button to delete the selected items. 
  • In the end, click the Yes button to confirm the deletion.

How to Clear All Payments in QuickBooks Online? 

If you want to clear all payments in QuickBooks Online, follow the below-given steps:

  • First of all, go to the accounting software QuickBooks Online.
  • Thereafter, move to the Banking section or select the Transactions section. 
  • Moving ahead, click the Banking option. 
  • Next, you have to click the option labeled Banking. 
  • After this, select the bank account you want to clear the transactions from. 
  • Now head towards the For Review option. 
  • Checkmark the box for Date. 
  • In the end, you have to click the Exclude tab, and it will remove all the transactions at once.

Final Words!

It is crucial to void or delete the erroneous transactions in QuickBooks Online, to prevent any discrepancies in your books. Some users find it difficult to delete erroneous transactions from their accounting software. Therefore, this post explains the easy procedure to delete transactions in the QuickBooks Online application.

QuickBooks Web Connector is a Microsoft Windows application that allows web-based applications to share data with QuickBooks Desktop products. These QuickBooks products consist of QuickBooks Financial software and QuickBooks Point of Sale.

Moreover, this is a separate application from QBDT, which needs to be installed separately on the Windows device. Whereas, in QuickBooks Online, the QBWC comes inbuilt and works over the cloud. However, it is necessary to set up QuickBooks Web Connector so you can easily share the data. In this comprehensive guide, you will get the proper instructions to set up the Application; go through it.

What is the significance of using a QuickBooks Web Connector?

The QuickBooks Web Connector is an application that helps users to integrate QBDT with third-party applications. The exchange between the QBDT and online web applications is done via QBWC which opens the online Application with “.qbw” extension. Intuit provides more than 500 applications on its website, which you can integrate with QB.

Download QuickBooks Web Connector

What is the QuickBooks version that supports the QuickBooks Web Connector?

Below are the QuickBooks versions on which you can easily utilize the QuickBooks Web Connector application. Check them out. 

  1. QuickBooks Pro
  2. QuickBooks Pro Plus
  3. QuickBooks Premier
  4. QuickBooks Premier Plus
  5. QuickBooks Enterprise 

Moreover, the QuickBooks Web Connector also provides users with the accessibility to utilize the most recently launched version of QuickBooks. Apart from this, the users can also utilize all of their files, create or edit documents, and can access financial reports using any of the web browsers. 

Procedure to Set Up QuickBooks Web Connector 

If you are frustrated while searching on numerous websites for the proper steps to set up QuickBooks Web Connector, don’t panic. We have provided you with some simple instructions using which you can easily set up your web connector with ease.

Step 1: Get the Latest version of QuickBooks Web Connector.

  • Initially, you have to download the installer to get the most recently launched version of the QBWC. 
  • Soon after this, right-click on the installer download and then opt for the Extract All option. 
  • Go to the extracted folder, and right-click on the downloaded setup file i.e “.exe”. Further, tap on the Run as Administrator option. 
  • Once the Application has been installed successfully, you will see the QuickBooks Web Connector icon in the system tray after installation. 

Once the downloading process is over, move toward the installation process. 

Step 2: Installation of QuickBooks Web Connector (QBWC)

  • Initially, pick the desired third-party applications from the Application List.
  • Now, you have to add the QuickBooks Password you created for the third-party Application.
  • Afterwards, tap on Update and select the button to initiate the data exchange process.
  • Soon after this, go back to the QuickBooks Integration screen within the third-party application.
  • End the process of installation by clicking on the Next button. 

Step 3: Adding an Application with the QuickBooks Web Connector 

You must ensure that you login into QuickBooks using the proper administrator credentials and then sign into your Intuit account. However, if you have a “.qwc” file from your third-party Application, you can link it to QuickBooks. For this, you have to perform the steps listed below:

  • Begin the process by tapping on the File, Update Web Service, followed by the Manage Web apps. 
  • Now, mark the “ Set Up” checkbox next to the application you want to set up with the QuickBooks Web Connector. 
  • Afterwards, choose the “Connect to QuickBooks” option on the app website. 
  • Thereafter, open the QuickBooks Desktop on your system. Further, tap on the Done option on the Access Confirmation screen. This will complete the setup process successfully. 

Handle an application 

To manage your application, you must ensure that you must sign in to QuickBooks with proper administrator rights. Then, you can log in to your Intuit account. Click on the File, App Management option followed by Manage Web Apps. After this, you need to opt for the Connected apps option to view all your applications and make changes. 

See Also – How to Fix QuickBooks Web Connector Error

Delete an application 

QuickBooks allows you to delete any application from the Web Connector application. Once you remove the Application successfully, the data exchange won’t work with the QBDT software anymore. To delete an application from QBWC, perform the following steps:

  • Firstly, move to the Edit menu and tap on the Preferences option.
  • Thereafter, hover your cursor over the Integrated applications followed by the Company Preferences. 
  • Now, you have to pick the Application that you want to delete out of many available and then click the Remove > Ok option.

Moving Application on your device. 

QuickBooks provides you with an option using which you can transfer an app for the same company file to a different computer. After transferring the Application, the connection will be withdrawn from another machine. You must be assured that you are accessing the latest version of the QuickBooks Desktop. 

Go through the following instructions listed below to transfer the application. 

  • The first and foremost step is to tap on the File menu followed by the Update Web Service. 
  • After this, hover your cursor over the Manage Web Apps.
  • Now, pick the Connected Apps option to view your Application and make some necessary changes. 
  • Next, choose the Transfer app to my device. This will transfer the application connected to your new device. You must ensure that you resume the process of data transfer.

How to Handle the Issues faced while Installing QuickBooks Web Connector? 

You need to uninstall and reinstall the application if you encounter any issues while installing the QuickBooks Web Connector. To do so, carry on the steps listed below. 

  • Firstly, press the Windows + R keys simultaneously to bring up the Run window on your computer screen.  
  • Soon after this, type “Control Panel” within the search field and then click on the Ok option. 
  • Thereafter, hover your cursor over the Uninstall a Program option. 
  • Following this, opt for the Web Connector followed by the Uninstall option. If you are unable to see the Web Connector within the Control Panel window, you must remove the QBWC from the following locations:
    1. C: > Program Files(x86) > Common Files > Intuit > QuickBooks or 
    2. C: > Program Files > Common Files > Intuit > QuickBooks. 

In a Nutshell !

Hopefully, we assure you that you now have a clear insight to set up QuickBooks Web Connector. Thus, you can now easily integrate QB with several third-party online applications using QBWC. However, if you still get stuck at any of the above-listed steps, then you must connect with one of our QuickBooks experts. Our experts will get you the best possible assistance to fix the issue within the shortest time possible. You can communicate with our experts through email or live chat support. 

Struggling with QuickBooks error 12031? Here is a handy guide for you that can help you with the error resolution! The emergence of QuickBooks has almost revolutionized the business sector across the globe. QuickBooks is designed to assist the firm in day-to-day accounting transactions. With just a snap of a finger, users can easily fetch business reports, create invoices, and compose tax bills simultaneously.

Accounting has become way easier than before with the use of QB software. Undoubtedly, the application has extraordinary features. Still, it is prone to several implications, like technical glitches, errors, bugs, and other concerns.

What is QuickBooks update error 12031?

QuickBooks error 12000 series is usually linked with the problems that happen while upgrading the QB software and Payroll update services. In other words, QuickBooks error 12031 appears when a QB payroll service is restored or the software is updated. Sometimes, disruption in firewall and security system set-up caused by improper configuration set-up could be the reason behind it. 

Invalid system set-up configuration can bring this error to your system. This is the common error code that the user faces. It interrupts the connection of the QB with the host services, which interrupts the work process.

Also Read – Reset QuickBooks Admin Password

What Are the Reasons Behind QuickBooks error 12031 appears?

There is no specific reason for this error to appear in your system. Have a look at a few of the reasons behind error code 12031, which are as follows –

  • Poor/weak Internet connection can be one of the possible reasons behind the error.
  • Internet explorer, which is the most favored browser by QuickBooks, is not set as your default browser.
  • Firewall hindrances can impact your work process.
  • Invalid SSL configuration set-up.
  • Due to the detrimental attack of Viruses or Malware. 

The aforementioned are the reasons behind the occurrence of the QuickBooks error 12031. You can fix the issue by considering the exact cause of the error. 

Step by Step guide to fix QuickBooks error 12031

Follow the steps given below in order to troubleshoot the QuickBooks error 12031. 

Step 1: Configure a Stable Internet Connection

When updating the QuickBooks Payroll service, you need to make sure that you have a stable Internet connection. If it is not stable, you need to switch to a strong one. Follow the below-given steps:

  • First, open QB software on your software. 
  • Navigate to the help menu located on the left side of the software.
  • Select “Internet Connection”.
  • Then, you are required to visit the option stating, “Use my computer’s Internet connection settings to establish a connection when this application accesses the Internet.”
QuickBooks Error 12031 (internet connection setup)
  • Tap on the next option and then click Done to complete the ongoing set-up. 

Note – Upgrade the software to the latest upgraded version, in case you haven’t done it yet. 

Step 2: Run QuickBooks Connection Diagnostic Tool

QuickBooks Connection Diagnostic Tool is an important utility in the program that helps you check your Internet connection. Following the below-given steps can get the task accomplished:

  • Download the QuickBooks Connection Diagnostic Tool. When downloading is completed, install it, following all the prompt instructions.
  • Proceeding further with the solution, double-click on the icon and open the tool.
  • Go to the test connectivity tab, choose Browse, and probe for the company file.
  • Select the company file which is affected by the issue.
  • Then, move to the Test connectivity option.

After a few minutes of processing, the QB error will get vanished.

Step 3: Examining the Firewall

At times, the firewall blocks the ongoing process of QuickBooks and halts the downloading and updating process. Hence, you have to alter the Firewall settings to resolve the QuickBooks error 12031. To do this, go through the given below steps –

  • Type Firewall and Enter in the search bar of the Start menu.
  • Pick out the Window firewall from the selection. 
  • Then, select Allow a Program or Feature option.
  • Choose the Change setting option. Then, a new window will appear. 
  • Click on the box that enables you to access the Firewall option.

Step 4: Rename the Network Data file

Network Data (.ND) is a network file; if damaged, you may experience trouble in updating your QuickBooks payroll service. To repair this file, follow the below-given steps:

  • Check the source folder of the QB company file.
  • Inspect the file name having extension as .nd or Network Data File. 
  • Do right-click on the .nd (Network Data file) and click on Rename option.
  • Add old at the end of the file name with extension .nd. For instance, companyfilename.qbw.nd.old.
Step 5: Update QuickBooks Payroll Services

Make sure that you are using the latest version of the QuickBooks application, including your payroll service. If not, you need to update it by following the below-described solutions:

  • Open QuickBooks and go to the menu option.
  • Select the “Internet Connection Set-up.”
  • Go to the “Internet Properties.”
  • A roll of tabs will appear before you, and you have to choose Advanced Tab. 
  • Then, change the Advanced Settings so as to align it to your needs. 
  • Click Apply.
  • Click on the OK button, and the appearing window will shut.
  • In the end, close your QuickBooks Desktop application before jumping to the next step.
  • Open it again to update the QuickBooks payroll services.

Summing Up!

Hope the above-given steps will help you to effectively troubleshoot the QuickBooks error 12031. Before applying any of the measures before, determine its specific reason. Then, implement any of the steps to fix the error code, even after applying the measures, if encountering the same error again. Feel free to approach Technicians or chat with live person, which is open 24×7 for your assistance.

QuickBooks provides the payroll facility that enables the users to pay their employees on time, keeping track of their working hours etc. The main purpose of this feature is to reduce the stress of manually creating the payroll and the hassle of maintaining the payroll records of the employees. However, if you want to use the payroll feature in QuickBooks then it is necessary to payroll setup in QuickBooks Desktop. Read this comprehensive post to know all the details that are required to set up payroll in QuickBooks Desktop easily without any further delays. 

Payroll setup in QuickBooks

Stepwise Instructions to Setup Payroll in QuickBooks 

Are you struggling while setting up payroll in QuickBooks? If that’s so then don’t worry and go through the steps listed below. 

Step 1: Get your Payroll Subscription Activated 

You are required to activate QuickBooks Desktop Payroll Basic or Enhanced Payroll annual subscription after purchasing it. The procedure of activation may differ if you purchase online, by phone or via retail store. 

A. Activate your Subscription purchased via Online or Phone :-

You will obtain the 16 digit service key via email while purchasing the QuickBooks Desktop subscription via Online or Phone. In order to continue using the QB feature you are required to enter this key. If you are unable to find the service key then check your junk folder or automated service key retrieval tool. You are supposed to logged in via your Intuit account. Follow the steps listed below to activate the QBDT. 

  • Initially, open your QuickBooks company file.
  • After that, go to Employees> Payroll > Enter Payroll Service key. 
  • Thereafter, tap on the Add option. 
  • Then, you are required to input the service key that you have obtained on your registered email id with QuickBooks. 
  • After this, click Next and then tap on the Finish option.
  • Select the Ok option once you receive the Payroll Update message on your computer screen. 
  • Finally, ensure that your service status is Active and then tap on Ok option.

B. Activate the Subscription purchased via Online store:-

  • In the first step, open the QuickBooks company file. Then, tap on Employees > Payroll> Install Payroll from the box. 
  • Now, input the details into the Payroll License and Product Information page. You can acquire your QuickBooks license number on the brightly colored sticker inside the box. 
  • Choose the Continue option and go through the steps shown online to accomplish your payroll activation including adding service key.

Also Read – How to Setup the QuickBooks Desktop for the First Time?

Step 2: Fill the online application/make a Payroll PIN 

Now, you are required to connect your bank account so that you can access the direct deposit and we can pay and file taxes. To complete the online application follow the steps listed below:

A. Assemble your business and Principal Officer details:-

must have your business legal name, address and Federal Employer Identification Number(FEIN).

  • The users must have the principal’s officer name, home address, Social Security Number and birth date. 
  • Moreover, you must have the user ID and password for your business bank account online. Otherwise you must have routing and accounting number for the account you wish to use for direct deposits and payroll taxes. 

B. Fill-Out an Online application:-

  • Initially, go to the Employees option > My Payroll Service > Activated Assisted Payroll.
  • Go through the instructions displayed on-screen and then input the details within the application wizard. 
  • Make your payroll PIN and ensure that the PIN must be of about 8-12 characters, letters and numbers only.

Step 3: Accomplish your payroll setup tasks 

In this particular task, users are supposed to add their employees, set up federal and state payroll taxes. Also, you need to add any paychecks and tax payments that you have already paid during this year. There might be the chance that it may take time to get your payroll info into QuickBooks. Therefore, the setup enables the users to add info as per your suitability. In order to get the setup tasks, you are required to follow the steps as follows:

  • In the first step, open your QuickBooks company file 
  • Then, move to the Employees and then tap on the Payroll Setup option.

1. Steps for adding employees:-

Before moving ahead to add the employees you must have the information such as hire date, birth date, pay rate, completed W-4 form, any paycheck deductions, bank details, etc. 

  • In the first step, open QuickBooks Desktop and then add the basic employee details within the required text fields. Then, click on Next option.
  • After this, you have to enter the compensation that may include information such as pay items, rates and pay frequency. Further, opt for the Next option. 
  • Now, fill out the personal details carefully and then tap on the Next option. 
  • Thereafter, pick the mode of payment between physical check or direct deposit and fill the bank details correctly.
  • Tap on the Next option and input the tax details appropriately within the required text fields.
  • Finally, review the details carefully and make changes if required and then choose the Done option.

2. Steps for setting up company (pay items, deductions, PTO):-

In this procedure you can either choose the preset lists of items, insurance benefits and retirement deductions or you can set up customer items.  If you give paid vacation to your employees or any sick leave then you have to mention that also.

  • Initially, click on the Employees option and then tap on Payroll Setup.
  • Ensure that you have added at least one employee. For that click Company and you will get a list of pre-selected compensation items. 
  • If there are some items that are not required then click on the toggle in the Status column. 
  • You may also add the pay items to your employees by choosing Assign to Employees. Tap on Insurance Benefits if you offer medical, dental vision or other insurances. 
  • Tap on Add, choose the insurance item from the insurance benefit type drop-down. 
  • If you offer Retirement benefits then choose the option of Retirement Benefits. 
  • Also, you may set up the sick or vacation leave by tapping on the Paid Time Off option. 
  • After this, you will get the pre-selected items or you can choose the Add option and then select from Miscellaneous Type drop-down.

3. Steps to Setup Taxes:-

For setting up the taxes the users must have a Federal Employer Identification Number (FEIN), state account numbers and State Employment Insurance rate. 

In order to set up taxes, open QuickBooks then click Employees > Payroll Setup. Then, you must choose the report which the IRS requires for reporting your wages and taxes. Your federal taxes  are already pre-set and this will represent all taxes for your state. For adding SUI rate, click Unemployment item > Edit > Next > Add your rate. Then, set up your bank account in Charts of accounts, add account number, deposit frequency and click Schedule Payments. After that, input the details required for each tax. Click Enrollments to get guidance to enroll in electronic payments and filing IRS. 

4. Enter Pay History:- 

The users are required to add the paychecks and tax payments if you have already paid it to your employees. These details may include pay stubs or reports for each of the employees paid during the entire year. Also, you must have the information related to tax liability reports or tax payment receipts or statements.

5. Review and Finalize:-

If you have input the pay history, you are required to enter federal and state filing details for closed quarters. QuickBooks will go through all the pay history details and detect errors. Thus, it ensures that your W-2 statement is appropriate.

Step 4: Activate your QuickBooks Service and sign your payroll authorization forms:-

After winding the setup tasks contact the experts and they will ensure that everything is set up appropriately so that you can create the paychecks easily. Also, the experts will guide you on how to activate your service.

Once your subscription is active experts will send the principal an email by attaching the payroll authorization forms. You are required to sign the forms by the principal officer and sent back to the experts as soon as possible so that they can easily file taxes and file your forms.

Closure

So, here we end this post and hope that now you get a better understanding on how to setup payroll in QuickBooks Desktop. However, if you are encountering any issue even after implementing these steps then you may contact our QuickBooks experts for complete guidance.

Are you frustrated with the QuickBooks and are thinking about the process to Delete Inventory Adjustment in QuickBooks? Then you are at the right place. We as a QuickBooks expert are going to help you by providing all the necessary and accurate information about the Inventory adjustment in QuickBooks and how to get it deleted. So, if you also wanted to delete the inventory adjustment in your QuickBooks account, then stay tuned till the end of the blog.

Inventory Adjustment in QuickBooks?

Inventory adjustment is one of the popular features because of which the QuickBooks has gained so much popularity. Although, we all know that sometimes completing a process in QuickBooks can become a trouble when a user eventually missed a single step. That’s why we are here to help you. We strongly recommend you follow each step with patience to avoid any discrepancy with your inventory values.

Although, we suggest you to first have a look at the process of editing the inventory adjustment, so that it may help you to solve your problem before you directly jump on to the deletion process of inventory adjustment.

How to Edit Inventory Adjustment in QuickBooks?

So, if you wish to edit the existing inventory adjustment in your QuickBooks, below we have mentioned the steps that you can easily follow to get that done.

  • At first, locate or search for the inventory adjustment, which you want to edit it.
  • Once, you find that specific inventory adjustment, then click on the Find button and then search there for the advanced tab.
  • After that, move ahead by selecting the inventory adjustment from all the transactions to drop down buttons.
  • At last, once you find the adjustment, then click on the edit button to edit or modify the changes in adjustment.

Now, you have successfully edited the inventory adjustment in your QuickBooks. In case, if you were able to solve your problem through the editing process, then well and good. In case, if you still wish to delete the inventory adjustment, then let’s have a look at the process of deleting the inventory adjustment in QuickBooks.

Also Read – QuickBooks Error Code H202

How to Delete Inventory Adjustment in QuickBooks?

So, here are the final steps that you can follow to delete the inventory adjustment in your QuickBooks account.

  • At first, run the QuickBooks on your PC.
  • Now, on the home page, click on the new button and then choose the inventory option.
  • After that, go to the list below the inventory heading and then search and select the inventory items which you want to delete.
  • Now, from the display window, select the Quick reports and then click on the “All tab” option and select the date range as per your requirements.
  • Once you have selected the specific time range, now you have to right click on the entry appearing next to the product or the inventory item that you have already selected to delete.
  • At last, to finally get it deleted, click on the delete option. In case, if you wish to delete several adjustments, then you have to follow the same steps again for each adjustment.
Delete Inventory Adjustment in QuickBooks Image
Delete inventory adjustment

After following the above-mentioned steps, you have now successfully deleted the inventory adjustment in your QuickBooks.

How to Alter Inventory Quantity in QuickBooks?

If you wanted to alter the inventory values or quantity without even recording a transaction of sale or purchase, then below are the steps that you can follow to get it done.

  • First of all, click on the plus icon and then select the Inventory Quantity Adjustments.
  • Now, select the adjustment dates as per your requirements.
  • After that, enter the Inventory Adjustment Account.
  • Then choose the product which you want to change the inventory quantity and then you will see the product’s information and the quantity available at hand.
  • Next, it’s optional to enter a new description. You can add it as per your need.
  • Now, mention the new available quantity.
  • Again, adding the additional products and the memo is optional. You can add them if you wish to do so.
  • At last, click on the save button to save the changes in your inventory.

Also Read QuickBooks Query Processing Error

How to Delete Inventory Starting Value in QuickBooks?

Apart from inventory adjustments, if you wish to delete the starting value of inventory, then for that you have to delete the amount linked with the inactive inventory product. To do so, here are the steps that you can follow.

Reactive the Product:

  • First, click on the “Sales” menu option.
  • Now, click on the “Products and services” tab, and then click on the “Filter” icon.
  • Then use the “Status” drop down menu and click on the “Inactive” button.
  • Now, click on the “Apply” option.
  • After that, select all the items which you wish to reactivate.
  • Under the “Action” drop down list, click on the “Make active” option.
  • At last, click on the “Clear Filter” option to finally return to the active items list.
  • Remove the amount
  • First, under the “Products and services” tab, search for the items.
  • Then click on the drop-down button near the “Edit” button.
  • Now, select the “Adjust starting value” option.
  • You can now change the amount value to Zero which displays as the “Initial Cost”.
  • At last, click on the “Save and close” button to implement the updated changes.

Summary

We hope this blog finds you well. In this blog, we have attempted our best to provide all the information about the inventory adjustment in QuickBooks and how to permanently delete the inventory adjustment in QuickBooks. So, in case if you like the content, then do share it with your friends or business colleagues who are also using the QuickBooks, so that in the future if they will face any problem with the inventory adjustment, then they will be aware of the solution and how to get it solved.

QuickBooks error H101 is a common issue in the program that takes place in multi-user mode. QuickBooks multi-user mode is an arrangement in QuickBooks wherein two or more users can work on the same company file simultaneously. The file is hosted on a server network, and all the computers connected with the server computer are known as workstations. When trying to access the company file in multi-user mode, errors can crop up due to erroneous or incompetent settings.

QuickBooks error code H101 belongs to the H series and shows similar characteristics. If you are stuck with error H101 and need relevant help, navigate through this post until the end.

What is QuickBooks Error Message H101? Description

Error Code H101 is a multi-user mode error, which indicates that the computer hosting the company file needs additional configuration. The improperly configured system can prevent users from accessing the company file in a multi-user environment. The error can have several possible reasons, and therefore, you need to perform multiple procedures to suppress them. Knowing the possible reasons behind the error can make troubleshooting easier for you.

What Promotes QuickBooks Error H101 in QuickBooks?

There are multiple possible factors that can evoke error H101 in QuickBooks. Check below:

  • It can be your security application, which is blocking access to the computer that stores your company data file.
  • Damaged Network Data (.ND) file, which is crucial for accessing the company file over a network.
  • If the hosting is not configured properly, QuickBooks error H101 can take place.
  • QuickBooks is unable to obtain the IP address of the computer where the company file is located.
  • When QuickBooks services are not running essential for a multi-user environment.
  • The location of the company file is not accessible.

Symptoms of QuickBooks Multi-User Mode Error H101

Now that you know the possible reasons behind the error, below are the symptoms:

  • On the arrival of the error message, the dynamic window crashes.
  • QuickBooks error H101 appears on the screen with the extended text about the error.
  • Windows become sluggish and respond slowly to mouse or keyboard commands.
  • The system crashes in no time when the program throws the error message on your screen.
  • The page has been expelled, but the URL remains the same.
  • The attempted page couldn’t be found on the server.

Read more : QuickBooks Error H202

How Do I Resolve QuickBooks Desktop Error H101?

The above-described sections explain much about the QuickBooks error H101. With this critical information on the error, you can proceed further with the troubleshooting solutions:

Solution 1: Run QuickBooks File Doctor To Eliminate The Error

QuickBooks File Doctor Tool is an important utility in the program that can repair a damaged company file and the related issues. It can also repair the damaged network file, which is causing the problem in the program. You can run this tool from the QuickBooks Tool Hub, which is like a launch pad for the tools. Below are the steps:

  • Open Intuit’s official website on your machine and download QuickBooks Tool Hub.
  • Open the downloaded QuickBooksToolHub.exe file to install it.
  • Follow the installation instructions and agree to the given terms and conditions.
  • Once the tool hub is installed, select Company File Issues and the tool hub will launch the QuickBooks File Doctor tool.
  • The tool will repair the damaged file, and you may try to check if the QuickBooks error H101 is fixed.

If not, go to the next solution and follow the steps.

Recent Added : QuickBooks Error H505

Solution 2: Run QuickBooks Database Server Manager

QuickBooks Database Server Manager is an important service in the program, which is essential for hosting company files in multi-user mode. Running QuickBooks Database Server Manager can help you with the error resolution. You can run it from the QuickBooks Tool Hub. As we have already installed the tool hub on our system, follow the below-given steps:

  • Open Tool Hub and click on the Network Issues.
  • Thereafter, you need to select the QuickBooks Database Server Manager option.
  • Your previous action will show up in your company file. Here, you need to click the Start Scan button.
  • If you are unable to see your file, use the Browse option to find it and then click the Start Scan option.
  • Allow the tool to diagnose the company file in order to find and resolve the problems in QuickBooks.
  • Once done, you need to click on the Close button.
  • Open QuickBooks, click the File menu and choose the Switch to Multi-User Mode option.

Solution 3: Change Company File Location To Open It

Changing the location of the company file will ultimately change the path through which QuickBooks accesses the company file. It also refreshes the company file. To change the location of the company file:

  • If QuickBooks is already running, close it.
  • Next, right-click on the Desktop screen and when a drop-down menu opens, select New Folder.
  • Name the folder as “Test” and save it.
  • Here, you need to click on the Windows icon and type Windows Explorer in the search area.
  • When the list of the programs opens, locate and click Windows Explorer.
  • In the next window, go to the folder containing the QuickBooks company file.
  • You need to right-click on the file with extension .QBW and then select Copy.
  • Now paste the company file into the Test folder you have created on your Desktop.
  • In the end, open QuickBooks.
  • Here, you need to click on the File menu and select Open or Restore Company >> Open a Company.
  • Now choose the file in the Test folder and click Open, and it will fix the QuickBooks error H101 for you.

Solution 4: Disable The Multi-User Access On Workstation and Enable on Server

To host the company file on a server, Multi-user access should be enabled on the server computer and should be disabled on workstations. To enable:

  • Open QuickBooks and avoid opening the company file.
  • Next, press the File tab and click on the Utilities option.
  • You may encounter any of the following scenarios-
  • Host Multi-User Access, which means hosting is disabled. Do not disturb it and move to the next workstation.
  • Stop Hosting Multi-User Access, which means the hosting is enabled on the workstation. Select this option to disable hosting on the workstation.
  • Check all the workstations and make sure that no workstation is hosting the company file.
  • Follow the same steps on your server computer and make sure that hosting is enabled on it.

With the right company file hosting, you can access your company file smoothly.

Summing It Up!

The solutions described in this post can help you troubleshoot the QuickBooks error H101. If the error is not fixed, you may reach out to our proficient QuickBooks experts and ask them to troubleshoot the error.

Isn’t it difficult to Convert Data File from QuickBooks Online to Desktop? Are you scrolling over other websites to find the simple process for the same? If that’s so, your search part ends here, as this informative guide is there to help you with it. Go through this post attentively and simplify the conversion of data files from one QuickBooks version to another. Thus, it will help you convert all the QuickBooks Online data to QuickBooks Desktop without missing any important company data. 

Do you need help Convert Data File from QuickBooks Online to Desktop? Call 1-855-603-0490 and have a conversation with our professionals anytime to resolve your issue. 

Here’s How to Convert Data File From QuickBooks Online to Desktop 

Are you seeking the complete procedure to convert data files from QuickBooks Online to Desktop? Go through the following procedure to get the desired outcome. 

First Stage: Get the Latest Version of QuickBooks Desktop 

  1. Before proceeding further, ensure you have downloaded the latest version of QuickBooks Desktop.  After this, install it on your device by following the instructions on the screen successfully. 
  2. Once installed, open the QuickBooks Desktop application by tapping on its icon. 
  3. Afterwards, navigate to the File menu and hit the Close Company option. Ensure you have kept the QuickBooks Desktop application open while accomplishing the remaining steps. 

Second Stage:- Enter Into the QuickBooks Online application and Get the Migration Tool Downloaded 

  1. Primarily, you must login to your QuickBooks Online account using the preferred Intuit web browser. While signing into the account, ensure you use the login credentials associated with the QuickBooks account. 
  2. After this, you must add the URL “https://app.qbo.intuit.com/app/exportqbodatatoqbdt” to the browser’s address bar and hit the Enter key. 
  3. Consequently, it will redirect you to the Export Overview window, and go through it attentively. However, you may also take out the Export Overview printout if required and then hit the Get Started button
  4. In the next step, you must hover your cursor over the Download Tool. As a result, it will download the QuickBooks Desktop Migration Tool on your device. 
  5. Once the download process ends, double-tap on the downloaded setup file to open the tool. 
  6. You are supposed to consent to the Terms and Conditions for the tool’s usage and hit the Next button to go further.
  7. Choose Complete as the Setup Type and then click the Next button. 
  8. End the process by hitting the Install button and the Finish button. 

Third Stage: Get Ready With The Export File and Choose Your Data From QBO To Export 

  1. Before starting the process, you must move back to the QuickBooks Online. You will notice you are in the “Prepare To Export” window, click Continue from the following window. 
  2. Afterwards, pick the data you wish to export. Herein, you can export all the data along with the transactions or only the lists and balances. Later on, hit the Continue button to move ahead. 
  3. Thereon, choose the “Learn about the limitations of converting data for QuickBooks Desktop” to gather more details regarding the drawbacks that can affect the migration process. 
  4. Now, add the Name and the Email Address on which you want to receive the Migration Confirmation email and tap the Continue button. 
  5. Thereon, hit the Close button to return to your QuickBooks Online file and wait until you get the confirmation email. You have to wait patiently as the email may consume some time. However, the time taken in the migration process depends on the data you wish to transfer. 
  6. Once again, you need to reach the export screen in QuickBooks Online. You have to resume the steps listed in step 2 to return to the export window. Later, you must go for the option “Get Started.”
  7. You are supposed to hit the Continue button from the Prepare to Export page
  8. Now, access the Select Your Data page, pick the option you chose earlier, and hit the Continue button
  9. Subsequently, you will receive a message stating, “You already have a file to download” on the Exporting from QuickBooks Online screen. Herein, you must opt for the Continue to Download option. 
  10. Navigate to the highlighted Download QBXML file, and if you get the pop-up to save the file, pick the appropriate location to restore it. 
  11. Ensure you are on the No Company Open screen within the QuickBooks Desktop. For instance, if a company is open on your device, navigate to the File menu followed by Close Company. Herein, by comparing both data, you can cross-check that all the data has been properly transferred from the QuickBooks Online version to the Desktop version. 

Fourth Stage:- Bring The QuickBooks Desktop Migration Tool Into Use 

  1. Initially, you must ensure the QuickBooks Desktop file is open in the No Company Open screen. 
  2. After this, you must launch the QuickBooks Desktop Migration tool you downloaded. 
  3. Thereon, you must navigate to the path of the downloaded QBXML file and hit the Import button
  4. Pick the appropriate location to save the file and assign a new name to the QuickBooks Desktop file. This will help you to identify the QuickBooks Desktop file easily. 
  5. Now, you must search for the QuickBooks-Application Certificate. If QBDT is running in the background, you’ll notice that it is behind other screens. However, if you wish to assign personal data access to the QuickBooks Desktop file, you must go with the Read/Modify rights option. 
  6. Later on, hit the Continue option followed by Done from the Confirmation screen. 
  7. In the end, click the Done button once again after importing all the data successfully. 

Note:- You must wait patiently to wind up the exporting process. However, if it seems like the application is frozen, it doesn’t indicate that the export process is failed. All you need to do is to wait for a few seconds and the progress bar will start moving again. 

Case:- If You Notice that the Status Bar Fails to Move 

For instance, if the status bar doesn’t move after waiting a few seconds, review the QuickBooks Desktop for an Application Certificate again. Furthermore, carry on with the following process to get the desired results. 

  1. To start the process, move to the Windows Taskbar and pick the QuickBooks Desktop to launch it on your device. Eventually, it will open the Application Certificate on your computer screen. 
  2. Now, hit the “Yes, prompt each time” option from the Application Certificate window. 
  3. Later on, from the Confirmation screen, go to Continue and then choose the Done option

Fifth Stage:- Confirm That All the Data Is Exported Accurately 

Once you have exported all the Convert Data File from QuickBooks Online to Desktop, utilize the Profit and Loss Report to tally your books of accounts. After this, you need to run one report in QuickBooks Online and tally it with the same report in QuickBooks Desktop. 

Case:- Steps to Follow if the Reports Don’t Tally 

Sometimes, the users fail to tally the reports due to export limitations and while using incompatible versions of Internet Explorer. So, in that stage, you must implement the following steps to tally the reports. 

  1. The users must open the QuickBooks Desktop application and navigate to the File menu > Close Company
  2. After this, return and try for the conversion once again. Sometimes, the users can overcome the issue while converting the data file for the second time. 
  3. Once it is done, review the Profit and Loss Reports again. If users still find the issues while matching their reports, you must include the manual adjustments to resolve the issue. 

Drawing To a Conclusion!!

We hope you have gained enough information through this post to Convert Data File from QuickBooks Online to Desktop. Thus, it would help you to transfer all the data from one QuickBooks version to another without causing any data damage. However, if you want additional information in that scenario, you can consult with our experts anytime for quick resolution. You can contact our QuickBooks professionals through email or live chat facility and get all your doubts clarified within one go. 

FAQ's

Ans 1. Consider the following points before converting data files from QuickBooks Online to Desktop. 

  • Ensure you access Internet Explorer 10 or the higher version for the conversion. 
  • Also, one must verify that they are accessing the latest version of QuickBooks Desktop. 
  • Check that the User Account has admin-level access to the export file from the Online application. 

Ans 2. You must verify that the file format is compatible with the version of QuickBooks Desktop. The file formats compatible with exporting the QuickBooks Online data to the Desktop are .qbo, .qbx, .ofx, and .csv formats. 

Ans 3. While exporting the QuickBooks Online data, the users can export charts of accounts, customers, vendors, and transactions, including invoices, bills, payments, etc.

Ans 4. Following are the data that you can’t convert from QuickBooks Online to QuickBooks Desktop. 

  • Details include location data, markups, and custom-filed information.
  • Attachments for transactions like invoices, expenses, and checks. 
  • Moreover, it also includes repeating and online banking transactions waiting for approval. 

Ans 5. Yes, taking the backup before converting QuickBooks Online to Desktop is compulsory. Doing so will create a duplicate copy of the data file, which you can use when the original gets hampered.

Posts pagination