QuickBooks Desktop is prone to multiple errors and issues such as company file errors -6000, printing and export issues, sudden crashing of QuickBooks, failure to update the program, and many more.
You may encounter these issues due to damaged or corrupted program files and technical issues. In such cases, running the Quick Fix My Program and QuickBooks Install Diagnostic tool. However, experts recommend you reinstall QuickBooks Desktop, which will help you replace the program and company files by renaming the older files and fixing the associated issues.
During reinstallation, your company file data will be intact, which helps fix bugs or issues with the software.
Different Ways to Remove and Install Your QuickBooks Desktop
As discussed earlier, when you remove and install your QuickBooks Desktop, it performs a quick repair by replacing your program and data file with new ones. This section will guide you through step-by-step instructions to remove and reinstall the program:
Prequisites
Get the software installer of the same version as your QuickBooks.
Keep your license number handy; you will find the software on the original package. Check the product confirmation email if you bought it online
Note: You can also get the information from the account management portal.
1. Remove and then install QuickBooks Desktop again
When you remove and install QuickBooks Desktop, it replaces the program files and the company file with the new ones by renaming them while keeping your data intact. Proceed with the below steps to re-install your QB program:
a. Remove QuickBooks
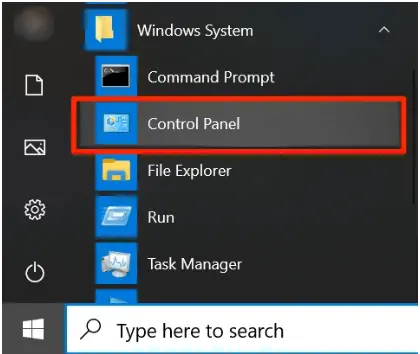
Press the Windows logo key to launch the Windows Start menu.
Type Control Panel in the search field and hit the Enter key.
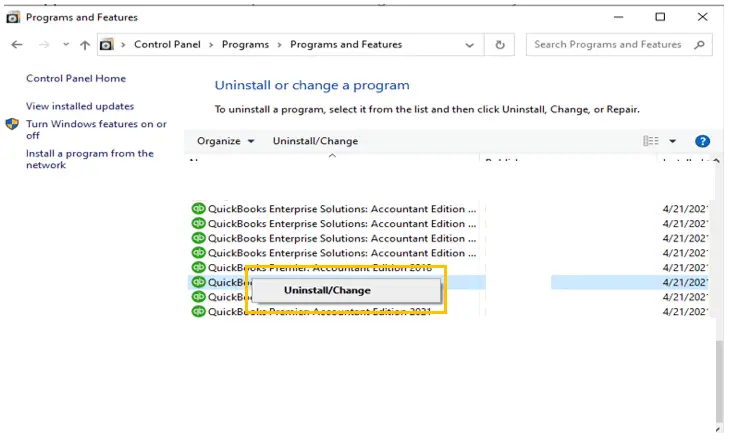
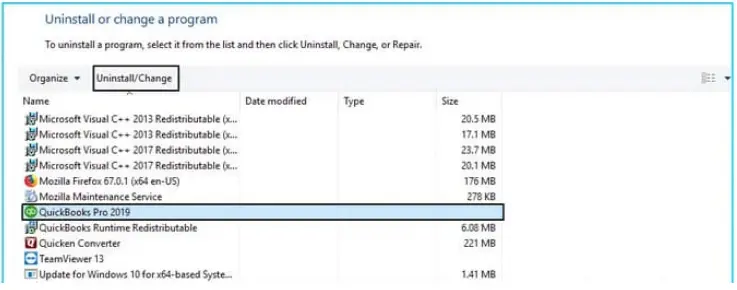
Select Programs and Features or hit on Uninstall a Program.
Choose your version of QuickBooks from the list of your QB program to remove.
Tap on Uninstall/Change, Remove, and select Next.
(If you can’t find the option, sign out and then sign in to Windows as an admin for the proper rights to make changes on your system).
b. Install QuickBooks Desktop Again
When you’re done, reinstall your QuickBooks desktop. Reinstalling QuickBooks will automatically install the new folders and rename the old ones.
Keep your computer connected to an active internet connection.
Locate the QuickBooks program file QuickBooks.exe.
Select
Express install – Installing QuickBooks Express will save all of your settings and replace your old version. To access your prior version, you will need to reinstall it using custom install.
Custom and Network Options: This allows you to maintain previous versions installed while installing the current version in a different location. The new version does not incorporate your choices from the previous version.
2. Manually uninstall QuickBooks and rename installation folders
Did you fail to reinstall QuickBooks Desktop and are wondering what to do? This section will guide you through the steps to manually delete and rename the installation folders to replace the damaged files with new ones. Let’s learn how to do that:
Uninstall your QB Desktop again.
Press the Windows icon key to launch the Windows Start menu.
Search for File Explorer and hit the Enter key.
Look for the company file folder that holds your company file. This is usually your QB program folder. You will find this in the following locations:
64-bit version C:\Program Files (x86)\Intuit\QuickBooks (year)
Right-click the file folder and choose Rename.
Add the .OLD extension at the end of the file name. This will prevent QuickBooks from opening when you reinstall it.
Once done, reinstall your QuickBooks Desktop by following the above steps.
If you encounter an error when trying to rename the file folder:
Navigate to the Windows task Bar and right-click on it.
Choose Task Manager.
Select the Processes tab.
Choose the Name column header to sort the list.
Now, select the following QB processes and End Process for each: QBDBMgrN.exe, QBDBMgr.exe, QBCFMonitorService.exe, and Qbw32.exe.
Click Yes if you see a warning message, “WARNING: Terminating a process can cause undesired results…“
Summary
Failure to update QuickBooks, open your company file, and any other related errors are mainly triggered due to any damages or corruption to the program file. The above guide helps you reinstall QuickBooks Desktop to replace the previous program files with the new ones, fixing the associated issues without affecting your company file.
If you fail to do so or require professional assistance, dial +1-866-500-0076, connect with a QB ProAdvisor, and consult your issues.
Although QuickBooks is known for its functionalities for seamless accounting, it also offers advanced payroll features with direct deposit to ensure your employees are paid on time. You can track time, allowing you to create payroll reports and plans such as pensions. Keeping payroll services up to date is essential to ensure accurate calculation of recent tax tables and tax rates. However, you may fail to update the features and encounter QuickBooks error code 15276 while updating the QB program.
This error is one of the 15XXX series, which varies from a larger number discussed below in this article. This blog discusses its possible causes and steps to fix the problem immediately. Let’s get started and make sure QB and payroll updates are seamless.
QuickBooks Error Code 15276: An Overview
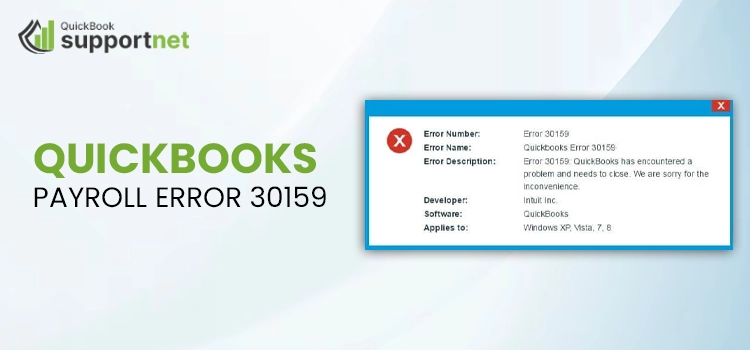
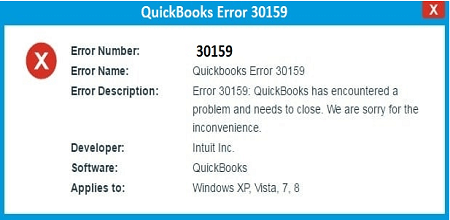
QuickBooks error 15276 is one of the 15XXX series that appears on your screen due to failure to update payroll services. The error suddenly comes on your screen with a warning message,
“[Error: 15XXX] The payroll update did not complete successfully. The update is missing a file.”
When updating payroll services, the error varies across multiple codes belonging to the same series, such as 15XXX. Let’s review the possible error codes you may get
What Triggers QB Error 15276 When Updating Payroll?
Failure to update payroll services in QuickBooks Desktop can occur due to several reasons, such as the error code 15276 on your screen. This section discusses the possible reasons behind the interruption. Let’s look at them one by one:
General internet connection or computer performance issues
Permissions not properly set for updating payroll services
General internet connection or poor computer performance.
Shared download drives may not be mapped correctly
Missing a file or component for payroll updates may also cause problems
There may be some damage to Windows files
Incorrect firewall settings often block QuickBooks or related processes
QuickBooks File Copy Service (FCS) may be disabled
Your QuickBooks is unable to verify digital signatures
Possible damage or corruption to your QB program files
Instant Ways to Troubleshoot Payroll Update Error 15276 in QuickBooks
QuickBooks error code 15276 when updating payroll services often fails due to insufficient permissions, disabled QB FCS, and other reasons we have discussed above. To resolve the issue and get back to updating payroll, consider following the step-by-step instructions below:
1. Download the Updates as an administrator
Not having sufficient permissions often hinders payroll updates and can also trigger unknown errors like QuickBooks error code 15276. Let’s run the update with all admin rights:
Close the company file and QuickBooks Desktop.
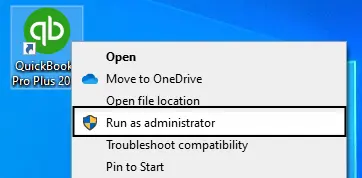
Find the QB Desktop icon and right-click on it. Then, select Run as Administrator.
Click OK when you see a prompt on your screen saying, “Do you want to allow this program to make changes to your computer?“
Once done, try again to update your payroll services.
2. Map a Shared Download Drive in Windows
Shared download drive lets you share your data over the network and work in a convenient way. Meanwhile, if the network drive is not mapped, administrators or power users will not be able to share or access the data.
Follow the steps below to map the shared download drive in Windows and try again to update payroll services:
Press the Windows logo key to launch the Windows Start menu.
Type This PC and hit the Enter key.
Click on More (…) and select Map network drive.
Note: If you don’t see the Map network drive, right-click on This PC, then choose Map network drive.
Select any drive letter in Drive.
You can either:
enter the full path of the folder that you are mapping or
Just enter the path of the computer on which the file is hosted and select Browse to find the folder
Choose Reconnect at sign-in to keep your drive mapped every time you sing in to your system.
Click Finish.
3. Enable the QuickBooks File Copy Service
Intuit File Copy Services (FCS) is one of the crucial components in QuickBooks that helps start and carry out QB Desktop updates. Proceed with the below steps to enable the QuickBooks File Copy Service:
Launch the Run window by pressing the Windows+R keys together.
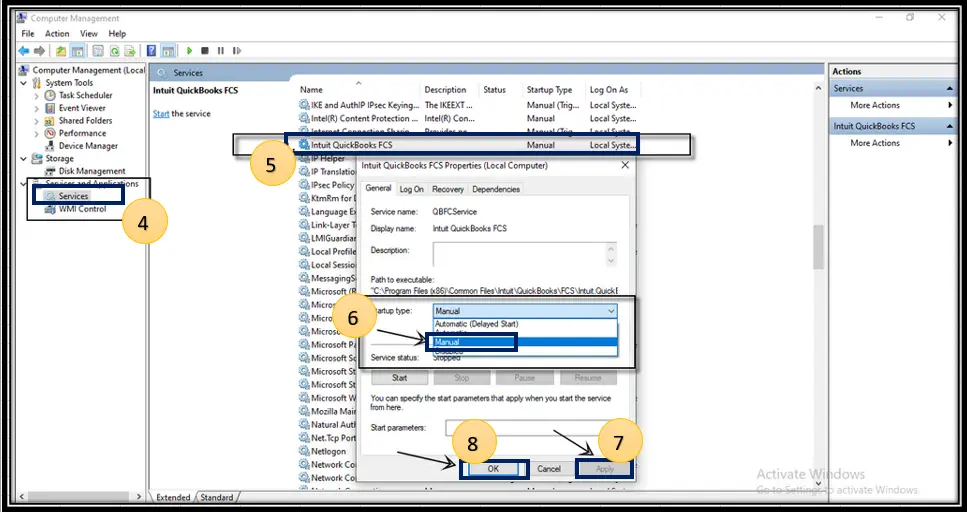
In the Run command, type COMPMGMT.MSC and hit on OK.
The Computer Management window will open on your screen.
Click on Services and Applications, then select Services.
Scroll down until you see Intuit QuickBooks FCS and double-click on it.
Choose Startup type and tap on Manual.
Finally, click Apply.
Once done, you will need to re-validate the payroll’s service key to refresh the connection.
Let’s learn how:
In QuickBooks, select Employees at the top menu bar.
Click on My Payroll Service.
Select Activate Service Key.
In the Service Keys window, highlight the current payroll and click Edit.
The QuickBooks Desktop security certificate is crucial as it holds all the information that protects or establishes secure network connections. If QuickBooks fails to verify the certificate when downloading the payroll updates, it may trigger QuickBooks error code 15276. Below are the steps to add a Security Certificate in QuickBooks Desktop:
a. Locate the file
Right-click on QuickBooks Desktop icon and select Properties.
Go to the Shortcut tab, choose Open File Location and then click OK.
Note: You can also access this location manually in the QuickBooks program file folder. You just need to eeplace the Xs with the year of your QuickBooks software as shown below.
Pro, Premier, or Premier Accountant: C:\Program Files (x86)\Intuit\QuickBooks 20XX
Enterprise or Enterprise Accountant: C:\Program Files (x86)\Intuit\QuickBooks Enterprise Solutions XX.0
b. Install the certificate
In the prompted File Location window, find the Application file (.exe file), then right-click and choose Properties. This will open the Application file Properties window.
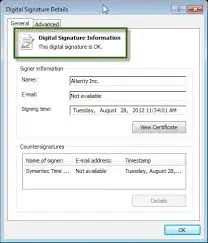
Go to the Digital Signature tab and select one of the entries in the Signature list field. Now, click on Details.
Choose View Certificate in the Digital Signature Details window. This will open the Certificate window.
Navigate to the General tab and select Install Certificate.
On the Certificate Import Wizard welcome screen, you need to make sure the Store Location is on Current User. Then, click on Next.
In the prompted Certificate Store window, Windows already selected the certificate store based on the type of certificate.
Choose Next and then Finish.
It will prompt you to say the import was successful; select OK.
Note: Consider following the steps to get the rest of the security certificates on the digital signature list.
5. Repair the Windows Files
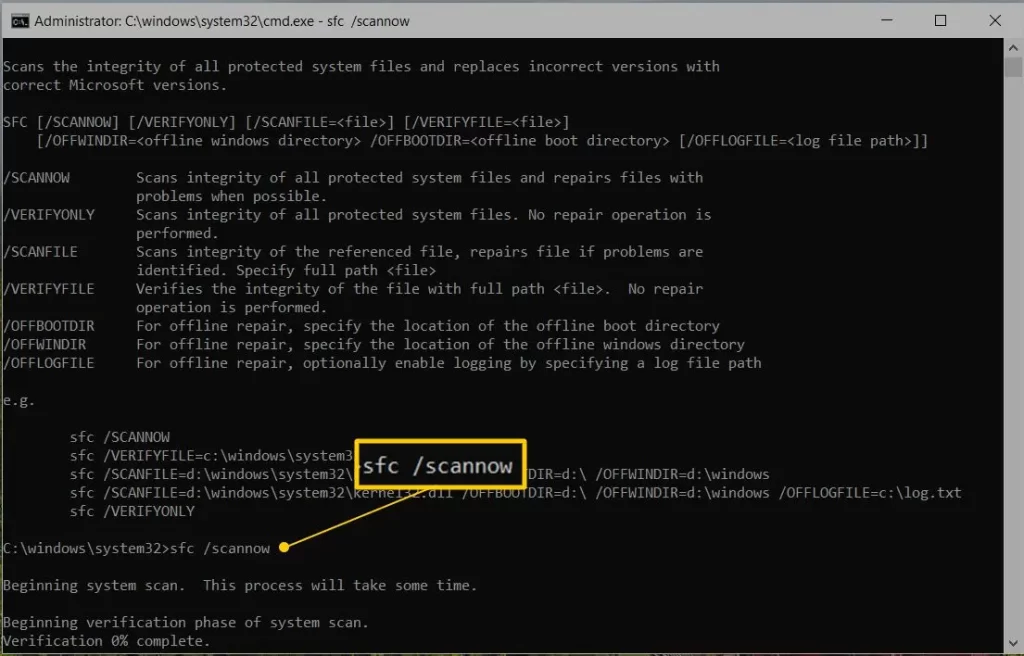
The Windows System File Checker (SFC) is a tool built into all modern versions of Windows. This tool allows you to fix corrupted system files in Windows. It can be run with administrator privileges both from within Windows and by using Windows recovery media.
Press the Windows+X keys on your computer.
From the drop-down menu, choose Command Prompt (Admin).
Note: You can also run the System File Checker (SFC) from Windows PowerShell (Admin).
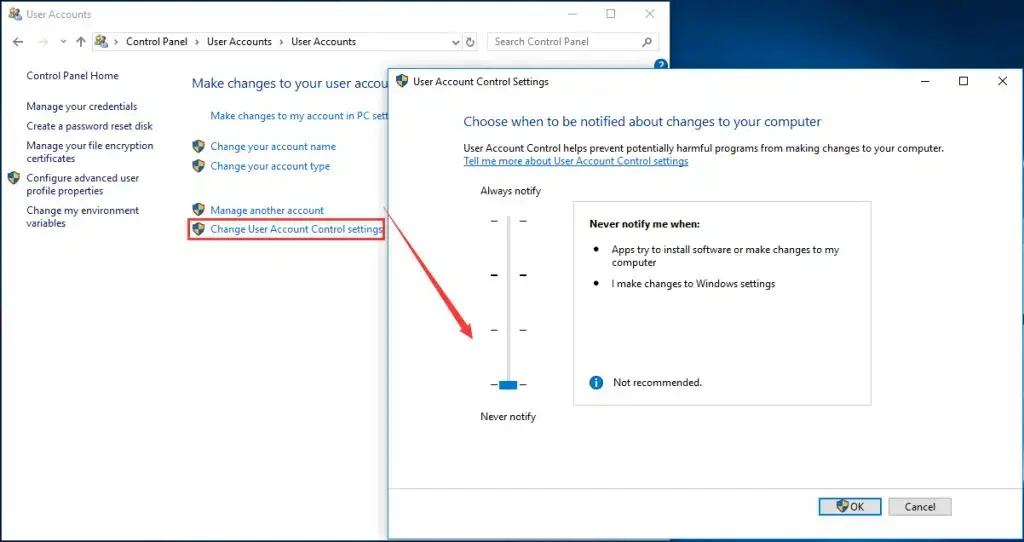
Click Yes on the User Account Control (UAC) prompt.
Type SFC /scannow in the command prompt window and hit Enter.
Now, the System File Checker utility will check the integrity of Windows system files and run a quick repair.
Once the process is complete, reboot your computer.
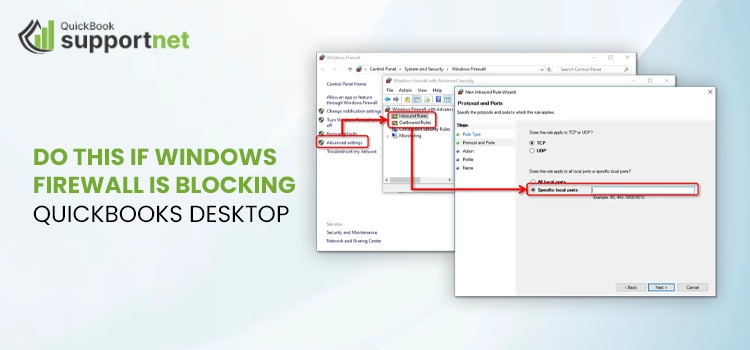
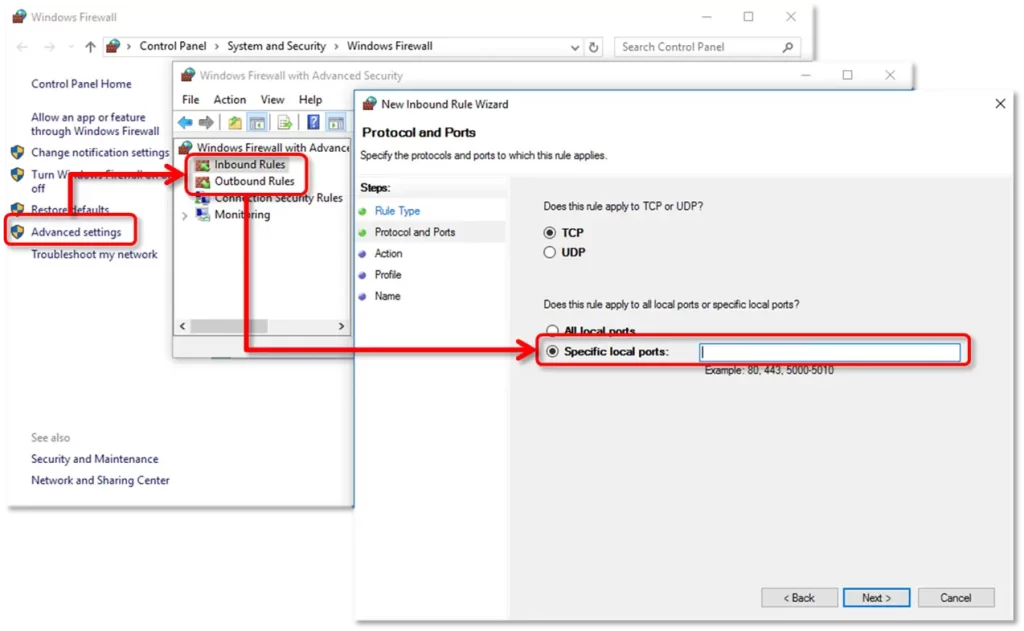
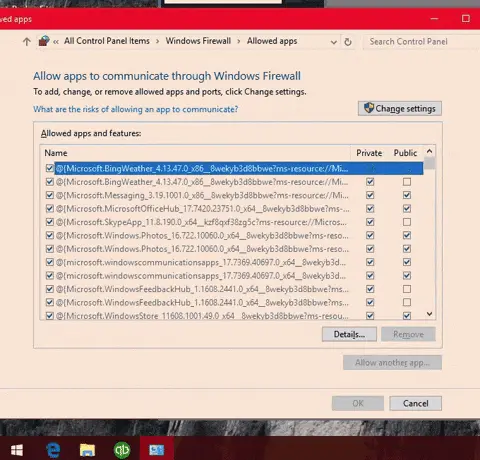
6. Configure the Windows Firewall Settings
As a system security application, the Windows Firewall may block your QuickBooks program and trigger QuickBooks error code 15276 when attempting to update the payroll services or QuickBooks Desktop. Thus, you must configure the Windows Firewall for QuickBooks Desktop and ensure you can run the updates seamlessly.
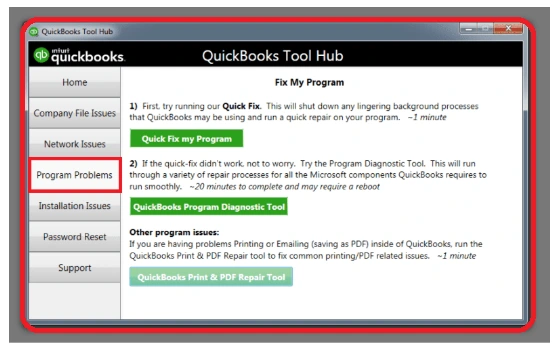
7. Run Quick Fix my Program
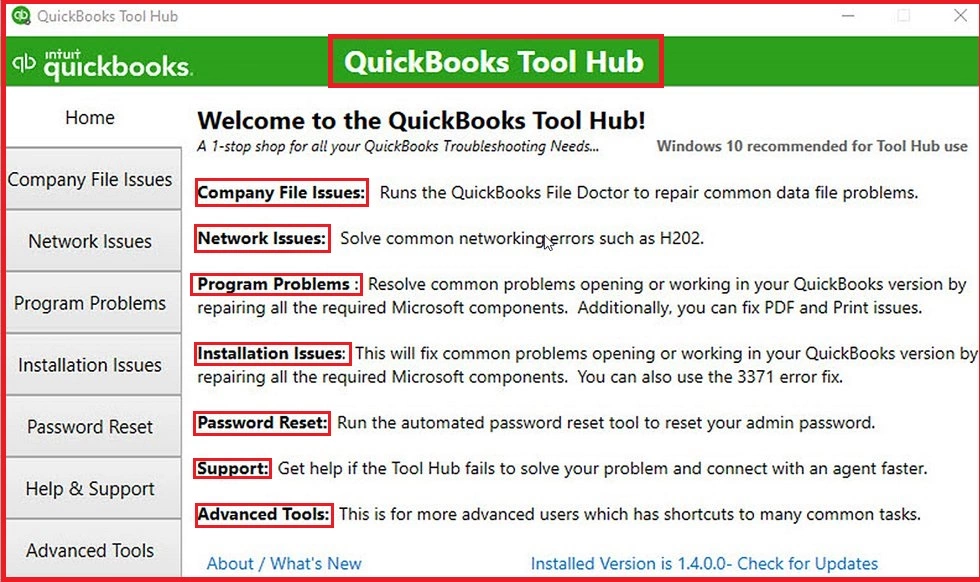
The Quick Fix my Program will shut down any of the background processes hamoering the update and also run a quick repair on your QB program. To access the tool, ensure to download and install QuickBooks Tool Hub to its latest release.
Select Program Problems in QuickBooks Tool Hub.
Hit on Quick Fix my Program.
Once done, launch QB Desktop and then your company file.
Now, try again to download the payroll updates again.
If you still see the error, try these:
Exit the QB application.
Navigate to C:\ProgramData\Intuit\QuickBooks XX\Components.
Note: XX represents the QuickBooks Desktop version you use. Fox example, QuickBooks Desktop 2023 is DownloadQB23.
Right-click on Components, then select Delete.
Launch QuickBooks Desktop and navigate to the Help menu.
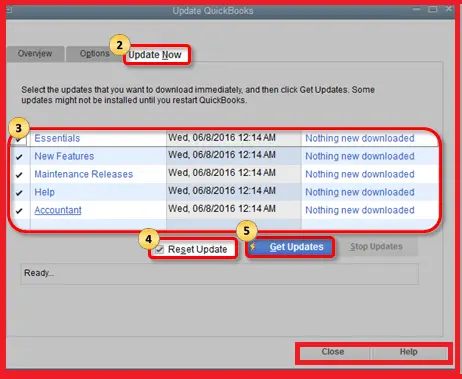
Choose Update QuickBooks Desktop and go to the Update Now tab.
Mark the checkbox for Reset Update checkbox.
When the download is complete, close and open your QuickBooks again.
Move again to the Help menu and select Update QuickBooks Desktop.
Select the Overview tab and click on Update Now.
8. Repair QuickBooks
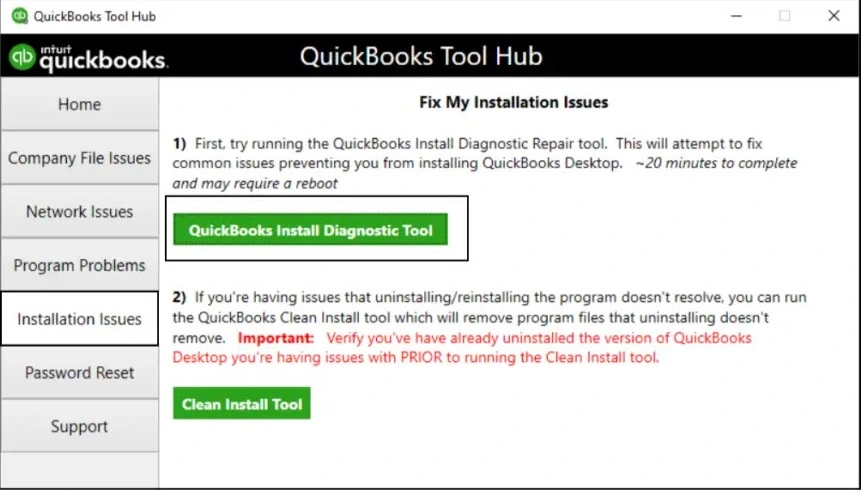
You may experience issues when attempting to utilize QuickBooks if there was an issue with the installation process. To resolve typical install problems, use the QuickBooks Install Diagnostic Tool.
Click on Installation Issues in QuickBooks Tool Hub.
Select QuickBooks Install Diagnostic tool. Let the tool run until it completes. It usually takes up to 20 minutes.
When the tool finishes, restart your computer and launch QB Desktop and open your company file.
When you re-install QuickBooks Desktop, it will automatically rename the existing folders and replace them with new ones to fix QuickBooks error code 15276. Also, this will not affect your data at all.
Let’s proceed to the below steps to re-install QuickBooks:
Launch the Windows Start menu and search for Control Panel.
Hit the Enter key.
Click on Programs and Features or Uninstall a Program.
Now, choose your version of QuickBooks Desktop you want to remove from the list of programs.
Hit on Uninstall/Change, Remove and click Next.
If you can’t find the option, sign out and sign in again to Windows as an admin (or a user with admin rights).
b. Install QuickBooks Desktop again
When you’re done, install QuickBooks Desktop. When you install again, QuickBooks will automatically install new folders and rename your old ones.
Note: If you need to install or move QuickBooks Desktop to another computer, we’ll show you how you can do it with the migrator tool.
Keep your computer connected to a strong internet connection.
Locate the QuickBooks program file QuickBooks.exe.
Now, select
Express install – This will install QuickBooks over your old version and save all of your preferences. To access your prior version, you will need to reinstall it using custom install.
Custom and Network Options – This enables you to maintain older versions installed while installing the current version in a different location. The new version does not incorporate your choices from the previous version.
Hit on Next and select Install.
Once done, select Open QuickBooks.
Summary
The outdated payroll services mean not having current tax tables or up-to-date tax rates and hampering the payroll management of a business. This detailed guide discusses the possible factors triggering QuickBooks error code 15276 and the best ways to address it. We hope this has helped you get back to your business.
Meanwhile, connecting with an expert is recommended if you get stuck somewhere or are seeking professional assistance. Dial +1-866-500-0076 and talk to a QB advisor now!
It is crucial to update the payroll service within the QuickBooks application. It makes the latest tax rates accessible to keep your payroll calculations accurate. When updating payroll service, you may encounter QuickBooks payroll error 30159. The error mainly occurs due to the incorrect file setup in your Windows operating system. These files play a crucial role in updating the software.
This error can disrupt your payroll management, and therefore, you need to take timely action. Here, we will explain the potential reasons behind QuickBooks Desktop error and suggest some effective solutions to eliminate this technical nuisance.
What Does QuickBooks Error Code 30159 Signify?
Let’s develop a fair understanding of the QuickBooks error 30159 before advancing any further. This error code appears in an error message “can’t verify your payroll subscription” and makes it difficult for the users to run the payroll service. An inactive payroll service is a prominent factor that can give rise to this problem. There are a variety of other possible factors that can cause error 30159, such as damaged QuickBooks files, disabled EIN status, virus attack and several others.
Factors To Blame For Causing QuickBooks Update Error 30159
The inability to verify your payroll subscription, mainly due to accidental deletion of one of the EINs, can trigger error 30159 in QuickBooks. Some other possible factors that can promote this error are stated below:
Damaged Paysub.ini File
The Paysub.ini file, also referred to as the payroll activation file, stores crucial information related to the payroll subscription. When the file gets damaged, you may experience difficulty when renewing the subscription.
Inactive Payroll Subscription
To run your payroll processes, you need to have an active QuickBooks payroll subscription. However, if the subscription is expired or inactive, it becomes challenging to update the payroll service.
Incorrect PSID
A PSID is the unique number assigned to each payroll processing entity. This number is used by a payroll system to categorize your company into groups for payroll processing. Based on the size of the company, you can have many PSIDs. However, you need to keep in mind that the correct PSID is used in the company file, or you may experience QuickBooks payroll error 30159.
Wrong EIN in Company File
EIN stands for Employer Identification Number and is used by the Internal Revenue Service to identify business entities and track their tax information. It plays a crucial role in payroll processing as well. An incorrect EIN number can cause a problem with QuickBooks payroll service.
Damaged Company File
The primary company (QBW) file that stores the crucial information about your business accounting needs to be intact. However, if damaged or corrupt, QuickBooks error message 30159 can appear on your screen.
Outdated QuickBooks Software
Using an outdated version of QuickBooks software can invite a wide range of technical issues. If you are running an outdated program, it means you have missed out on the latest security updates and improvements.
Incompatible Windows With QuickBooks
Compatibility issues between QuickBooks and Windows can also make you prone to receive error code 30159 in QuickBooks. The software updates use Windows components. However, damaged or outdated components can hinder the update process.
Symptoms Of 30159 Error in QuickBooks Desktop
Like any other error in QuickBooks, error code 30159 also shows some apparent signs that can help you determine the problem. Check the list:
An active window crashes on the arrival of the error message on your screen.
The error message also adversely affected the system’s performance.
As you try to run the program, you may notice repeated instances of the system crashing.
An alert message, including the error code 30159, is the most apparent sign that confirms the error.
How To Fix or Troubleshoot The QuickBooks Error 30159?
Now that you are fully aware of the kind of error you are dealing with, we are all set to move ahead with the error resolution. Let’s implement the powerful solutions to eliminate the QuickBooks payroll error 30159:
Solution 1: Check Your Payroll Subscription Status In The First Place
Trying anything to resolve the error is useless if your payroll subscription is inactive. It is the foremost thing you need to examine by implementing these steps:
In QuickBooks software, go to the Employees section and select My Payroll Service.
Accounting and Billing is the next option you need to choose while moving ahead.
Thereafter, enter your login credentials in the respective areas and hit the Sign In tab.
Now, in the “Confirm your account information” window, you may choose a suitable method to verify your identity.
Based on the chosen option, you will get a confirmation code on your email or phone number.
After receiving the code, click the Continue button.
Moving ahead, enter the 6-digit verification code in the given area and click Continue.
Once you are signed in, try updating the payroll service from within QuickBooks.
If it doesn’t fix the error 30159 in QuickBooks Desktop, try fixing the other factors.
Solution 2: Rename the Paysub.ini File To Fix The Payroll Update Error
A damaged Paysub.ini file can cause trouble when initializing the payroll service. Renaming it will create a fresh copy of the file that is free of damage. You can rename the file with the help of these steps:
Go to the My Computer and then select the Organize option.
Advance in the procedure by selecting the Folder and Search tab.
Thereafter, you are supposed to click the View tab.
Next, click the Hidden Files and Folders option, which will allow you to see the files and folders that are hidden.
Confirm your choice by selecting Show Hidden Files, Folders, and Drivers.
Moving ahead, click Apply, followed by clicking the OK button.
Move back to the My Computer section and enter “Paysub” in the search bar.
When the file appears in the result, right-click on it and select Rename from the drop-down menu.
Now, using the Rename option, add “.old” at the end of the file name.
The file will name will now look like paysub.ini.old.
If it doesn’t resolve the issue, it means some other factor is responsible for the error.
When in the Update window, click the Update Now option.
Also, mark the checkbox for Reset Update, and it will remove the previous updates.
Now, clicking the Get Updates button will start the update process.
After the update is completed, reopen QuickBooks Desktop software.
If you are still facing the issue, updating QuickBooks can bring your accounting software to its optimal health.
Solution 4: Check and Edit An Incorrect Payroll Service Key
Using an incorrect service key can give rise to an error when updating the payroll tax table in QuickBooks. You can check and edit the service key with these steps:
Close all the company files and restart your PC to terminate all the undesired applications.
Thereafter, launch the QuickBooks software and go to the Employees menu.
Next, select My Payroll Service, and then you need to click the Manage Service Key option.
Here, you need to check and confirm that the Service Name is correct and the Status is showing as Active.
Check your service key number, and if it is not correct, you need to enter the correct one.
After that, click the Next button and unmark the checkbox for the Open Payroll Setup box.
In the end, click the Finish button to conclude the procedure.
After entering the correct service key, try updating your payroll service without receiving the QuickBooks error code 30159.
Solution 5: Verify Data Integrity and Rebuild The Damaged Data
A damaged QuickBooks company file is also a prominent reason for promoting the payroll error 30159 in QuickBooks. You can run the Verify and Rebuild Data utility to detect and resolve the data damage in the company file by implementing these steps:
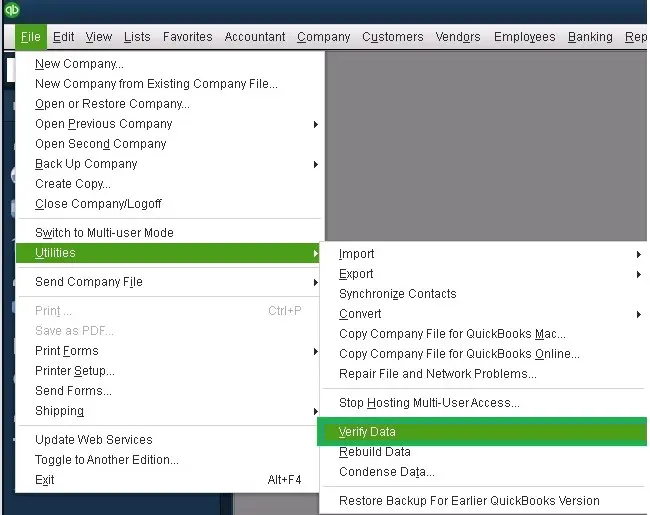
Go to the QuickBooks File menu and select the Utilities option next.
Now, opt for the Verify Data option and click OK when you are asked, “Do you want to continue?”
On enabling the Verify Data utility, it will scan your company file for possible damage.
If it doesn’t detect any issue, you don’t need to run the Rebuild Data.
However, if the damage is detected in the scan, you need to rebuild this data.
Again, click Utilities from the File menu and select Rebuild Data.
After creating the data backup, you can run the Rebuild Data utility, and a progress window will appear.
After the rebuild process, you are recommended to run the Verify Data utility again to ensure that the data integrity is now intact.
After repairing the company file, perform the same procedure that was giving the error and check if the problem is fixed or not.
Solution 6: Fix The Inactive EIN Status
Add the correct EIN number to the company file by executing the below-listed steps:
Start the QuickBooks software login procedure using the correct credentials.
After that, click the Payroll option to advance.
Use My Existing Payroll Service is the next option you need to choose.
When the Account Maintenance window appears on the screen, click the Add File option.
Subsequently, click the radio button against the add EIN number option.
A disabled radio tab implies that you have already subscribed to the company’s EIN number.
Click Next and Review all the information to ensure that everything is correct.
In the end, open QuickBooks and check the status of QuickBooks payroll error 30159.
Solution 7: Update Windows To The Latest Release
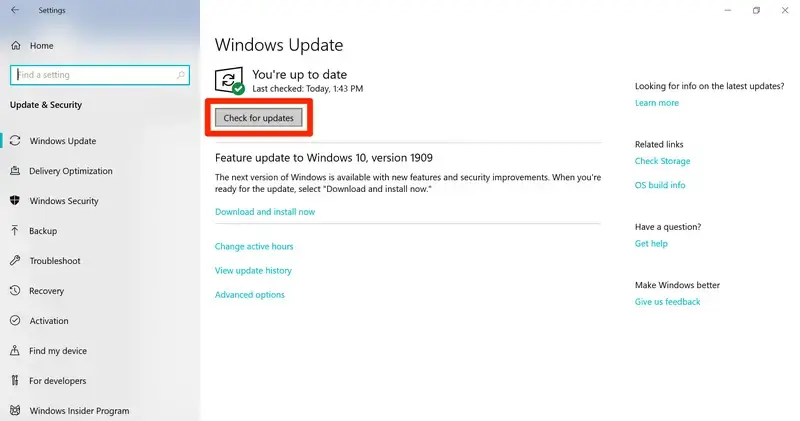
If your Windows is outdated, QuickBooks payroll will use outdated or incompatible settings or components. It can cause error 30159 in QuickBooks. Installing the latest Windows updates will resolve this problem:
The procedure starts with clicking the Start key on your keyboard.
Now, you need to type “Update” in the Windows search box and click Enter.
After that, the system will check for the available updates.
If an update is available, you can see it on your screen.
Install the pending updates and wait for the process to complete.
After the complete installation of the update, restart your system.
Now that you have the most recent version of Windows installed update the QuickBooks payroll service with full compatibility.
Solution 8: Run QuickBooks File Doctor For The Error Resolution
If the damaged company file is hindering the payroll update process, you can repair it with a powerful tool known as QuickBooks File Doctor. You can access the file doctor from within the QuickBooks Tool Hub if it is already installed in your system. Otherwise, you need to install the Tool Hub to bring the QBFD tool into use.
Visit Intuit’s official website, where you can get to download the latest version of QuickBooks Tool Hub.
Once you see the download link, click it and save the downloaded file to a suitable location.
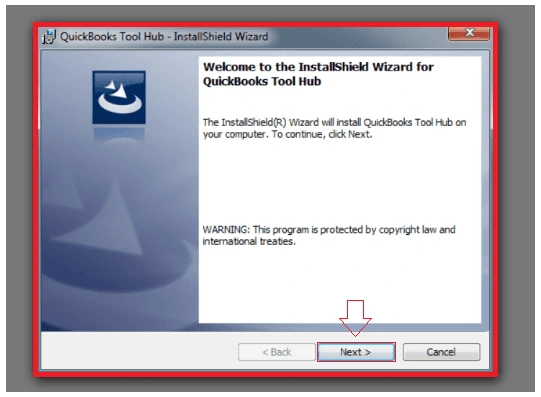
Next, you need to run the installation file (QuickBooksToolHub.exe) from the same location.
Follow the on-screen prompts and agree to the terms and conditions after the successful installation.
Open QuickBooks Tool Hub and locate the section wherein different issues related to the program are listed.
The option you need to click is “Company File Issues.”
It will allow you to run the QuickBooks File Doctor tool.
Let the tool scan the file for the damages and repair them.
It is a completely automated process and can take up to 20 minutes based on the size of the file.
Besides, the complexity of the problem can also alter the total time taken to finish the process.
After executing this procedure, check the status for the QuickBooks payroll update error 30159.
Solution 9: Run Windows System File Checker
System File Checker utility in Windows checks the issues with files on your computer. Below is how you can make it work:
Make sure that you have full admin credentials for the system before you start.
Now, click the Start button on your Windows computer to move further.
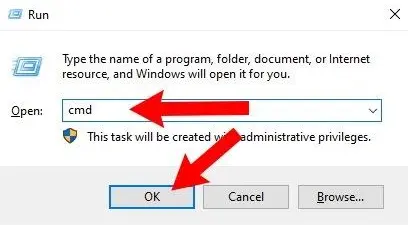
Next, press the Windows + R keys together, and it will open the Run window.
In the blank area, type “CMD” and click the Enter button.
Next, you will see a black screen with a blinking cursor.
Using this cursor, type “sfc/scannow” and click Enter.
The entire process will take a few seconds.
On A Final Note!
Users struggling with QuickBooks error 30159 can fix the error using the solutions explained in this post. After fixing the error, you can get the latest payroll tax table update and handle your payroll processes without becoming prone to errors. Moreover, efficient management of the payroll processes keeps your workforce happy, and they deliver great efficiency at the workplace. If you are still experiencing the problem or need someone to guide you through the process, connect with the QuickBookSupportNet experts at +1(866) 500-0076and receive instant help.
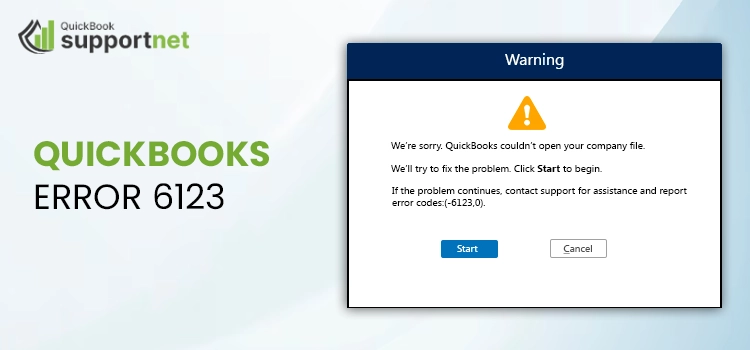
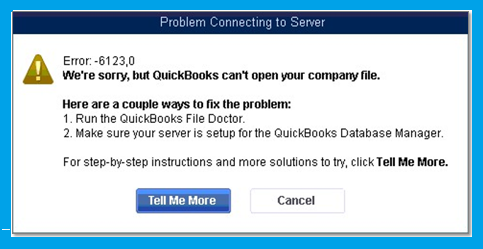
Most often, users might receive QuickBooks Error 6123 when upgrading or opening a company file. As a result, when the error occurs, the following error message appears: “We’re sorry, but QuickBooks can’t open your company file.” This company file issue might occur due to inadequate firewall permissions, damage in data files, or interruption due to third-party applications. Every time this error appears, it prevents users from accessing the data file. So, if this issue is also causing trouble while accessing files, don’t worry. Read this post thoroughly and gain all the essential details to address the problem.
Why Does Error Code 6123 in QuickBooks Desktop Appears?
The users might confront Error Code 6123 in QuickBooks Desktop due to numerous reasons, which are as follows:
Inadequate Folder Permissions:-
The issue may arise when the user doesn’t have enough permissions to the QuickBooks folder that carries the company file. Therefore, users must have proper administrative rights to access the data file accurately.
Issues At the End of Windows Firewall or Third-Party Software:-
Conflicts due to incorrect Windows firewalls or third-party software are among the reasons for QuickBooks Error Code 6123.
Using the Older QuickBooks Desktop Version:-
Another major reason that causes the QuickBooks Company File Error 6123 is using the QuickBooks version which is not up-to-date. As a result, the older QuickBooks version creates issues when opening the latest company file.
Changing the Location to Save the File:-
Moreover, QuickBooks Error 6123 might appear when you try to restore the backup through an online or an external storage device.
Presence of Damage or Corruption in the Data File:-
Sometimes, the issue might trigger due to the presence of damage or corruption in the company file.
Interference Due to the Network Connectivity:-
Poor or unstable internet connectivity might obstruct users from opening QuickBooks company files.
Key Considerations Before Resolving Error 6123 0 QuickBooks
Before you fix Error 6123 0 QuickBooks, it is necessary to consider a few important points for immediate resolution.
Get the latest version of QuickBooks and Windows operating systems on your workstation.
Also, ensure that you have established the backup of your data file to safeguard your data from getting lost.
Verify that the QuickBooksDBXX service is running accurately on your device.
Effective Solutions to Rectify Error 6123 QuickBooks Desktop
To deal with the Error 6123 QuickBooks Desktop, properly use the solutions given below.
Solution 1: Use the Up-To-Date Version of the QuickBooks Desktop
Sometimes, users might have issues opening company files, such as QuickBooks Error Code 6123, while using the QuickBooks version, which doesn’t exist. So, to regain access to the company file, it is necessary to get the latest QuickBooks version. To get a complete insight into updating QuickBooks, read this post.
Solution 2: Start Running the QuickBooks Tool Hub To Resolve the Issue
Users often get QuickBooks Error Code 6123 while trying to open, upgrade, or restore their company files. Therefore, to fix this issue, running the Quick Fix My Program and File Doctor tool is essential.
Begin Downloading QuickBooks Tool Hub
QuickBooks Tool Hub is a one-stop solution that offers numerous tools, such as Quick Fix My Program and File Doctor tool, to configure the damages with the file. Therefore, to get this tool, you must perform the following steps.
Initially, get the latest version of the QuickBooks Tool Hub (1.6.0.8) from the Intuit website.
After that, once it gets download, move on to the Download section and double-tap on the QuickBooksToolHub.exe.
Thereon, reviewing the License Agreement thoroughly. Furthermore, use the on-screen instructions for installing QuickBooks Tool Hub seamlessly.
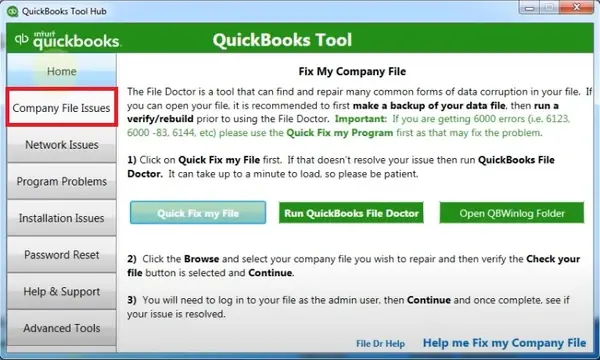
Steps to Use the Quick Fix My Program
First, you must open the QuickBooks Tool Hub that you have previously install on your computer. Then, choose the Program Problems tab.
After that, move to the Quick Fix My Program tab and wait for some time to run the tool.
Once the tool finishes repairing, launch the QuickBooks application and see if the issue exists.
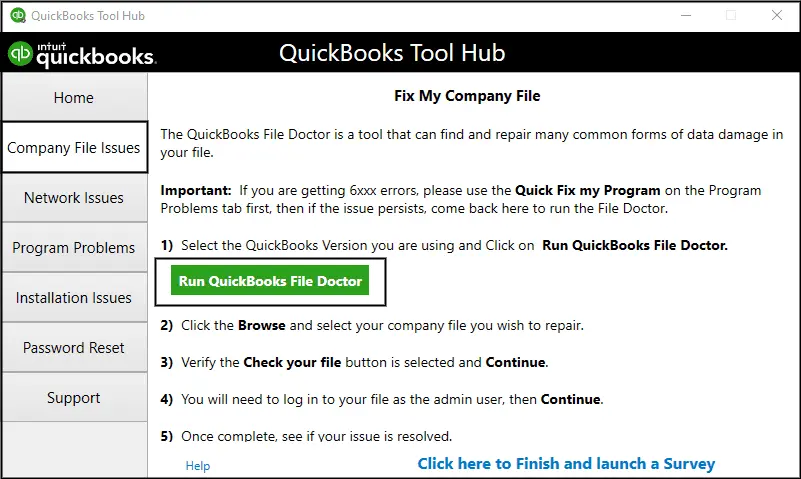
Instructions to Run the QuickBooks File Doctor Tool
Even after running the Quick Fix My Program, if you cannot fix the issue, you can use the File Doctor Tool. You can run the File Doctor tool and address the common QuickBooks Desktop data file issues smoothly.
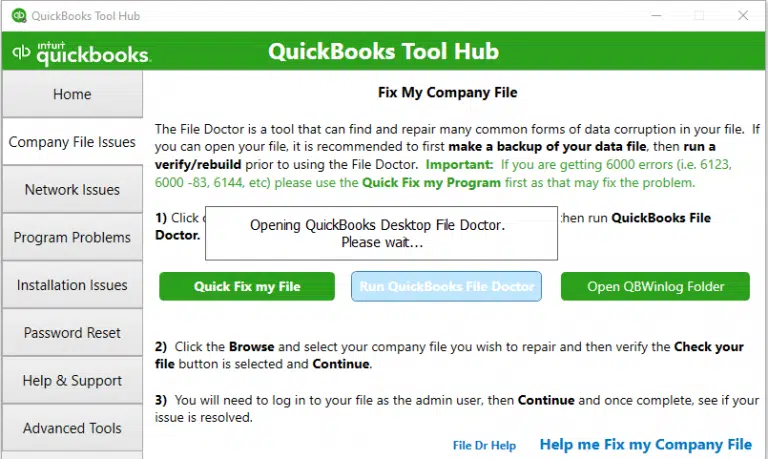
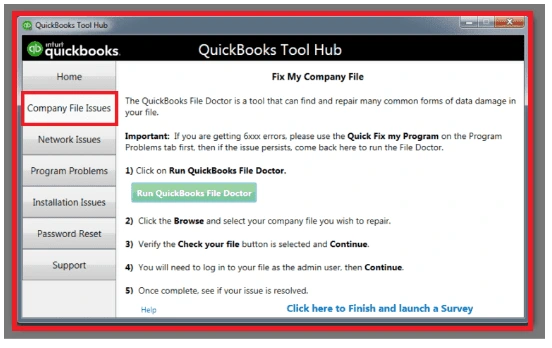
Open the QuickBooks Tool Hub on your workstation and click the Company File Issues tab.
After that, choose the Run QuickBooks File Doctortaband pick the company file creating issues. If you have any problem in getting your data file, hit the Browse tab to get it.
Now, opt for the Check your file option and then click the Continue tab.
In the next step, correctly mention the QuickBooks admin password and choose the Continue tab. As a result, the QuickBooks File Doctor tool will start fixing the issues with the company file.
Next, when the repairing process is over, choose your data file from the list of options. After that, hit the Open QuickBooks tab.
If you notice that the data file is opening without trouble, everything is going great. Only you have to generate the backup of the company file to let it open on your device.
Otherwise, try another solution if you fix the data file issues using the File Doctor and still get the QuickBooks Error Code 6123.
Solution 3: Try Restoring your QuickBooks Data File Via Hard Drive
There are certain instances when the users start receiving QuickBooks Error 6123 while restoring company files from the backup, which isn’t present on the hard drive. Therefore, storing a copy of the backup file in an external storage device is essential to resolve the issue. If the file is saved in any other location, it might create issues.
Firstly, start copying the .qbb file available on the network, external or online.
After this, make sure that you won’t open the file if it is available in some other location.
Now, paste the file you copy to an easy-to-access location on your hard drive. The location of your company file can be your desktop.
Thereon, you must initiate restoring the data file from the backup using these steps.
Open the QuickBooks application, hit the File menu, and then the Open or Restore Company.
Start clicking on the Restore a backup copy and then tap on the Local Backup option.
Next, search for the backup company file with the file name [Your Company name].qbb.
Afterward, you must open the folder to save the restore company file. Later on, opt for the Open tab to go further.
When all the necessary changes are done, confirm them by hitting the Save tab. Even after that, if you are receiving messages for overwriting your data, pick the relevant option as per your choice. Herein, you must not overwrite anything in the file unless you have an idea what to do.
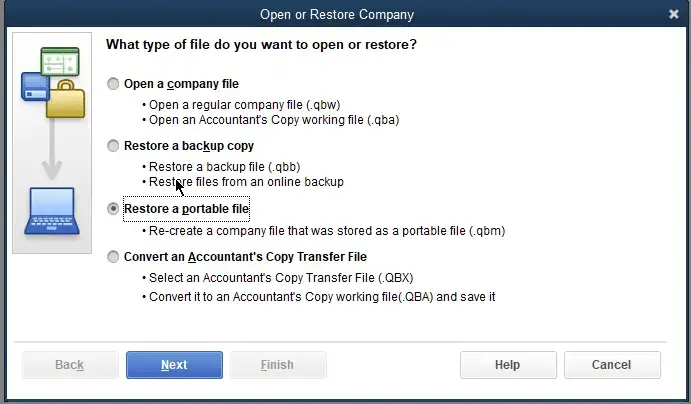
Solution 4: Restore Your Backup File Via Portable Company File
It is necessary to generate a new portable company file if you wish to generate the portable company file on the new computer. After this, you can recover the old file from the new portable file.
The users must launch the QuickBooks on their old workstation and then hit the File menu.
Then, after tapping on the Next tab, start mentioning a new name for your data file.
Now, pick the suitable location for storing the company file and save them by hitting the Save tab.
Thereon, shift the portable company file to a new computer where you have to restore the backup.
Next, open the QuickBooks application again, tap the File menu, and restore a portable company file.
Afterward, begin looking for the portable company file with a .qbm extension and click the Open tab.
Moving on, thoroughly review the instructions from the “Where do you want to restore the file” page.
At last, hit the Next tab and then the Save option before launching your data file.
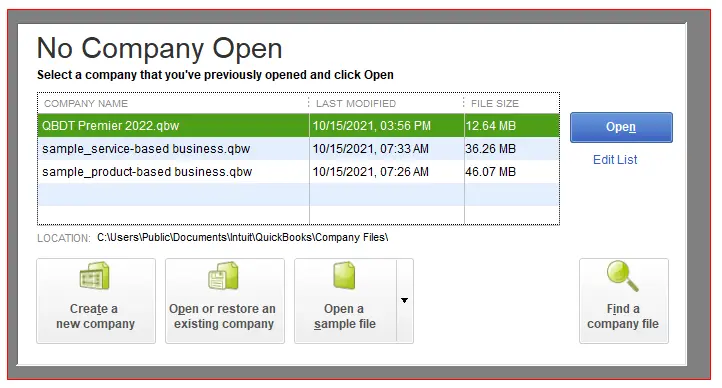
Solution 5: Shifting the Company File To a New Location
To change the location, right-click on the desktop to pick the New option and then the Folder option.
Once you create the new folder, assign a new and unique name to it so that you can spot it easily.
After that, ensure the file is save in an appropriate folder.
Thereon, start copying the file using the Ctrl + C keys and then paste them to a new folder.
At last, try opening the company file from a new location. If you are able to open it, the issue lies with the company file.
Solution 6: Inadequate Permissions to Access the Company Files
In certain scenarios, the users start getting stuck with Error 6123 0 QuickBooks when the users don’t have enough permissions to access or update those files. Therefore, to regain access, users must log in as admins. So, for that, you must follow the steps given below.
Before starting the process, ensure that all the previous tasks on your system are over.
After this, relaunch your computer and search for the QuickBooks program you wish to run.
Thereon, you must right-click on the QuickBooks icon and then hit the Run As Administrator option.
Finally, you must get the up-to-date version of the QuickBooks Desktop; it will avoid data corruption from the company file.
Taking Everything Into Consideration!!
So, that’s all you must know about the root causes and then troubleshooting solutions to rectify QuickBooks Error 6123. Thus, it will help you easily access data files to continue with your day-to-day business operations. Furthermore, if you are still getting the error, talk to our proficient QuickBooks experts, who will help you fix it. You can contact our experts at +1-866-500-0076 anytime and find the appropriate solutions within no time.
You may encounter the QuickBooks Alt Key suppress error when trying to open the company file by suppressing QuickBooks after seeing the unrecoverable error or bypassing the error itself using the Alt key. The QuickBooks unrecoverable error occurs when you:
Open or close a file
Save a copy (backup or portable copy)
Choose any menu option, button, or link in QuickBooks
Update QuickBooks (program or payroll update)
Run file utilities (Verify, Rebuild, or Collapse)
If you experience the same and are wondering what to do, this guide will help you. Read this detailed guide that explains when you might encounter Alt key press errors and troubleshooting steps to help fix even unrecoverable errors.
What Causes an Unrecoverable Error in QuickBooks?
The QuickBooks Alt Key Suppress error occurs when trying to bypass an unrecoverable error; the underlying cause for both is the same. Let’s discover the possible reasons causing the failure to open QuickBooks, company files and hamper other processes:
Running QB processes in the background
There might be some damage to your company file
QuickBooks Desktop might not be up-to-date with the latest release
Damaged or corrupted QuickBooks user
The file might be long, or the folder holding the company file might be damaged
Any damages to your QuickBooks program or installation is corrupted
Learn How to Troubleshoot QuickBooks Alt Key Suppress Error
Since the Alt Key Suppress Error occurs when a user fails to bypass the unrecoverable error using the Alt key, dealing with the underlying factors causing an unrecoverable error is required.
The section below covers the suitable steps to address the error and the Alt Key Suppress issue or you can contact QuickBooks professionals at TFN.
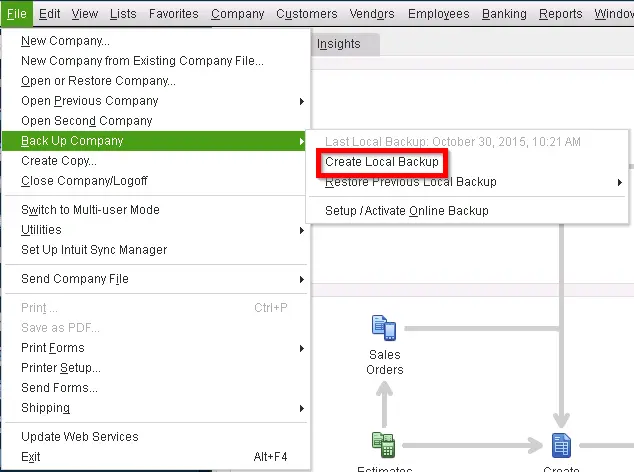
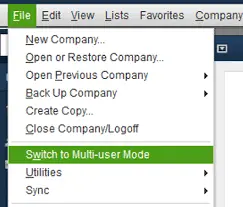
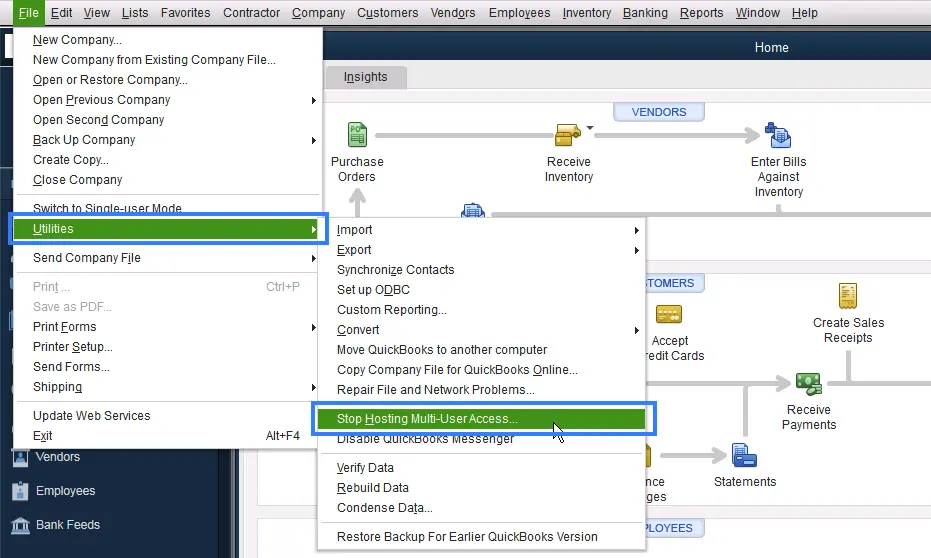
Select Switch to Single-user Mode and move back to the File menu.
Hover over Back up Company and click on Create Local Backup.
In the prompted window, choose Local backup and then Next.
Move to the Local Backup Only section.
Click Browse and choose the location to save the backup copy.
Now, you can set the number of backup copy you want (optional).
Note: You don’t need to pencil it in on your calendar. Simply choose the option in the Online and Local Backup section to set backup reminders.
This will run a test to the backup if it’s in good shape before saving.
When it’s done, click OK.
Choose Save it now and Next.
1. Open QuickBooks with all windows closed
QuickBooks will re-open any windows when closing the company file. If you have a large report or several windows to open automatically when starting up, the QuickBooks program may crash with an unrecoverable error.
Try again to open QuickBooks with all windows closed in the background:
Launch QB Desktop.
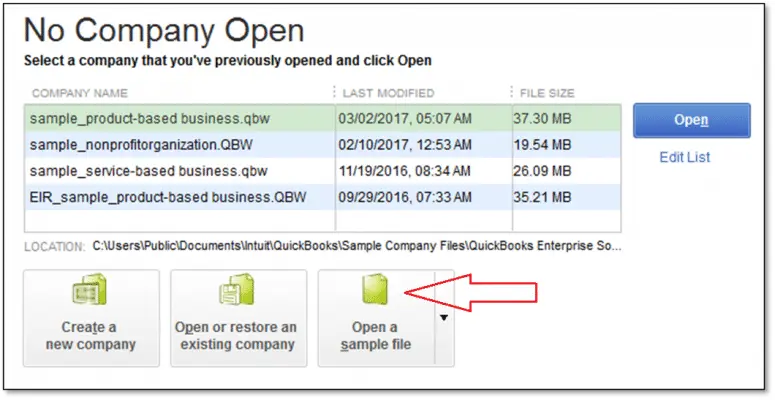
Choose your company file in the No Company Open.
Press and hold the ALT key and click Open to bypass the unrecoverable error. Keep the Alt pressed until the file opens. You might be asked to sign in, release the key and enter the password. Press and hold the Alt key again and click OK.
You may fail to bypass the error due to the QuickBooks Alt Key suppress error, which means the Alt key to suppress the windows in the background might not work, as discussed earlier. Proceed with the below steps to fix the Alt Key Suppress and unrecoverable error.
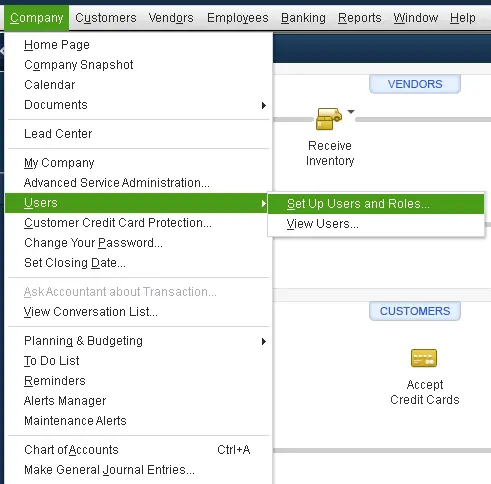
2. Use a different QuickBooks user
The QuickBooks user might be damaged; try to open your company file or QuickBooks with a different user:
Go to Company> Set Up Users and Passwords, then click Set Up Users. Enterprise users: Select the Company menu> Users then select Set Up Users and Roles.
Click on Add User…, type the username and password then select Next.
Note: Make sure not to use the damaged user.
Customize the QuickBooks user as required and then select Finish.
Navigate to File and click on Close Company/Logoff.
Sign in to the company file using the new credentials.
If this helps you to open the company file and QuickBooks, then delete the user you are having a problem with and create them again.
Note: If you see any error when opening the company file as an admin user, run the QuickBooks File Doctor.
You must download and install QuickBooks Tool Hub to access the utility, then run the File Doctor.
In the QB Tool Hub, select Company File Issues.
Hit on Run QuickBooks File Doctor. The tool might take one minute for the file doctor to open; wait until then.
Note: If you fail to open the File Doctor, search for QuickBooks Desktop File Doc and open it manually
Now, choose your company file from the dropdown menu. If you don’t see the company file, click on Browse and search to find your file.
Tap on Check your file (middle option only) and then Continue.
Enter the QuickBooks admin password to allow the tool to run the scan> Next.
The scan time depends on the company file size and may take 10-15 minutes. It may say the scan is unsuccessful, even if it is. Once the scan finishes, launch QuickBooks and your company file.
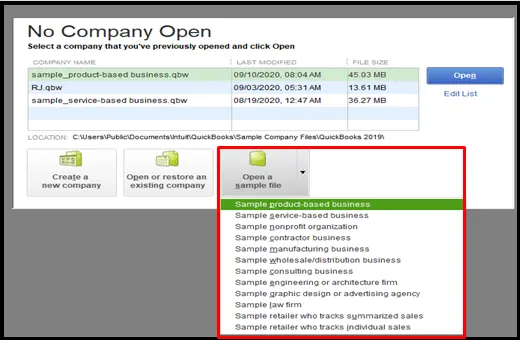
3. Open a sample company file
A sample company file helps you identify whether the problem is in your company file or in QuickBooks.
Let’s open a sample company file:
Press the Ctrl key; don’t release it yet.
Double-click on the QB program icon.
Hold the Ctrl key until the No Company Open window appears.
Select Open a sample file from the window.
Choose any of the sample files from the list.
If the sample company file opens and you don’t see the error, the company file might be damaged, or the folder is. Consider using a recent backup copy or ADR to restore your file.
4. Move your file to a different folder
Move your company file to a new folder to verify if the folder you opened the company file from is damaged.
Copy the company file to a different location:
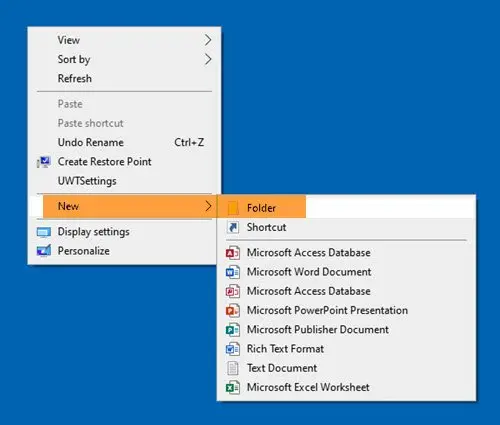
Right-click anywhere on your desktop and choose New.
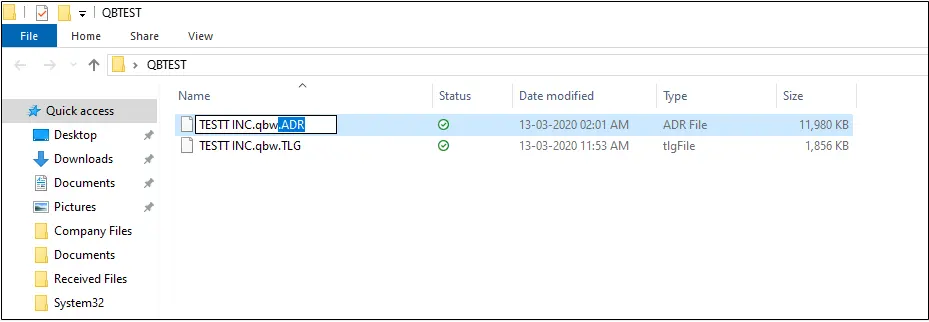
Select Folder and name this folder QBTEST.
Open the folder in the same location as your company file.
Right-click on the data file and select Copy.
Paste the file in the QBTEST folder.
Now, try to open the company file from the QBTEST folder.
If you don’t see an error when opening the company file from a different location, the company file folder might be damaged, or the path is too long. To fix the issue, you must create a new company file to save the company file.
5. Run Quick Fix my Program
The Quick Fix my Program shuts down the QB processes in the background and performs a quick repair on your program.
Launch QuickBooks Tool Hub and click on Program Problems.
Hit on Quick Fix my Program.
Open QuickBooks Desktop and try again to open your data file.
If you still see any unrecoverable error or the QuickBooks Alt Key Suppress error, run the QuickBooks Install Diagnostic tool to fix the installation issues. The utility will automatically diagnose and fix the issues with Microsoft components the QuickBooks program uses.
Open the QB Tool Hub.
Select the Program Problems menu.
Hit on QuickBooks Install Diagnostic Tool. The tool might take up to 20 minutes; let it run until it completes.
Once done, restart your computer and launch QuickBooks again.
6. Re-install QuickBooks Desktop
Re-installing QuickBooks Desktop renames the QuickBooks file folder and fixes the associated issues triggering the QuickBooks Alt Key suppress error or an unrecoverable error.
Hit on Programs and Features or Uninstall a Program.
Select the QuickBooks Desktop version you want to remove from the list of programs.
Choose Uninstall/Change, Remove and then Next.
If you don’t see any of the options, sign out and sign in back to Windows as an admin.
b. Install QuickBooks again
Make sure your computer has an active and strong internet connection.
Locate to QuickBooks program file QuickBooks.exe.
Select Express install – This will install over your old version of QuickBooks and save all of your preferences. To get your old version back, you’ll have to reinstall it using custom install. Custom and Network Options – This allows you to leave older versions installed and install the latest version somewhere else. The new version does not include your previous version choices.
Select Next and Install.
When it finishes, click Open QuickBooks.
Summary
The QuickBooks Alt Key Suppress Error is an issue that comes when you fail to bypass the unrecoverable error with the Alt key. The above article covered everything about the problem and the troubleshooting steps to address it. The solution will even help you deal with unrecoverable errors in different scenarios.
For further assistance or professional help, contact our QuickBooks support team on +1-866-500-0076. The experts are able to deal with the issue on your behalf and help you get back to the process.
Running a business is no easy task, and what’s even more complicated is managing the company’s important data and keeping it as secure as possible.
The same applies to managing your accounting or financial data using QuickBooks software. You may experience errors, potential data loss or corruption when opening the company file, or losing customer, vendor or employee lists, and you may face network issues when hosting the company file. But there’s no need to worry, as Intuit developers make sure you don’t have to deal with such problems and introduce users to the QuickBooks File Doctor tool – which identifies and quickly resolves company file and network-related problems.
Let’s take a look at this detailed guide and learn how File Doctor works and what to do when it displays test results on your screen to resolve the issue.
It’s common to worry about permanent data loss or corruption if a company file suddenly fails to open or host on the network. But don’t worry; connect with our QB professionals at +1-866-500-0076, who are available to guide you every step of the way!
What is QuickBooks File Doctor?
QuickBooks File Doctor is a utility that helps identify and address company file and network-related issues mainly due to possible data damage or corruption.
Before September 2020, the utility was available to download separately, known as a stand-alone version. Now, you must download and install Tool Hub, which works as a launchpad for various tools and utilities such as QuickBooks File Doctor, Quick Fix my Program, QuickBooks Install Diagnostic tool and others.
The File Doctor tool helps troubleshoot the common company file and network-related network-related errors, which we are discussing below, along with the instructions for using the tool.
Errors You Can Fix Using QuickBooks File Doctor
As discussed, the QB Desktop File Doctor utility helps resolve the issues associated with the company file and network connectivity issues when sharing the file with other users over the network. Let’s get an overview of the possible errors and issues the tools help to address and in what scenarios they encounters:
The error indicates a potential data integrity issue, which can be fixed by the QBFD or Verify and Rebuild Data utility.
You may also see “We’re Sorry. QuickBooks couldn’t open your company file” on your screen.
QuickBooks Error 6000 82
The error appears when opening a company file, indicating a problem with the company file itself, such as a damaged file or an incorrect file extension.
QuickBooks Error 6000 301
The error indicates the failure to open the company file, accompanied by a warning message stating, “An error occurred when QuickBooks Desktop tried to access the company file. Please try again.”
The error occurs due to corrupted or incorrect file path when opening the company file.
Network or hosting related errors
Issues when hosting the company file on the network with a warning message, “This company file is on another computer, but QuickBooks needs some help connecting” with a possible error code such as QuickBooks Error H202, QuickBooks Error H303, QuickBooks Error H505.
Missing or blank customer, vendor, or employee lists
Missing your customer or employee data in QuickBooks payroll.
Fixing Company File and Network Related Issues in QuickBooks
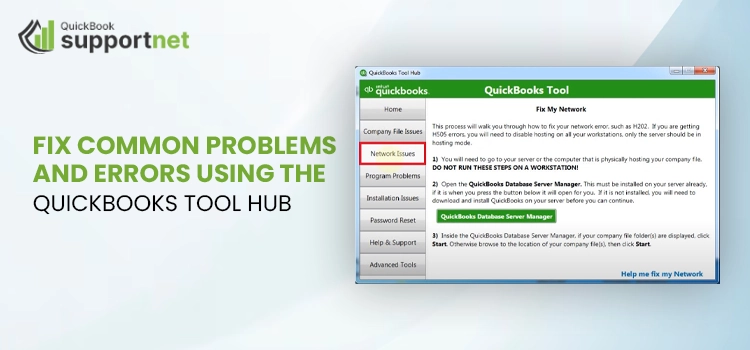
Now, we know what QuickBooks File Doctor is and what types of errors it comes in handy for. This section explains how you can download or install QuickBooks File Doctor and run it to identify or troubleshoot any specific issues and network connectivity problems you may encounter while opening or hosting a company file.
a. Download and Install QuickBooks Tool Hub
The QuickBooks Tool Hub is a launchpad for various tools and features that help troubleshoot issues and errors in QuickBooks, interrupting your financial and accounting operations. One of them is QuickBooks File Doctor.
To access the File Doctor tool, you must download and install QuickBooks Tool Hub in the most recent version and ensure that you use the latest Windows version in 64-bit to get the best out of it.
b. Run Quick Fix my file
Running the Quick Fix My File tool helps to get the best out of File Doctor in fixing the company file and network-related issues.
Hit on Company File Issues.
Click Quick Fix my File.
Select OK when it completes and launch QuickBooks.
c. Run QuickBooks File Doctor
The File Doctor tool identifies and runs a quick fix to the company file and network connectivity issues when opening a company file or hosting it on the network.
Select Company File Issues in QB Tool Hub.
Click on Run QuickBooks File Doctor. The tool might take up to one minute to open; wait until then.
Note: If the QuickBooks File Doctor doesn’t open, search for QuickBooks Desktop File Doc and open it manually.
In QuickBooks File Doctor, choose your company file from the drop-down menu. If you can’t find the company file, click Browse and locate to the file.
Hit on Check your file, then Next.
Allow the access, entering the QB admin password and then click Next.
The scan time of QB File Doctor depends on your company file size and might even take 10-15 minutes. The scan may states its unsuccessful even if the issues are fixed. Once the scan finishes, launch QB and open your company file.
Resolve network issues with QuickBooks File Doctor test results
The QuickBooks File Doctor tool is designed to recover damaged company files and help you identify and address common network or hosting issues. Check the results below after using File Doctor and learn how to resolve them.
Below are the different sections of each test result and how to resolve them; let’s begin.
1. Hosting mode is off
If hosting mode is disabled, you will eventually fail to host the company file on the network. Follow the steps below to ensure that hosting mode is enabled on the server computer:
Note: The main or server computer hosts your company file; other computers are connected. Thus, you must enable the hosting only on the server.
Launch QuickBooks on your server computer.
Choose File from the top menu bar.
Hit on Switch to multi-user mode to enable the hosting.
Now, check each of your workstations and repeat the above steps:
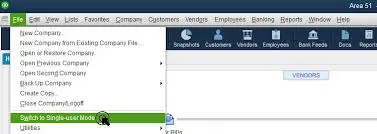
Launch QuickBooks on your server computer.
Choose File from the top menu bar.
If the option is, Switch to single-user mode; don’t select it.
Move to the next workstation, and if the option is Switch to multi-user mode, select it.
2. Folder containing the file is not writable or is not shared
Sometimes, the folder holding your company file does not have the right set of permissions to share with other users over the network.
Proceed with the below steps to set up a folder and Windows access permissions to share company files:
a. Setting up the folder permissions
Let’s set the QuickBooks file folder permissions correctly to ensure that the company file can be shared on a multi-user network:
Verify that permissions are set correctly
Launch the Windows Start menu on your computer.
Find the QuickBooks company file folder and right-click on it. Select Properties.
Choose Advanced from the Security tab.
Click on QBDataServiceUserXX then select Edit.
Configure the following settings to Allowed:
– Traverse Folder/Execute File – List Folder/Read Data – Read Attributes – Read Extended Attributes – Create Files/Write Data – Create Folders/Append Data – Write Attributes – Write Extended Attributes – Read Permissions
If the permissions aren’t set correctly:
Locate the QuickBooks company file folder and right-click on it. Choose Properties.
Click on Security and then Edit.
Select QBDataServiceUserXX, then hit on Full Control, Allow.
Choose Apply and click OK.
Change folder permissions
In case you want to adjust the file folder permissions:
Open the Windows Start menu and search for File Explorer.
Now, follow the steps below for each file folder. Keep in mind that you may not have all the folders, as some folders are version-specific.
Right-click on the folder and choose Properties from the drop-down.
Move to the Security tab and select Everyone.
Note: If you can’t find the Everyone option in the Group or User Name checkbox, select Add and type in Everyone. Then select OK
Choose Full Control and click on Apply. The, select OK.
b. Set Windows access permissions to share company files
You must ensure that QuickBooks has the right set of permissions to prevent issues in the future when hosting or working with your company files over the network on Windows.
Launch the Windows Start menu, type File Explorer and then hit Enter.
Locate the QB company file folder and right-click on it.
Choose Properties, click on Sharing and then Share Add.
Find and select the corresponding version of QBDataServiceUserXX.
Now, set the permission level of both users to Full Control and choose Share.
3. No network connectivity
Ensure to have at least one working TCP/IP adapter and the host-name of the local computer is resolvable.
4. Run IPConfig
The IPConfig tools verifies the TCP/IP configuration of your computer and helps to troubleshoot problems using QuickBooks on a network.
The most common IPConfig commands are:
Command
Descriptions
ipconfig
basic TCP/IP information
ipconfig /all
detailed TCP/IP information
ipconfig /renew
Renew the IPv4 address for all network adapters
ipconfig /release
Release the IPv4 address for all network adapters
To run ipconfig:
Click on the Windows Start button.
In the search field, type CMD and hit the Enter key.
This will open the Command Prompt.
Type ipconfig and press the Enter key.
For more information on IPConfig, type ipconfig /? at the command prompt or you can also visit port.microsoft.com,Microsoft.com is not an Intuit website.
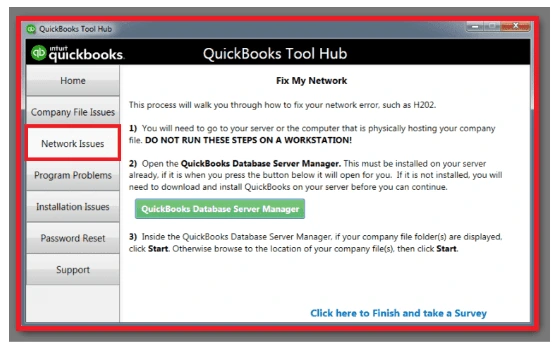
5. QBCFMonitorService/QBDBMgrN not running or Firewall is Blocking QuickBooks
You may fail to host your company file or encounter network errors if the firewall blocks internet access for specific QuickBooks programs or files. Updating the Windows Firewall to the latest release may also resolve the issue or you must configure the exceptions and ports needed for your Windows Firewall.
a. QBCFMonitor Service not running:
Configure the firewall settings to allow the 8019 port for running tools and QuickBooks applications on the server and workstations.
Check and ensure that hosting is enabled on the server computer.
Ping the server, as it must be successful for a successful connection between the client and the server.
b. QBDBMgrN not running:
Configure the Windows Firewall to open the dynamic database port for QuickBooks File Doctor and all other QB applications and tools. You should configure all client computers and your server.
Make sure you have turned on hosting on the server.
Ensure you can ping the server with IP and host-name on the server and all client computers.
Summary
Often, company file issues and network connectivity problems can hinder your operations, display unknown errors on your screen, and even cause potential data damage or failure to host the company file. Above, we explained how QuickBooks File Doctor will help you identify and resolve the problem and how to deal with network issues while hosting.
If the above steps seem challenging or require professional assistance, connecting with technical or QB professionals is advisable. Dial +1-866-500-0076 now to connect with a QuickBooks ProAdvisor!
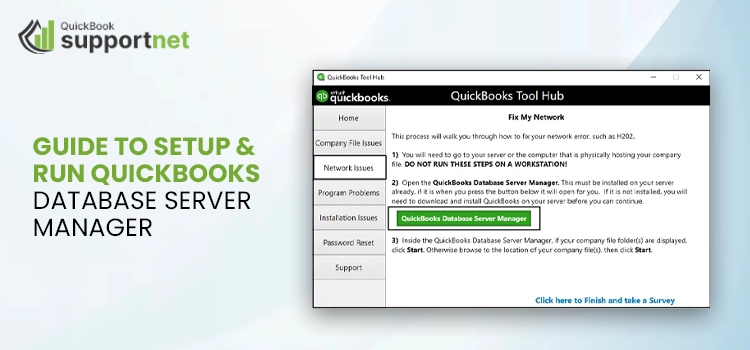
Have you decided to download and run the QuickBooks Database Server Manager? If so, this post will help you throughout. Undoubtedly, the QuickBooks or Intuit personal database manager tool creates network data files for all the company files on your host system. Also, if you run QuickBooks in multi-user mode, the QBDBSM is a must-have tool that allows multiple users to run the company files simultaneously.
In this post, we will discuss everything about the QuickBooks Server Manager, how to download, set up, and run it, what makes it worth using, and much more. So, let’s get started!
If you’re looking for a QuickBooks professional to assist you while installing QuickBooks Database Server Manager, dial the toll-free number +1(866) 500-0076. Get in touch with our QuickBooks live technicians for a one-on-one conversation.
What’s the Intuit QuickBooks Database Server Manager All About?
Intuit has rolled out an excellent feature, QuickBooks Database Server Manager. This tool ensures efficient and seamless multi-user access to work on the same company file. Apparently, if the QuickBooks Database Server is inactive, users won’t be able to run QuickBooks in multi-user mode, which will affect the sharing of company files with other network systems.
It’s because the database server manager develops the required network data (.ND) files for the host computer. Now, before we begin installing the QuickBooks Database Server, take a look at the related facts given below:
If you run multiple versions of QuickBooks Desktop software, you need to install every version of the database server manager QuickBooks.
As noted above, this database server manager develops network data files. These files are essential for creating and sharing the company files over other computers in the network system.
For running QuickBooks in multi-user mode, the activation of the database server manager is crucial.
The database server manager scans the company file, which is crucial for multi-user access.
To automatically detect the creation of new company files, the database server manager QuickBooks also verifies the space in the local storage device.
After the installation of the QuickBooks Database server, each of the QuickBooks versions will add one user.
Basic Requirements for QuickBooks Database Server Manager Download
Find the basic requirements that you must get on your system to seamlessly download and install the QuickBooks Server Database Manager in the section below:
Note – Linux and Windows 10 S modes aren’t supported on the QuickBooks Database server.
The 64-bit version of AfterWindows 11 and 10
Windows Server 2012 of Standard and Essentials version
Standard and Essentials Windows Server 2022
Standard and Essentials Windows Server 2019
Standard and Essentials Windows Server 2012 R2
Windows Server 2016 of Standard and Essentials version
To perform the QuickBooks Database server manager download and installation, you must have a stable and strong internet connection on your system.
Make sure you have a minimum of 4GB RAM disc space for a hassle-free installation.
Also, a processor of a minimum of 2.4 GHz is essential.
The computer’s display must optimized for 1280×1024 screen resolution.
In addition, you must get a maximum of 8GB recommended of RAM on your system to allow 1-5 users to access the same company file in QuickBooks multi-user mode.
Here’s How to Install QuickBooks Database Server Manager
After ensuring the above requirements on your computer system, now start performing the steps below to install QuickBooks Database Server Manager. Carefully perform the below download and installation:
Start this method by first ensuring all the background processes and Windows applications are closed on your computer. Also, make sure to disable or configure the Windows Firewall settings.
Next, navigate to the internet browser and visit the official Intuit website. Afterward, navigate to the QuickBooks Product Download page.
Following this, search for the Setup_QuickBooks.exe file and start downloading the file. Make sure you save this file on your computer’s desktop location.
Now, double-click this installer file to open it, and begin performing the on-screen instructions on your computer system. Here, you will also get a license agreement tab. Carefully read the given terms & conditions and agree to the same.
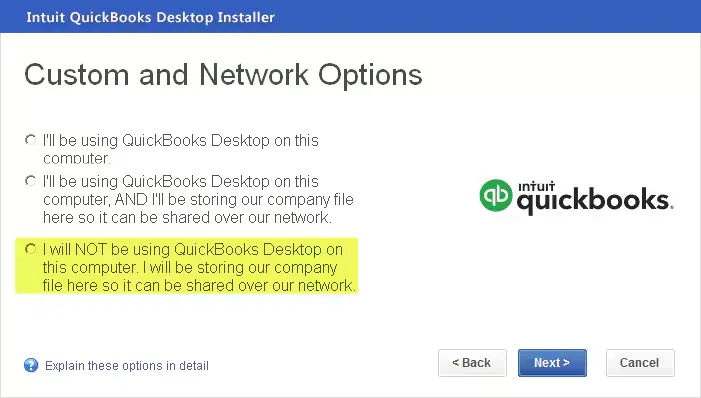
After this, you will be asked to choose the installation type. From here, you must choose the Custom or Network option accordingly.
Following this, you must hit the Next button and make sure you don’t select the Express option.
Once you’ve chosen the most appropriate alternative for network setup, click the Next option.
Here, if you wish to run both the QuickBooks database server manager latest version and the QuickBooks Desktop software, you must select the “I’ll be using QuickBooks Desktop on this computer” option. However, if you only wish to run the Database server manager on the server computer, click the “I will NOT be using QuickBooks Desktop” option.
Finally, you must follow the on-screen instructions and then click the Install button. This will allow the installation of the database server manager to begin.
Configuring the Settings of QB Database Server Manager
So, have you successfully installed the QuickBooks Database server manager latest version on your computer? If so, now you must undertake the below procedure to configure the default settings of the Database server manager:
Begin the configuration by first choosing the Windows button on your keyboard. By this, the Start menu of your Windows system will appear on your screen.
Next, within this Windows Search menu, you must type Services and hit the Enter key on your keyboard.
Following this, open the Services tab, and here, you must select the QuickBooksDBXX option to open.
Afterward, move to the General tab, and look for the Services status section. Now, here, if it’s set as Started or Running, you must change it to the Stop option.
Now, navigate to the Startup type drop-down menu, and from here, you must choose the Automatic alternative.
Next, move to the Logon tab and then opt for the Local System Account alternative. Moving on, move to the Recovery tab, and then choose the Restart the service option.
Following this, from the drop-down menus, you must select the First, Second, and Subsequent failures options.
Finally, you must go back to the General tab and choose the Start button again. This will restart the QB Database Server Manager service.
Easy Steps to Setup QuickBooks Database Server Manager
Now, let’s begin setting up the QuickBooks Database Server Manager so that you can seamlessly start running QuickBooks in multi-user mode. For this, you need to undertake the below stepwise method:
1st Step – Scan your Company File Folders
Initiate scanning your file folder on the server computer by first pressing the Windows button on your keyboard.
Next, type Database in the Search Programs and Files bar. Now, you must open the QuickBooks Database Server Manager.
Afterward, move to the Scan Folders tab, and then choose the Browse option to search for the folder where you wish to store your company files.
Once you select the folder, hit the OK button and hit the Start Scan option.
By this, the scanning process will begin, and you must wait till it successfully ends. Once the scanning is over, now the file folder will display the QuickBooks company files found option.
Click this option, and the QuickBooks company files found tab will appear on your screen. Within this tab, you will be able to access all your QuickBooks company files on your network computers.
2nd Step – Monitor your Drive Tabs
Now, you must move to the Monitored Drives tab within the QB Database server manager.
Afterward, you must tick-mark the boxes next to the hard drives where you have saved all your company files.
Following this, ensure that monitoring won’t be required for mapped drives.
3rd Step – Go through the Database Server Manager
After setting up the Database server manager, you must now go through the additional tabs to ensure seamless multi-user QuickBooks operations. These tabs are:
Database Server Tab – This tab will provide real-time status updates of the QuickBooks Database server tool. Also, this tab will display the latest connections.
System Tab – This tab is dedicated to the information related to the location of the Database Server Manager on your computer.
Features Available in QuickBooks Database Server Manager
Find below the impressive and advanced features available within the QuickBooks Database Server Manager. Take a look and learn how these features can help you run QuickBooks:
The Database server manager has features to help users easily connect their company files with the server network.
It notifies users about the total number of users accessing the company file at a time.
Users can access the Services Administrative option to adjust the service status and configure the settings of the QB database server manager.
The server manager also has automatic update features that automatically download the latest available updates for the Database Server manager.
Another remarkable feature of the server manager is the monitor drive feature that helps users update the tool after adding any new QuickBooks company files to the server.
That’s All!
So, that’s the QuickBooks Database Server Manager in a nutshell! Hopefully, this post has helped you learn about the Database server manager. If you prefer to run QuickBooks in a multi-user mode, we suggest you install this excellent Intuit Database server manager service on your server computer. However, if you find any difficulty or confusion while installing or running this service, consider contacting our QuickBooks Desktop technicians at +1(866) 500-0076. You can also access our Live Chat Support option for more information.
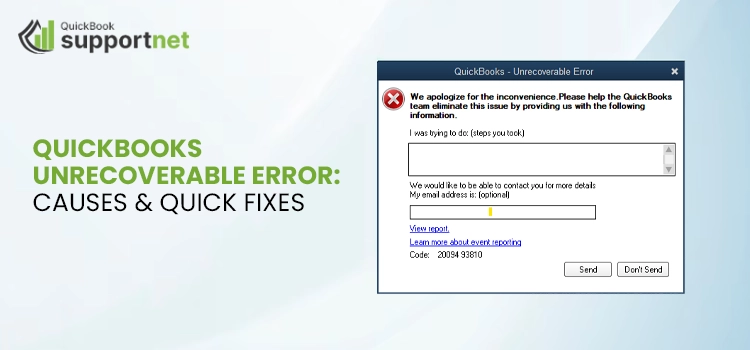
QuickBooks Unrecoverable error is the most common issue that many users might confront while performing different tasks. It might appear while opening the company file, emailing, printing, saving files as PDFs and importing the Accountant’s changes. Sometimes, this issue may also trigger while reconciling or running the rebuild utility. Most often, this issue appears because of damaged data or missing QuickBooks updates. Unfortunately, this issue comes without any prior indication and interrupts the entire ongoing task.
In this post, we have covered all the root causes and simple fixation ways to deal with the Unrecoverable errors in QuickBooks. So, let’s begin reading!
Finding the simple ways to eliminate QuickBooks Unrecoverable error right away? Ring our QuickBooks experts at +1(866) 500-0076, and our QuickBooks professionals will provide you with step-by-step instructions to figure out the issue quickly.
What Causes Unrecoverable Error In QuickBooks Desktop?
Most often, the users might get an Unrecoverable Error in QuickBooks Desktop while accessing the data file. This issue can also appear due to numerous other factors. So, let’s study all of them to fix it smoothly.
Working on an Incompatible QuickBooks version-
Sometimes, users might get the QuickBooks Unrecoverable error when using the QuickBooks version that isn’t available anymore. Therefore, it is necessary to get an up-to-date version of QuickBooks to open the company file easily.
Presence of Data Damage within the Company File-
If the company file you are trying to open contains damaged or corrupt data, it might restrain the users from opening the file. As a result, it starts giving an Unrecoverable error in QuickBooks.
Incomplete Window Updates-
In other cases, the issue may arise when you are working on the older version of the Windows operating system.
Interference of Windows Firewall or Third-Party Applications-
At times, the users might get the Unrecoverable error in QuickBooks if the Windows firewall blocks the access to the data file. It may also be possible that the antivirus application within your system isn’t allowing you to access the file.
Important Tips Before Fixing QuickBooks Desktop Unrecoverable Error
Following are the points that the users must note before fixing the QuickBooks Desktop Unrecoverable error.
The first and foremost step is to get the latest version of the QuickBooks Desktop.
Never skip to get the backup of your QuickBooks company file to safeguard your data.
Ensure that you log in to QuickBooks with the proper administrative rights.
How can you resolve the QuickBooks Unrecoverable Error using these Simple Fixes?
If you are still witnessing QuickBooks Unrecoverable error while performing your financial tasks using this application, then stop worrying. Instead, go through all the solutions carefully and fix the issue smoothly without any further delays.
Solution 1: Launch QuickBooks By Shutting Down Other Windows
If you have previously set to open the large report or windows automatically, then it will start throwing the Unrecoverable error in QuickBooks on the startup. Therefore, it is mandatory to stop all the background processes to run the QuickBooks smoothly. Use the below steps to close all the open windows.
Open your QuickBooks application and then pick the data file from the No Company Open window.
After this, keep pressing the Alt key and then hit the Open tab. You mustn’t leave the key till the time the company file opens up.
Thereon, if QuickBooks prompts you to log in, leave the Alt key and mention the password correctly. Once again, keep holding the Alt key and click the OK tab.
Solution 2: Opening the Company File Using Different QuickBooks User
Sometimes, opening the company file with the help of another QuickBooks user will help you prevent the QuickBooks Unrecoverable error.
Initially, you must hit the Company option and then the Set Up Users and Passwords tab.
Afterwards, switch to the Add User tab and mention the username and password accurately.
You have to modify the user according to the requirements and then tap on the Finish tab.
Thereon, opt for the File menu and then the Close Company/Logoff tab.
Now, you must log in to the data file with the help of the sign-in details. Later on, if the new user is able to work, remove the user who is creating issues and generate them again.
Windows Server 2012 and Later Version
Launch the Server Manager on your workstation and then click the Tools option.
After that, move to the Computer Management option and tap on the Groups option.
Thereon, hit the Groups tab from the Local Users and Groups sub-menu list.
Next, double-tap on the Administrators Groups and the Administrators Properties window will be launched. Then, choose the Add option.
Finally, mention the account that you want to link with the local admin groups and hit the OK tab.
Solution 3: Generating a Sample Company File
Creating the sample company file will help analyse whether the issue is with the company file or the QuickBooks application. Following are the steps for creating the sample file.
Firstly, keep pressing the CTRL key and tap on the QuickBooks icon twice.
After this, you must keep pressing the Ctrl key till the time No Company Open Window displays.
Now, choose the Open a sample file option and then pick any sample from the options given.
Thereon, if you see the file is opening without giving any error, it seems that there is some issues with your file or folder. So, to recover the damaged file, you must run the QuickBooks ADR Tool.
Solution 4: Shifting the Company File To a Different Location
Most often, users might get an Unrecoverable Error in QuickBooks due to a problem with the file in the folder. Therefore, changing the company file location will help you figure out whether the issue is with the location or the file itself. So, use the following steps to change the file location.
Firstly, right-click anywhere on the desktop, click the New and then the Folder option.
After this, name the folder QBTEST and go to the folder that contains your file.
Thereon, right-click on the QuickBooks file and hit the Copy tab.
Now, paste the file into the folder created in the last step.
Next, you must try opening the company file from the new folder.
If you didn’t see any error while launching the file through another location, it states that the folder is damaged. At that time, you must establish a new folder to save the file.
If the same issue arises after changing the location, then try another solution.
Solution 5: Start Running QuickFix My Program Via QuickBooks Tool Hub
You can run the QuickFix MyProgram Tool through the QuickBooks Tool to configure the damage in the program. For that, you must follow the following steps:
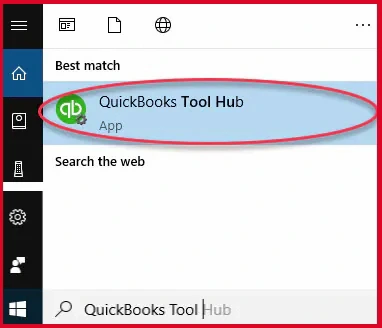
Initially, you must download and install the up-to-date version of the QuickBooks Tool Hub.
After this, open the QuickBooks Tool Hub and click the Program Problemstab.
Thereon, browse to the Quick Fix My Program option.
Finally, open the QuickBooks Desktop and then your company file to see if the Unrecoverable error still appears.
Solution 6: Try Reinstalling the QuickBooks Desktop application
Case 1: Unrecoverable error when opening a company file
If you are facing an Unrecoverable error while opening the company file, then you can try the following solutions to fix it.
Solution 1: Take the Help of the QuickFix My Program To Fix the Issue
To address the issues with the QuickBooks program, you must run the QuickFixMy Program tool. Use the steps given in the previous step to resolve the issue.
Solution 2: Avoid the QBCFMonitorService From starting on your PC
Initially, get the latest version of the QuickBooks Tool Hub if you don’t have one.
After this, launch the Run window by pressing the Windows + R keys together. Later on, mention the “services.msc” in the search console.
Thereon, double-click on the QBCFMonitorService from the options and then hit the Properties tab.
Now, browse to the Disabled option from the Startup Type drop-down menu.
Finally, all the changes are imposed by clicking Apply and then the OK option.
Solution 3: Fixing the Damages With the Installation of QuickBooks Desktop
In some cases, the QuickBooks Desktop Unrecoverable Error might occur due to the incomplete or damaged installation. So, to address the issues with the QuickBooks installation, you must run the QuickBooks Install Diagnostic Tool.
Case 2: PDF and Print-Related Issues in QuickBooks Desktop
There are certain instances when the users start getting the error while printing the reports, emails and other documents in QuickBooks Desktop. Therefore, to address this issue, you must implement the following solutions.
Solution 1: Start Using the QuickBooks PDF and Print Repair Tool
If you are getting the QuickBooks Unrecoverable errors while printing the documents, then running the PDF and print repair tool will fix the issue. Therefore, to use this tool, you must read this article.
Solution 2: Change the Temp Folder permissions
To make changes to the temp folder permissions, follow the instructions below.
First of all, open the Run window and insert “%TEMP% to bring up the Temp folder on your computer.
Now, right-click on the Temp folder to pick the Properties option and then the Security.
After that, you must verify that the user names and groups in Security have Full Control.
At last, when the permissions are set, try saving the PDF again in QuickBooks to see if the issue exists.
Next, you must verify if the XPS Document writer is able to print properly. For testing, follow the instructions below.
Primarily, launch the Notepad on your workstation and write Test.
Afterwards, go to the File menu and click the Print option.
Thereon, opt for the XPS Document Writer option and then the Print tab.
You must insert a filename in the search area and then save it to your desktop.
Return to your desktop and verify if the XPS Document Writer is printing from the Notepad.
If you are having difficulty printing to your XPS Document Writer, consult your IT experts instantly.
Solution 3: Construct a New Template or Form
Primarily, prepare a new template of your form on your computer.
After this, modify the template on your transaction using the available options.
Next, you must prepare your .pdf accurately.
Solution 4: Modifying the Properties of Print Spooler Service
Open the Run window, insert “services.msc”, and it will open the Services window.
Now, start looking for the Print Spooler Service, right-click on it to hit the Properties tab.
After that, move to the Startup Type, choose the Automatic, Apply and then the OK tab.
Next, right-click on the Print Spooler Service again and tap on the Start option to commence the service.
With this, you can now easily save or email the company file in the form of a PDF without getting unrecoverable errors.
Case 3: Rectify the Unrecoverable Error occur while running Rebuild Utility
There are times when the users might get Target Chaining Errors while rebuilding company files in QuickBooks Enterprise. Following are the messages that you get when the error pops-up.
Verify.c (4620): CHECKPOINT: 1104: Thu Jul 14 15:36:39 Target Chaining: Target ###### in transaction ######, points to ‘next’ target ###### which is NOT in that transaction
Verify.c (4747): CHECKPOINT: 3544: Fri Jul 01 11:25:45 Target Chaining: Next target pointer error in transaction #####
In other instances, the users may also receive the Unrecoverable Error in QuickBooks Desktop when the data file has the target chaining errors. In other instances, it may appear in the 2.0 version within the Entered/Last Modified column rather. Another cause may be insufficient storage space while running the Rebuild Data Tool. Therefore, to fix the issue, you must perform the following solutions.
Solution: Make Use of the Verify and Rebuild Data Tool
To repair the damages in the company file data, you must run the Verify and Rebuild Data tool in QuickBooks. To do so, go through the following steps.
a. Start Running the Rebuild Data Tool
Initially, launch the QuickBooks application and then click the File menu.
After that, choose the Utilities tab and then hit the Rebuild Data option.
Thereon, click the OK tab and wait for some time to complete the rebuilding process.
b. Use the Verify Tool to ensure that there are no further issues.
Primarily, move to the File menu and choose the Utilities tab.
After that, switch to the Verify Data tab and hit the OK option.
Thereon, you must hold on for the moment to complete the verification.
Case 4: Unrecoverable error while performing bank reconciliation or checking old reconciliation reports
There are certain instances when the users might experience an Unrecoverable Error in QuickBooks while trying to open the PDF file. It may also occur while accessing the version of Adobe Reader that isn’t present any more. So, to fix the issue, you must update them to the latest version of Adobe Reader.
Solution 1: Get the latest version of Adobe Reader
Open the Adobe Reader on your system and hit the Help menu.
After that, click the About Adobe Reader option.
Now, if you are using the versions 8.0, 9.0, or 10.0, then you must update them to the latest version 11.0 from the main Adobe website.
Finally, go through the instructions on the screen for installing Adobe Reader 11.0. Later on, try restarting the computer once you are done installing the latest Adobe Reader.
Solution 2: Making Changes With the Display PDF in Browser Preference
Initially, open the Start menu and choose the Programs/All Programs option.
Afterwards, opt for the Adobe Reader/Acrobat tab and click the Edit menu.
Thereon, you must hit the Preferences tab and then choose the Internet option.
Soon after this, unmark the Display PDF in Browser preference within the Web Browser section.
Finally, when all the settings is done, choose the OK tab to save the changes.
Case 5: Unrecoverable error when importing Accountant’s Changes
Following are the Unrecoverable errors that might appear while importing Accountant’s changes into a client’s data file. So, to resolve these errors, you must follow the solutions below.
Unrecoverable Error 00000 16133
Unrecoverable Error 00000 41897
Unrecoverable Error 00000 41953
Unrecoverable Error 00000 42127
Unrecoverable Error 00000 42394
Unrecoverable Error 00000 31901
Unrecoverable Error 00000 43109
Unrecoverable Error 00000 41765
Unrecoverable Error 00000 16440
Unrecoverable Error 00000 95431
Unrecoverable Error 00000 42045
Unrecoverable Error 00000 37760
Unrecoverable Error 00000 40592
Unrecoverable Error 00000 31609
Solution 1: Resume Further with the Import Process
Initially, go with the Send option whenever the error message pops up on the screen.
After this, hit the OK tab to start the import process once again.
As a result, it will present a list if there are any changes that isn’t done with the client’s file. Herein, you must insert those changes manually.
Solution 2: Thoroughly Review the Data and Re-establish Change File
Primarily, you must restore the latest backup of your data file.
First of all, you must delete the Accountant’s copy restriction from your client file.
To delete the Accountant’s restriction, choose the File menu and then the Send Company File tab.
Thereon, navigate to the Accountant’s Copy and then tap on the Client Activities.
Soon after this, go with the Remove Restrictions and then the Yes, I want to remove the Accountant’s Copy Restrictions. Later on, hit the OK tab for the confirmation.
After that, the issues can be repaired by running the Verify and Rebuild Data Utility tool.
Finally, the users must prepare an Accountant’saccountant’s copy to recreate the changes.
To create the Accountant’s copy, move to the File menu and then the Send Company Files.
After that, tap on the Accountant’s Copy and click the Client Activities tab.
Thereon, move to the Save File tab and then go to the Accountant’s Copy tab.
Herein, you must start mentioning the dividing date and hit the Next tab.
Case 6: Rectify the Data Damages On Your Company File
If you experience an Unrecoverable Error in QuickBooks Desktop due to data damage, then you must stop worrying. Instead, use the below solutions to resolve the issues with your data file.
Solution 1: Configure the Damages With the Help of Rebuild Data Tool
The Rebuild Data is an inbuilt tool that comes along with the QuickBooks Desktop application. After installing the tool, you can use it to fix the minor damages present within the company file data.
Solution 2: Run the QuickBooks File Doctor Tool To Fix the Issue
Even after running the Rebuild Data Utility, you are still facing issues opening the company file, then try to use the File Doctor Tool.
QuickBooks File Doctor Tool
Solution 3: Fixing the Damage Company File By Rebuilding Company Data Manually
Open the QuickBooks application, switch to the File menu and then Utilities from the sub-menu.
After this, browse to the Verify Data tab and allow the tool to resolve the damages.
When you arrive at the Verify Results screen, hit the Expand All tab to get the list of all the errors.
Later on, to get the steps for resolving the error, choose the See Online Article tab.
Case 7: Unrecoverable error when writing checks via QuickBooks Online Bill Pay
Online Bill Pay is a feature in QuickBooks that lets users pay vendor bills. Moreover, it is also used to record the payment so that you can obtain accurate results. However, sometimes, users might start receiving an Unrecoverable error in QuickBooks while using the online bill pay system. However, this feature isn’t available after the 12/12/19.
Taking Everything Into Account!!
QuickBooks Unrecoverable Error might be challenging for the users, but with the correct solutions given in this post, they can fix the issue quickly. Furthermore, if this issue still bothers you while accessing the company file, immediately consult with our QB experts. They will offer you the best assistance to deal with this issue quickly.
No matter how advanced software you use, it is quite common to face performance issues, technical glitches, and other errors. Similarly, QuickBooks is plagued with various errors and problems that make it challenging to manage your accounting and financial data. Dealing with such problems is a tough task. Nevertheless, Intuit developers make sure that you don’t have to go through such critical complaints and let you address them easily using QuickBooks Tool Hub.
This advanced launchpad provides various utilities in one place to handle errors in various instances. This tool has multiple tabs with different tools customized for specific problems. For instance, if you face problems while opening a company file over the network, the QuickBooks File Doctor tool is ideal for troubleshooting. This article gives a detailed overview of QuickBooks Tool Hub 2025, helping you use the available tools for different situations.
To utilize the QuickBooks Tool Hub, understanding the interface and how the different tools work is necessary yet challenging. Connecting with industry experts is recommended for better use of the tool. Dial +1(866) 500-0076 and talk to a QB ProAdvisor now!
Download and Install QuickBooks Tool Hub
Above, we’ve become familiar with the QuickBooks Tool Hub and all the tools and features you can use to troubleshoot various errors. To get the best out of the tool, you will need to close QuickBooks Desktop and ensure you are using the Windows 10, 64-bit or higher version of the operating system.
Exit QB Desktop.
Visit Intuit’s official site and download the most recent version of QuickBooks Tool Hub (1.6.0.8). Save the downloaded file on your Windows desktop or Download folder to ensure you can easily access it.
Note: If you already have the Tool Hub installed, you can which version you use at the bottom of Tool Hub. Go to the Home tab. You will see the version at the bottom.
Locate the file you just downloaded, QuickBooksToolHub.exe, and double-click on it.
Adhere to the on-screen instructions on your screen and agree with the product’s termsand conditions.
When the installation is complete, double-click on the Tool Hub icon on your Windows desktop.
A List of Error Codes You Can Fix Using the Tool Hub
The Tool Hub is a launchpad for various tools that fix different types of errors in the program, such as Quick Fix My Program, which helps you troubleshoot program-related problems. Below is a list of the tools in the QuickBooks Tool Hub and their roles in fixing different types of errors:
Tools
Errors
Quick Fix my File
Possible data damage or other company file errors that occur when opening or hosting on the workstations, such as QuickBooks error -6000 and others.
Run QuickBooks File Doctor
QuickBooks File Doctor works to fix errors related to company files and networks, such as QuickBooks error -6000, QuickBooks error H101 and other H-series errors, missing or blank customer, vendor, or employee lists, network or hosting problems, and more.
Open QBWinlog Folder
Find the QBWin.log or QuickBooks.log files and fix problems related to the log file or folder that contains all information about program messages and errors, including information created by the utility that validates, rebuilds, and compresses data.
QuickBooks Database Server Manager
This tool helps you host your company file in QuickBooks without any issues and ensures that the related issues are fixed.
Quick Fix my Program
Errors or problems you may encounter while installing QuickBooks updates such as QuickBooks error 15XXX, QuickBooks error 12XXX, unrecoverable error, and others.
This tool will help you eliminate problems and all other PDF and printing errors when printing, emailing, or saving as PDF.
QuickBooks Install Diagnostic Tool
Activation, license and product related issues, QuickBooks error 15XXX, QuickBooks error 12XXX, QuickBooks error 1904, QuickBooks error 1722 and other issues when installing or updating the program.
Clean Install Tool
Unrecoverable error, installation issues and fatal application errors.
Explore Features and Products of QuickBooks Desktop Tool Hub in Detail
The QuickBooks Tool Hub is well organized, yet complex to understand because it has multiple tabs and tools for different problems, such as company file issues. It is designated to deal with problems that occur when running updates, opening company files, or running other operations in the desktop version.
In this section, you can access only company file-related tools. Let’s take a closer look at all the tabs in the Tool Hub and discuss the types of errors you can resolve:
Home
The Home tab in the Tool Hub is a central hub for various troubleshooting and resources. It lists all the tools and features that resolve QuickBooks issues.
If you are wondering which tool to choose for a specific error you are encountering in the program, we recommend you read the description of each tool on the Home tab and use it accordingly.
Company File Issues
As the name suggests, the Company File Issues tab in the QuickBooks Tool Hub contains a set of tools that serve to fix various problems or errors related to your company file on the local and server computer. These tools also help you deal with network-related problems when opening the company file. Let’s take a look at what you can access in the tab:
The Network Problems tab serves the QuickBooks Database Server Manager tool to ensure that you can host the company file without any obstacles.
Program Problems
Sudden slowdown or poor performance of your QB program can disrupt all your important work. In such cases, go to Program Issues in the QuickBooks Tool Hub to access several utilities to resolve these problems. Get a brief overview of the available utilities:
Program Problems
Quick Fix my Program
QuickBooks Program Diagnostic Tool
QuickBooks Print & PDF Repair Tool
Installation Issues
Users often encounter problems when installing QuickBooks updates or downloading a new version of the program.
The Installation Problems tab lets you access several utilities designed to resolve problems that interfere with updates or installations. Here is a list of the tools you can access:
It’s nothing new when we forget our password while logging into a software. But don’t worry – password reset tools can help you reset QuickBooks password in just a few moments.
Password Reset
The steps to reset your password may vary depending on whether you have QuickBooks 2020, QuickBooks 2019 or another.
Help & Support
QuickBooks is an advanced tool not only for its features but also for the robust support it offers. If you need any help from an Enterprise or Pro/Premier/Plus expert, the QuickBooks support team will take care of you. Simply visit the Support menu in the QB Tool Hub and find the kind of help you need to connect with the support team.
Advanced Tools
The Advanced Tools tab in the Tool Hub ensures that you can address multiple Windows problems from one place by providing several shortcuts that help diagnose and fix more complex problems.
Let’s take a quick overview of what you’ll find under this tab:
QuickBooks Updates that are Slow or Appear to Be Stuck
This feature comes in handy when you get stuck downloading QuickBooks or payroll updates. Simply click on the QuickBooks Tools Hub menu feature and proceed to reach the support team.
Note: If you are installing a tool from QuickBooks Tool Hub, it will download automatically in the background. The tool may take some time to complete the process. Do not close the tool and wait until it runs successfully.
Finally, you’re ready to get started with QuickBooks Tool Hub to troubleshoot the issues and enjoy seamless financial and accounting management.
Summary
Any error code or problem in QuickBooks disrupts your accounting and financial processes running in the program or even hinders you while using payroll to pay your employees and other important tasks. If you are experiencing the same and wondering what to do, the above article is a comprehensive guide that helps you troubleshoot problems using QuickBooks Tool Hub – a launchpad for various utilities by Intuit.
If you don’t find this helpful and you keep getting the same error, we recommend consulting professionals. Dial +1(866) 500-0076 and talk to a QuickBooks ProAdvisor now!
Windows Firewall, or a feature of Microsoft Windows, is a security application that controls the traffic that enters or exists on your device. This traffic is filtered based on various criteria, such as source and destination IP address or source and destination port number. QuickBooks has these port numbers assigned to pass through the Firewall, which can be blocked for security reasons. The Firewall might also be considered a threat or unwanted access to pass through your computer. This blog will cover the possible reasons and instances when the Windows Firewall is blocking QuickBooks with suitable fixes. Let’s go through this comprehensive guide.
Not a techie and wondering what to do to configure Windows Firewall settings? Don’t worry; our technical and QuickBooks professionals are available to handle such critical tasks. Dial +1(866) 500-0076now!
Setting Up the Firewall Windows Settings in QuickBooks Desktop
Disabling the Windows Firewall will leave your computer unprotected and weaken the system security. Along with manual configuration, running different QuickBooks tools will also help you fix the respective issue.
This section will cover the various processes that the Windows Firewall can hinder and step-by-step instructions to address the issue accordingly.
Case I: When Opening a Company File
You may fail to open the company file in QuickBooks and encounter an error message stating,
“Cannot communicate with the company file due to a firewall.“
This is due to the Windows firewall is blocking QuickBooks. To successfully open the company file without interruptions, you must configure the settings or resolve the associated issue. Proceed with the below solutions to do so:
1. Run QuickBooks File Doctor
QuickBooks File Doctor utility will help you fix the firewall settings so you cannot open the company file over the network. Adhere to the following steps to make use of the tool:
a. Get QuickBooks Tool Hub
Exit QuickBooks Desktop.
Get the most recent version of QuickBooks Tool Hub (1.6.0.8). Save the downloaded file on your computer from where you can easily locate.
Note: If you already have Tool Hub on your computer, check the current version from the Home page.
Locate the file you just downloaded QuickBooksToolHub.exe and double-click on it.
Follow the on-screen instructions on your screen and agree with the product’s terms and conditions.
Note: If you can’t find QuickBooks Tool Hub, manually search for it on your Windows.
b. Make Use of QuickBooks File Doctor
Launch QB Tool Hub and navigate to Company File Issues.
Hit on Run QuickBooks File Doctor. The file doctor tool might take a minute or two to open; wait until then.
Now, choose your company file from the drop-down menu. If you can’t see the file, click on Browse and search to find the file manually.
Select Check your file and network, then tap on Continue.
Type the QuickBooks admin password and select Next.
The scan time depends on your company file size, which usually takes up to 5 minutes. Once the scan is successful, launch QuickBooks and then open the company file. In some cases, the scan may even say it was unsuccessful after addressing the issues.
2. Update QuickBooks Desktop
Sometimes, using an outdated version of QuickBooks hinders regular operations and can also cause connectivity issues. So, it is recommended to keep your QuickBooks updated to the most recent version.
Launch QuickBooks and navigate to the top menu bar.
Move to the Update Now tab and mark the Reset Updates checkbox.
Now, hit the Get Updates button and wait the update downloads.
Restart your computer and open QuickBooks again to let the changes apply.
3. Configure the Windows Firewall Settings Manually
You might fail to open your company file when Windows Firewall is blocking QuickBooks. In that case, you must configure the Windows Firewall settings by adding the firewall port exception or by creating an exception for QuickBooks programs:
Add Firewall port exception for QuickBooks
In case you use multiple versions of QuickBooks on the same computer, perform the below steps to carefully the firewall port exception:
Press the Windows logo icon on your keyboard to open the Windows Start menu.
Search for the Windows Firewall application and hit Enter.
Go to Advanced Settings.
Now, right-click the Inbound Rules, then click on New Rule.
Choose Port and then hit on Next.
Ensure the rule applies to TCP.
Enter the specific port number of your version of QuickBooks in the Specific local port field. – QuickBooks Desktop 2020 and later: 8019, XXXXX. – QuickBooks Desktop 2019: 8019, XXXXX. – QuickBooks Desktop 2018: 8019, 56728, 55378-55382. – QuickBooks Desktop 2017: 8019, 56727, 55373-55377.
Important: QuickBooks Desktop 2019, 2020, and other future versions of QuickBooks use dynamic ports. These are specific firewall ports that are used during the software installation. The assigned port number ensures the QuickBooks Desktop gets exclusive use of the given port.
Get the dynamic port number: – Launch the Windows Start menu. – Search for QuickBooks Database Server Manager and hit the Enter key. – Move to the Port Monitor tab. – Find the QuickBooks Desktop version you use and note down the Port Number. This will be used to create firewall port exception in the further steps.
Note: Remember that you can modify the assigned port number by selecting Renew, but only for QuickBooks Desktop 2019 and later versions. If you do, navigate to the Scan Folders tab and click on Scan Now to reset the firewall permissions.
Enter the port number and select Next.
Choose Allow the Connection, then select Next.
When prompted, ensure all the profiles are marked. Choose Next.
Create this rule while naming it as QBPorts(year).
Once all done, select Finish.
Launch QuickBooks Desktop and try switching it to the multi-user mode. You can also open your QuickBooks over the network using the computer that hosts your company file. If the Windows Firewall still blocks the connection, move on to the next step.
Create Windows Firewall exceptions for QuickBooks programs
QuickBooks uses the executable files (.exe) to run various programs. Follow the steps below to create an exception for each executable file in the table below.
Open the Windows Start menu.
In the search bar, type Windows Firewall and hit the Enter key.
Select Advanced settings and right-click the Inbound Rules. Now, click on New Rule.
Choose the rule type as Program, then click Next.
Select This program path and hit on Browse.
In the table below, locate and pick an executable file. Then, choose Next.
Click on Allow the connection and select Next.
Finally, create this rule by naming it as QBFirewallException(name.exe).
Create outbound rules by repeating the previous procedures. Proceed as before, with the exception of choosing Outbound Rules at step 4.
Note: If case you see these files as Program Files (x86), this just means your using a 64-bit Operating system.
Launch your QuickBooks desktop program and switch it to multi-user mode. If you still encounter problems or any errors, configure your program’s antivirus settings.
Check the antivirus and configure it
Make sure QuickBooks Desktop has normal permissions so that QuickBooks programs are not blocked. The steps vary from program to program in terms of enabling antivirus settings. To do this, check the program’s official site to set permissions for your antivirus software.
After this, restart your computer for changes to save. Once you’ve finished configuring the firewall, restart your computer and reopen QuickBooks.
4. Setting up the Folder Permissions
You must ensure the folder holding your company file is set up to share the company file over the network. Proceed with the below steps to configure the permissions:
a. Set the Folder Permissions Verify if the permissions are set correctly
Launch the Windows Start menu.
Search for File Explorer and hit the Enter key.
Look for the company file folder and right-click on it. Then, choose Properties.
Move to the Security tab and click on Advanced.
Select QBDataServiceUserXX and click Edit.
Now, set the following settings to Allowed: – Traverse Folder/Execute File – List Folder/Read Data – Read Attributes – Read Extended Attributes – Create Files/Write Data – Create Folders/Append Data – Write Attributes – Write Extended Attributes – Read Permissions
If the permissions are not configured correctly:
Right-click the folder that has your company file and select Properties.
Choose Security, then click on Edit.
Select QBDataServiceUserXX and hit on Full Control, then Allow.
Follow the instructions for any of the folders below. Remember that you might not have every one of these directories.
Right-click the company file folder and choose Properties.
Move to the Security tab, select Everyone. Note: If Everyone is in the Group or User Name checkbox, select Add and then type Everyone. Click OK.
Choose Full Control and then click Apply and OK.
b. Configure the Windows access permissions to share the company file
As you deal with your company file over the network, make sure QuickBooks has the appropriate level of access to help avoid problems later.
Open the Windows Start menu.
Locate your company file folder and right-click on it.
Click on Properties then Sharing and then select Share Add.
For your version of QuickBooks, select the corresponding QBDataServiceUserXX.
Now, configure the permission to Full Control and select Share.
5. Run QuickBooks Database Server Manager
Your computer is the main computer that hosts your company files, and the ones connected are workstations. You must ensure that you run QuickBooks Database Server Manager to successfully open the company file on the network.
Note: Install and set up the Database Server Manager on the main computer if you haven’t done so yet
In QB Tool Hub, select Network Issues.
Choose QuickBooks Database Server Manager. You will be prompted to install it if you haven’t yet.
If your company file folder is displayed, select Start Scan in QBDSM. If they aren’t, click Browse to locate the company file and then click Start Scan..
The QuickBooks Database Server Manager will automatically repair the Firewall permissions.
When the scan is finished, select Close.
Note: Locate and open the folder you scanned after you’re finished. Ensure the company file folder has the .ND file. It looks like this: [your company file]qbw.nd.
6. Disable the Hosting on Workstations
Ensure the hosting is disabled on the workstations, as your server computer is the main one that hosts your company files. These computers are connected to the server and don’t host company files.
Launch QuickBooks Desktop on one of the workstations.
Instead opening your company file. Navigate to the File menu and choose Utilities.
If the option you see is the Host Multi-User Access option, don’t select it. Move to the next workstation as this isn’t causing the issue.
Select the option only if it says, Stop Hosting Multi-User Access.
Now, check on each workstation and then move to the server computer and try resetting the hosting settings.
Launch QB Desktop on the server computer.
Navigate to File, then Utilities.
If you see the Host Multi-User Access option, select it. Repeat the same process and select Stop Hosting Multi-User Access to reset the hosting settings.
Repeat the process on more time and select Host Multi-User Access to enable the hosting.
Case II: When downloading QB updates
Downloading the QuickBooks Desktop is necessary to get timely security patches and updated features and stay updated with the current features. However, you may encounter errors such as QuickBooks error 12000 and QuickBooks error 15000 when Windows Firewall is blocking QuickBooks.
This may also happen due to an outdated operating system. Perform the below steps to address the problem and get back to updating the program.
1. Update Windows
Bring your operating system to the latest version and then try downloading the QuickBooks update again.
Press the Windows logo to launch the Windows Start menu.
Search for Settings and then hit the Enter key.
Select Update & Security.
Click on Windows Update, then select Check for Updates.
If the updates are available, select Download & Installthe updates.
Finally, reboot your computer to ensure the issues are fixed.
2. Configure the Windows Firewall settings
If Windows Firewall is Blocking QuickBooks during the update, you must configure the settings and allow the applications through the ports. This helps you run the QuickBooks processes such as downloading the newer version of QuickBooks seamlessly.
Proceed to Solution 3 in Case I to find the suitable steps to set up the Windows Firewall for QuickBooks.
Case III: When scheduling a company file backup with Intuit Data Protect
Sometimes, you might fail to schedule a company file backup using Intuit Data Protect due to the firewall and might also see an error message stating,
“Intuit Data Protect Backup Failed: Firewall or connection issue.”
Multiple reasons could be involved, such as incorrectly configured Windows firewall ports, highly stored caches, cookies, etc. We will discuss the steps below to fix the issue where your Windows firewall is blocking QuickBooks.
1. Ensure the Windows firewall isn’t blocking Intuit Data Protect
Intuit Data Protect requires to access the Windows Firewall to backup your company file. Check the firewall settings and ensure the important files are allowed through the ports.
a. Add important files to the Windows firewall
Press the Windows logo key on your keyboard.
Type Windows Firewall into the search field.
Click on Allow an app through Windows Firewall and then Allow another app.
Select Browse and navigate to Program Files(x86)\Common Files\Intuit\Data Protect.
Choose QBIDPservice.exe, then click Open.
Tap on Network types and mark the Private checkbox. Then, click Add.
Repeat the above 5 and 6 steps for the IBUenghost.exe and IntuitDataProtect.exe files. If a message prompts on your screen saying the files already exist, you’re all set.
Note:Except for the Windows Firewall, other third-party software on your computer can also block important files. Ensure these files are allowed through the antivirus ports. If you aren’t aware of how to do so, visit the official website of your antivirus product.
b. Add Intuit Data Protect to your Trusted Sites
Ensure the Intuit website are added as trusted sites in Internet Options.
Press the Windows logo on your keyboard.
Type Internet Options into the search and hit Enter.
Go to Security, then select Trusted sites.
Choose Sites, then add the following sites. You can copy and paste or type them manually. Click Add each time you add a website. – backup.com – *.intuit.net – *.intuit.com – *.intuitdataprotect.com – *.quickbooks.com – workplace.intuit.com – emerald.backup.com
Ensure the Require server verification (https: ) for all sites in this zone checkbox is selected.
Click Close, then select OK.
Make sure you can open the Intuit Data Protect certificate site. You need to be able to open it to avoid errors in your backup.
Try backing up with Intuit Data Protect. If it still doesn’t work, move on to the next solution.
3. Make Sure Intuit Data Protect is up to date
You won’t be able to back up the company file data using Intuit Data Protect if the version is outdated. Therefore, ensure to download the Intuit Data Protect update by following the below steps:
a. Download the Intuit Data Protect update
In QuickBooks, navigate to the Help menu.
Choose Update QuickBooks and then move to the Update Now tab.
Make sure you select Data Protect, then click Get Updates.
b. Install the downloaded update
On your desktop toolbar, select the up arrow ^. You will see it in the lower-right corner near the clock.
Right-click the Intuit Data Protect icon from the Windows toolbar and choose About Intuit Data Protect. This icon looks like a green padlock.
Click on Update.
Once all done, select OK.
Case IV: When using QuickBooks Payments
You must configure the security settings when the Windows Firewall is blocking QuickBooks for uninterrupted payment process. As all the web-based credit card or bank processes uses SSL to transmit data through firewall ports. Incorrectly configured Windows Firewall can blocks ports and hence interrupting the overall payment processes. You may also encounter the following error messages:
Page cannot be displayed
Server response reported an error
Error 404, Error 500, etc
Your request requires escalation
Time out messages
The page you are trying to view is taking too long to respond
Script errors
Blank page
To ensure these payment based service are working without any interruption, you must add these ports as an exception. Here’s how you can do it:
1. Configure the Windows Firewall settings
If the Windows Firewall is interrupting the QuickBooks Payments or other payment applications, you must configure it using the specific port number and create an exception to allow the data exchange on your computer.
For the instructions, we recommend you visit Solution 3 in Case 1, but use the port number given below to create an exception.
Open and allow these internet ports:
8443 (UDP and TCP)
443 (UDP and TCP)
Enable these applications for internet access:
QBW32.exe
QBPOS.exe
EFTSVR.exe
Enable these domains for QuickBooks payments access:
*.intuit.com
*.innovativemerchant.com
*.innovativegateway.com
2. Change the User Account settings
The User Account Settings is a Windows security feature that protects your operating system from unauthorized changes. Make changes as an admin; the payment processes may fail if other users make the changes.
For any system changes that require administrator permission, UAC will notify the user whether they want to allow the change or not. So, consider changing the UAC settings by following these steps:
Launch the Run prompt by pressing the Windows+R icon key.
Search for Control Panel and then press the Enter key.
Choose User Accounts and then click on User Accounts (Classic View).
Hit on Change user account control settings.
Now, move the slider: – To disable UAC, set it to Never Notify and click OK. – To turn on UAC, set it to Always Notify and click OK.
Finally, reboot your computer.
Summary
As a security application, the Windows Firewall filters your computer’s incoming and outgoing data to protect the system from security threats, viruses, or unwanted entries. Windows Firewall is blocking QuickBooks as it might have considered the program a threat to your computer. The above solutions will help you configure the Windows Firewall settings and ensure you can run the QB services smoothly.
For further assistance, it is recommended that you connect with technical experts. Dial +1(866) 500-0076 will connect with QuickBooks ProAdvisors and let them handle the issue.