QuickBooks software has become the utmost priority for businesses in managing their company’s financial and bookkeeping-related tasks. Undoubtedly, it is a great accounting solution, but users sometimes observe QuickBooks Error 1406 while installing the application. This issue is mainly triggered when the users don’t have enough admin rights to install or use an older version of QBDT.
Consequently, the appearance of QuickBooks Update Error 1406 restricts the users from installing the application. As a result, it will eventually lead to a delay in their ongoing business process. In certain scenarios, it is necessary to resolve the issue by following the resolution methods explained in the post.
Are you seeking an expert’s guidance to deal with the annoying QuickBooks error 1406? In that case, you don’t have to worry any longer and can simply dial 1-855-603-0490 and get an exact solution to your query.
How Can You Describe QuickBooks Error Code 1406?
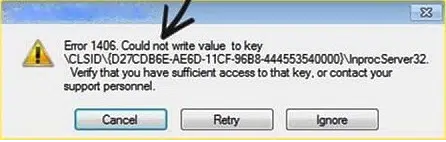
The users mainly observe QuickBooks Error Code 1406 whenever they try to install a new program or software that utilizes the Windows installer runtime. However, this issue mainly signifies that your computer system can’t read the QuickBooks Desktop components while you attempt to install the software. Upon the arrival of this error, the users might notice the following error message on the screen stating:
Error 1406, Could not write value “InprocServer32” to key “\CLSID\{[removed] -000- C [removed] 00045}\InprocServer32’’
Why You Got Stuck With QuickBooks Installation Error 1406?
After going through what do you understood by the QuickBooks Installation Error 1406, it is crucial to know about the root causes that may trigger this error. However, to get a clear picture of it in your mind regarding it, read the possible causes listed below.
- Users might encounter QuickBooks Error 1406 when third-party applications like antivirus and anti-spyware programs create issues while installing the application.
- Problems with the Windows Registry are another reason that triggered this issue.
- Sometimes, it may happen due to damage or missing .NETFramework.
- You may also notice this issue when the users don’t have enough admin permissions to install or update the QuickBooks Desktop application.
- In other cases, Error 1406 in QuickBooks may also appear when there is a problem with the internet connection.
Which symptoms are displayed upon the onset of QuickBooks Online error 1406?
Here, we have described the signs and symptoms that you may notice upon the arrival of QuickBooks Online error 1406.
- You may observe the unusual shutting down of the Windows operating system.
- The users might see Error 1406 in QuickBooks and the error message on the screen.
- Sometimes, you may notice the sudden freezing or crashing of the PC.
- You might have encountered certain problems while installing the QuickBooks Desktop on your device.
Troubleshooting Methods You Must Perform to Eliminate Error Code 1406 in QuickBooks
To resolve Error Code 1406 in QuickBooks smoothly, you must try to apply the troubleshooting methods listed below. Remember that you are well-connected with a stable internet connection while fixing the issue.
1st Fixation Method: Try to Install QuickBooks in Selective Startup Mode
Sometimes, installing QuickBooks Desktop in selecting mode will help you resolve QuickBooks error 1406. Enabling this mode will help you start Windows with certain items running on your device. You must closely apply the steps instructed below for the detailed steps.
- First, you need to open the Run Command window by hitting the Windows + R keys together.
- Afterwards, insert the “msconfig” command into the search panel and click the OK button.
- You must hit the Selective Startup and Load system services option from the General tab.
- Thereon, navigate to the Services tab and choose Hide All Microsoft Services.
- From there, pick the Disable All option and confirm that you have unmarked the Hide All Microsoft Services checkbox.
- The users then have to review the list of services and check whether the Windows Installer checkbox is marked. They should hit the OK button if the checkbox is not already chosen.
- You are supposed to choose the highlighted Restart option from the System Configuration window.
2nd Fixation Method: Install the Newly Launched Windows Updates To Your System
Sometimes, working on an outdated version of Windows might cause QuickBooks Error 1406. Therefore, to fix the issue, it is important to install the updated version of Windows by following the instructions below.
- Initially, you must open the Start menu and add Windows Update into the search column.
- You are supposed to double-tap on the Windows Update icon to open on the device.
- Following this, pick the highlighted Check For Updates option and select the necessary updates to download.
- Finally, when you see the startup screen, open the QuickBooks application and spot whether the issue is resolved.
3rd Fixation Method: Fix the Damage in Windows Registry
To repair the issues in the Windows registry, you must follow the steps outlined below.
- The first and foremost step is to open the Windows menu and then hit the “regedit’’ into the search panel.
- As a result, it will open the Registry Editor window on your screen.
- Afterwards, you must browse to the following path: “HKEY_LOCAL_MACHINE\SYSTEM\CurrentControlSet\Services\ia STOR registry key.
- Finally, you must confirm that all the keys are allotted to the administrator’s group.
4th Fixation Method: Utilize the QuickBooks Install Diagnostic Tool
The QuickBooks Install Diagnostic Tool is the perfect way to tackle problems installing accounting software. You can also resolve QuickBooks Error 1406 by running this tool and following the instructions illustrated below.
- The first and foremost step is downloading the latest QuickBooks Tool Hub version.
- Soon after this, double-tap on the downloaded setup file of QB Tool Hub to open it.
- From there, you must click on the highlighted Installation Issues tab to proceed further.
- Following this, hover your cursor over the QuickBooks Install Diagnostic Tool tab.
- Afterwards, allow the QB Install Diagnostic tool to scan and resolve the issues.
- Once you are done repairing the issues, you must relaunch your device to check QuickBooks Error Code 1406 is resolved.
5th Fixation Method: Disable the Antivirus Software on Your Device temporarily
At times, the antivirus software might interrupt the users while installing the QuickBooks Desktop on your device and lead to Error 1406 in QuickBooks. So, to fix the issue, you must try to disable the antivirus for some time using the steps below.
- In the first step, users must search for the antivirus software installed on their device.
- After this, right-click on the antivirus software and choose the Turn off/disable antivirus software option.
- Ultimately, relaunch your device and try to install the QuickBooks Desktop again to verify whether the issue is resolved.
6th Fixation Method: Give the Necessary Permissions For “data.dat” File
At times, the users can get rid of the QuickBooks Online error 1406 by giving full control to run the “data.dat” file. To accomplish the process, you must use the following steps closely.
- Begin the procedure by launching the Windows File Explorer on your device. For that, you can use the shortcut keys i.e, Windows + E keys.
- Now, you must browse the Organize tab and then hit the Folder and Search Options.
- Afterwards, hit the View tab, followed by the Show Hidden File and Folder option.
- Thereon, you must confirm that you have marked the “Hide protected O/S File” and then the OK button.
- From there, you must browse to the following location “C: >> Users >> All >> Users>> Microsoft >> Office >> data.”
- Subsequently, right-click on the opa12.dat file for Office 2007 users and data.dat file for Office 2003.
- Move ahead by hitting the Properties menu and then choose the Security tab > Advanced option.
- Following this, navigate to the Permissions tab and then opt for the Permission Entries.
- You are supposed to pick the list and select the Edit menu.
- Finally, ensure that the checkbox for Full Control is marked.
To Summarize the Above!!
Through this comprehensive post help, we assure you that you can now easily install the QuickBooks software without encountering QuickBooks Error 1406. However, you can talk to our highly qualified professionals through a live chat facility for quick resolution if you have any further queries.
Frequently Asked Questions (FAQ's)
Question 1: What are the other ways to rectify the install errors in QuickBooks?
Ans. Users can deal with installation errors in QuickBooks by applying the following resolution methods.
1. Try to end the QBW32.exe process running in the background.
2. Also, you can fix it by suppressing the QuickBooks software.
3. Run the Clean Install Tool of QuickBooks
Question 2: What precautions you must take before fixing QuickBooks Error Code 1406?
Ans. You must take the following precautions before fixing QuickBooks Error Code 1406.
1. The users must try to schedule the company file backup to keep the sensitive data safe.
2. You can also install the updated QuickBooks Desktop and Windows on your device.
3. Also, check that the internet connection you are accessing is configured properly.
Question 3: What will happen due to error 1406 in QuickBooks?
Ans. Upon the arrival of Error 1406 in QuickBooks, the users fail to access the data file, which might obstruct them from resuming their ongoing tasks. As a result, the task might be delayed, so it is important to fix it quickly using the troubleshooting methods explained in this post.
Question 4: Can I fix QuickBooks Error 1406 by configuring the Internet settings properly?
Ans. Sometimes, the users might confront QuickBooks Error 1406 due to the misconfigured internet settings. However, you can fix the issue by fixing the internet settings.
Question 5: Does the occurrence of QuickBooks Online Error 1406 affect the company file data?
Ans. As the occurrence of QuickBooks Online Error 1406 stops the users from accessing the data file. However, there is the possibility that the error crashes or freezes the system. Consequently, it might lead to loss of your company file data, which may hamper the company’s performance. So, to avoid the issue, it is important to back up the data file.