Tax season can be overwhelming, and we know how crucial it is to get everything right without errors. If you’re using QuickBooks Desktop, printing Forms 1099 and 1096 is simple and hassle-free. These forms are essential for accurately reporting business income, so managing and printing them correctly is a must. If you’re looking for a step-by-step guide on how to print Forms 1099 and 1096 in QuickBooks Desktop, you’ve come to the right place—just keep reading!
Whether you’re new to QuickBooks or an experienced user, encountering challenges while managing and printing Forms 1099 and 1096 is quite common. To make things easier, we’ve created this guide to help you. Here, we’ll cover everything you need to know—what these forms are, their purpose, and simple steps to print them effortlessly. Ready to dive in? Let’s get started!
| What makes you restricted from printing the essential forms 1099 and 1096? Discuss the issue in brief with our QuickBooks experts and get instant professional help. Ring us at +1(866) 500-0076. |
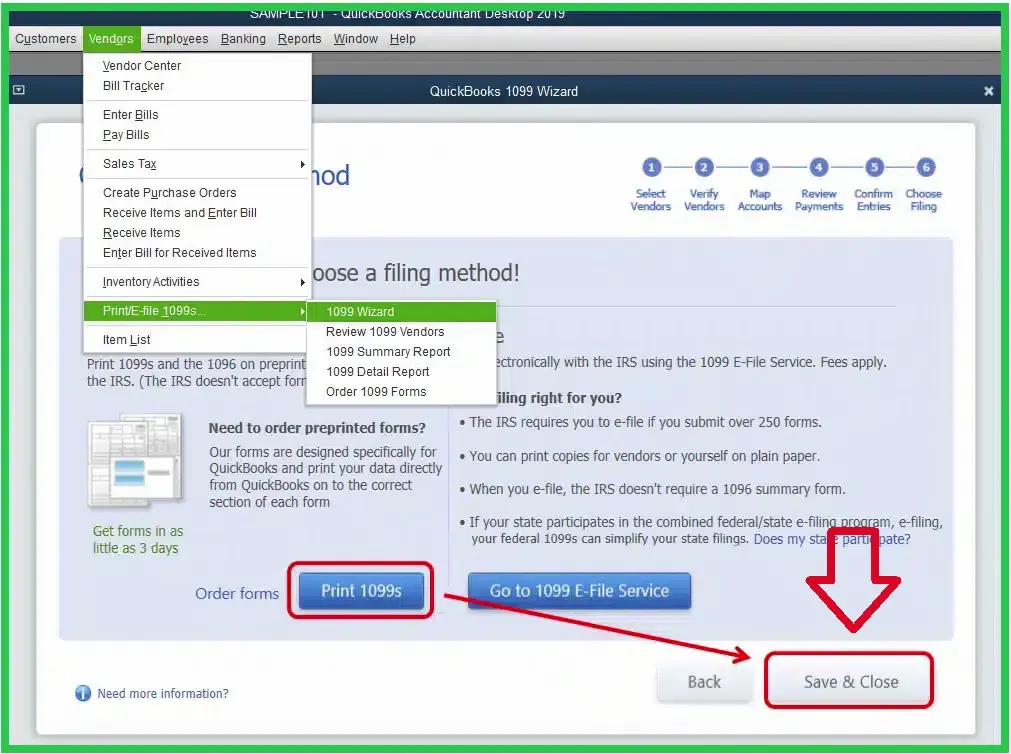
Table of Contents
An Overview of Forms 1099 and 1096 in QuickBooks
The IRS Form 1096, officially titled “Annual Summary and Transmittal of U.S. Information Returns,” is a crucial document used to summarize and transmit various tax forms submitted by businesses. It is required when filing in paper format and applies to forms such as 1099, 1098, 1097, 3921, 3922, W-2G, and 5498.
Form 1096 acts as a cover sheet for tax forms reporting different business payments. It is typically used by individuals or businesses that are not classified as employers. In this process, the payer completes the 1099 form with all necessary details and submits copies to the IRS, ensuring that all reportable payments made during the tax year are properly documented.
Read More- Fix Sales Tax Issues in QuickBooks Desktop
Step-by-Step Process to Print Forms 1099 and 1096 in QuickBooks Desktop
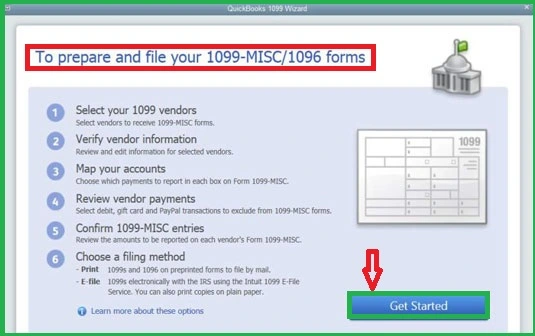
First, summarize the necessary information for the tax year from form 1099 to form 1096 that you need to print and submit. Once done, follow the procedure below with the stepwise instructions to manually print form 1099 and 1096 in QuickBooks Desktop and then submit them to the IRS.
- Firstly, condense the 1099 tax information into form 1096 and switch to the single-user mode in your QuickBooks Desktop.
- After this, you must double-check the information on the forms you’re submitting to the IRS.
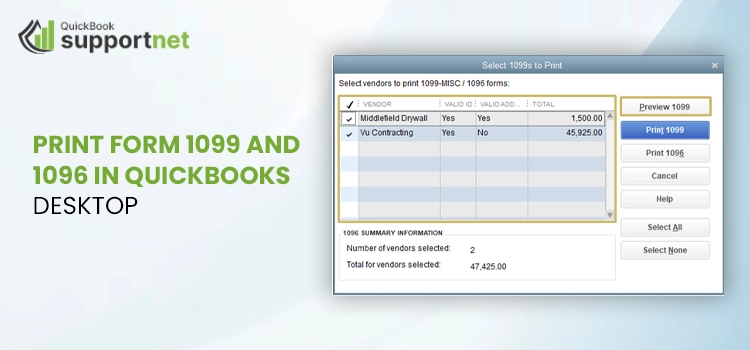
- In the next step, select the option to fill in the necessary information and hit the Print 1099s button.
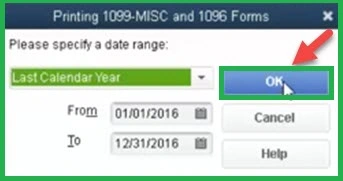
- Here, click the Continue button, then OK to confirm the printing action. Following this, choose the date range and hit the OK button.
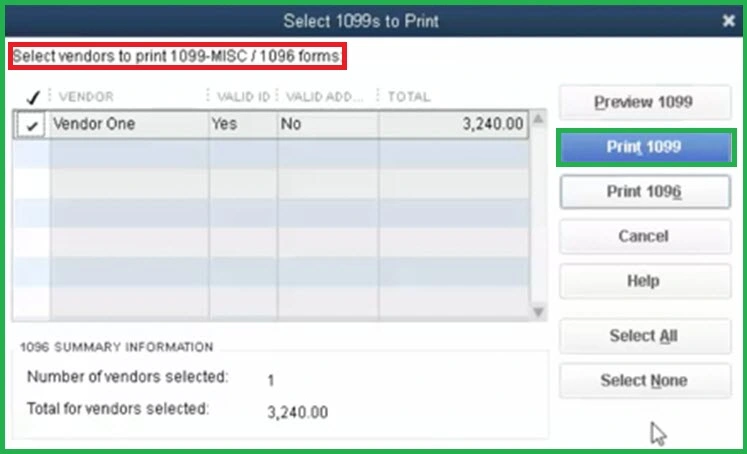
- Done up to this? Now, you’re required to choose the desired form that you wish to print.
- Hit the Print button, and continue to verify the alignment of the form you’re printing. For this, click the Preview 1099 button and move to the next step.
- To align your form, first move to and access the File menu. After this, you must make a selection for your Printer Setup.
- Now, select the Form Name list and close it. After this, on the basis of your requirement, align your screen by choosing the Align alternative.
- Finally, save all the changes above by clicking the OK button. Once you complete the process, choose the Print option, select the 1096 tab, and continue to print the form.
Do the same process to print your Form 1099, and by this, you can seamlessly print Form 1099 and 1096 in QuickBooks Desktop.
Learn More- How to Change Sales Tax Rate in QuickBooks?
Ensuring Accuracy When Filing and Printing 1099 & 1096 Forms
Above, we’ve explained the quick steps to print 1099 and 1096 forms. Now, take a look at the instructions below to carry out accurate and error-free tax filing while printing these forms.
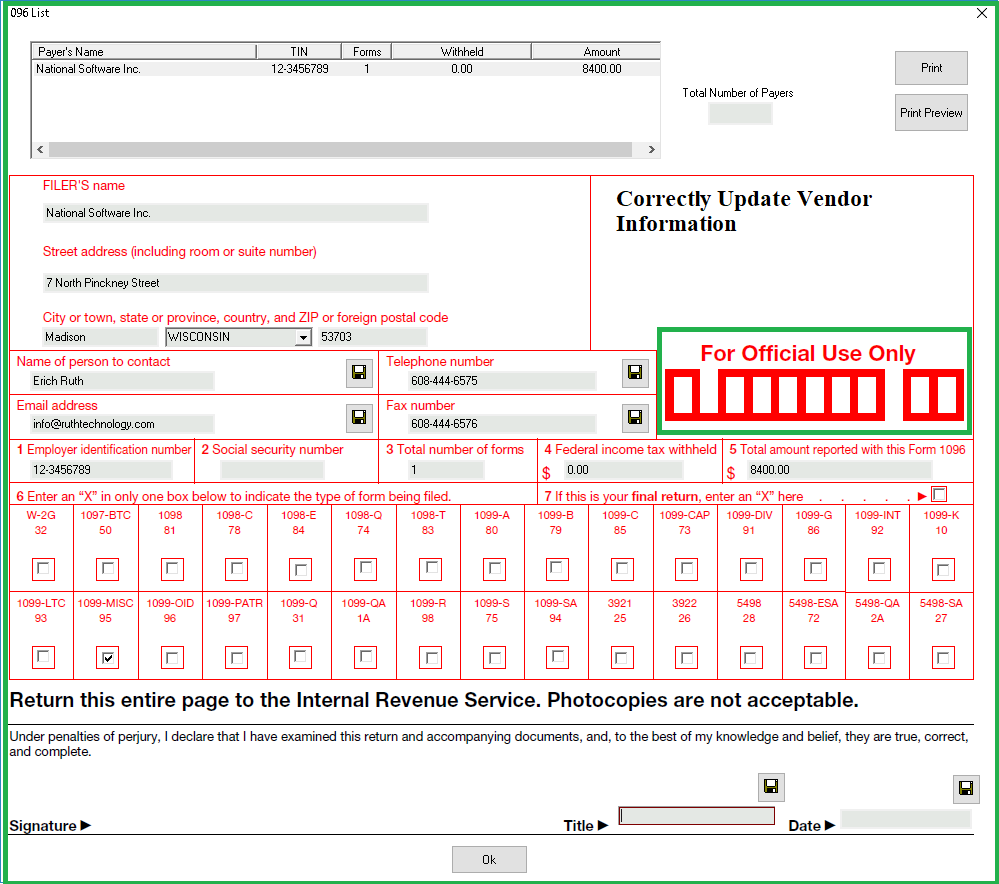
1- Correctly Update Vendor Information
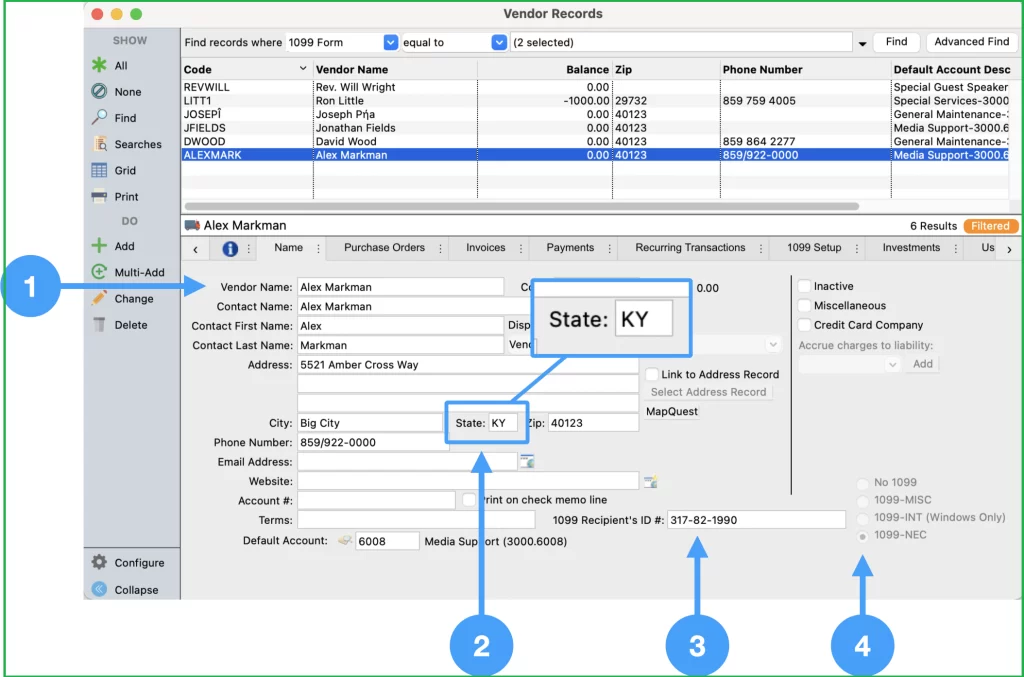
Firstly, you must open your QuickBooks Desktop software and sign in to your QuickBooks company data file to open the same. Now, in the company file, carefully review and update the necessary vendor details. These details include addresses, names, Taxpayer Identification Numbers (TINs), and payment details.
2- Carefully Set Up Form 1099 Vendors
Once you’ve reviewed and updated the vendor information, identify the form 1099 vendors by selecting the Vendors tab and then clicking the Vendor Center. From here, search for your business vendors who require form 1099s. Once you get these vendors, update their records accordingly by assigning the appropriate 1099 categories for each vendor. Now, edit the 1099 vendor information and choose the Tax settings tab to create specific vendor assignments.
3- Check and Confirm your Payments & Transaction Records
Here, you must review your payments and transaction records made to form 1099 vendors within the year. Once you verify the correct categorization, run these 1099 reports by first moving to the Reports tab in QuickBooks, clicking the Vendors & Payables option, and finally choosing the Vendor Contact List. Following this, you must edit the report to summarize Form 1099 details, including TINs and payments into Form 1096. By this, you can successfully print 1099 and 1096 forms.
4- Continue Printing Form 1099 and 1096
Now, to print form 1099 and 1096 in QuickBooks, you must first access the 1099 Wizard by clicking the Vendors tab in QuickBooks and hitting the Print/E-file 1099s. After this, you must follow the Wizard to verify your vendor details, review and confirm 1099 categories, and confirm your payment information. Continue to hit the Print 1099s tab, get the relevant 1099 forms into your printer, and QuickBooks will automatically print the 1099 forms.
Also, QuickBooks Desktop will generate the 1096 forms once you’ve summarized the 1099 details into the 1096 form. For this, choose the Print 1096 option and continue to print this summary 1096 form.
5- Finally, Review and Mail the 1099 and 1096 Forms
It’s the final stage, where you must carefully review all your printing forms, ensuring accurate payment, vendor, and business transaction details. Once done, mail the 1096 summary form along with relevant copies of the 1099 forms to the IRS on the assigned date.
Learning How to Print Form 1096 in QuickBooks Online
In this section, we will discuss the quick procedure explaining how to print form 1096 in QuickBooks online. So, if you’re a QuickBooks online user, complete the steps below and print your summary form 1096 with 1099 form details.
- Initially, to begin this process, you need to open your QuickBooks online application and directly move to the left side of the screen to select the Express Menu.
- Here, choose the Vendors menu, and continue to click the Prepare 1099s in QuickBooks button.
- Now, you must select and highlight the complete details for the tax year. Done till this? If yes, choose the Print button and then the Send form option from the given menu.
- Following this, select the 1096 form and check if everything is in the correct order or not. Once you confirm the accurate categorization, choose the Print button on the 1096 form.
- Make sure to check the alignment of the form before you give the command for print. The alignment must be correct.
- Now, you will see a button saying, “Yes, Looks excellent.” Click this button and choose the Print option to print form 1099 and 1096 in QuickBooks Desktop successfully.
What’s the Purpose of Printing Form 1099 and 1096 in QuickBooks Desktop?
This section will talk about the purpose of printing form 1099 and 1096 in QuickBooks Desktop and its notable benefits. Have a look. The below information will clear all your doubts regarding the 1099 and 1096 forms (if any).
A Summary Document
As discussed multiple times above, Form 1096 is a summary document and acts as a cover sheet. This form is an aggregator form with information from other forms, including 5498, 1098, and 1099. Additionally, printing and submitting the 1099 form and the summary form 1096 is important to the IRS and is essential to avoid the headaches of tax season. The forms are essential information returns about which the IRS (Internal Revenue Service) must know. Overall, by printing form 1099 and 1096 in QuickBooks and submitting them on time, your business financial mechanism always stays safe from tax penalties and other costly issues.
Compliance with IRS Rules
Managing business tax-related tasks and operations compliance with the IRS rules is again challenging, and we can’t take any chances with the rules and regulations. But when you print form 1096 in QuickBooks Online and Desktop, it helps you comply with all the latest IRS laws and rules. These forms provide a systematic approach to recording and transmitting return information, including types of dividends, interest, income, and other business payments.
Accurate Data Recorded to the IRS
The IRS (Internal Return Service) must have accurate data records of your business financial management to avoid any tax-related challenges. However, by QuickBooks Desktop 1099 and 1096 printing and filing the forms to the IRS helps you. These forms are the compiled information returns with all the required data reported. From the vendors’ details to the payments and other business transactions made within the year, everything is concluded within these essential forms to continue preparing for the tax season.
Submission of Essential TINs
The next purpose of QuickBooks Desktop 1099 and 1096 printing is to submit the essential information, including your business and vendor’s address, the filer’s name and address, the Taxpayer Identification Number, and the total number of forms or information returns submitted. These details must be accurate and carefully mailed to the IRS on the given deadline to avoid any tax filing-related problems. The required TINs help businesses track tax liabilities and payments for the company employees and employer as well.
Ensures Accuracy and Completeness
Tax-related tasks are daunting enough. Agree? Also, we can’t bear a single mistake in the accuracy and completeness of any information. But, when you submit the form 1099 and the summary 1096 form, you no longer have to bother. These forms ensure the accuracy and completeness of the individual information returns and the total reports by allowing the IRS to cross-verify everything. Eventually, you don’t have to face any issues related to any sort of inaccuracy.
Avoid Potential Tax Penalties
One of the most vital purposes to print QuickBooks 1096 form and 1099 forms is to save businesses from potential tax penalties. The timely and accurate printing plus submitting the forms to the IRS helps business managers comply with the tax regulations and avoid situations that may be imposed for wrong or late submissions of informational returns. So, the conclusion is simple and straightforward: printing and submitting the 1096 summary form and 1099 form always helps businesses in another way.
Ask Our Experts for Further Help..!
So, that’s all! We suggest you follow each step given to print form 1099 and 1096 in QuickBooks Desktop and Online as per your business needs. Meanwhile, you can connect with us if you face any difficulty regarding the procedure given above. Also, if you need professional help printing these essential forms, just contact our team of QuickBooks experts via the available Live Chat Support facility.
Frequently Asked Questions
Yes, QuickBooks Desktop allows e-filing through the IRS-approved QuickBooks E-file service to save time and avoid paper filing.
No. You have to submit a document by scanning the same. The IRS will further process the summary form 1096. Also, keep in mind that printing a form in PDF format from the IRS online will be a document, and the IRS won’t scan it. Eventually, you may have to bear some penalties from the IRS.
You can purchase 1099 and 1096 forms from Intuit, office supply stores (Staples, Office Depot), Amazon, or the IRS website.
No, QuickBooks Desktop does not support printing on plain paper. The IRS requires official red ink forms for submission.
To print 1099 and 1096 forms in QuickBooks Desktop, go to Vendors > Print/E-file 1099s, select the correct tax year, review vendor details, and print the forms using pre-printed paper.
To reprint, go to Vendors > Print/E-file 1099s, select the tax year, and print again. Ensure your printer settings match the pre-printed form.