
Reconciliation is an accounting process that ensures that all the transactions you make match your bank transactions, which means all the money spent from your account matches your bank transactions at the end of the financial period. This process ensures that there are no unauthorized changes to the transactions during processing.
In QuickBooks Online, you can reconcile each transaction in your bank statement with the transactions present in QuickBooks and ensure that the closing balance is zero. If you are new to QuickBooks and wondering how to reconcile in QuickBooks Online, then this blog is for you. Read this guide till the end and reconcile your accounts.
Read More- How to Fix QuickBooks Desktop Won’t Open Error in Easy Steps?
Table of Contents
Easy Steps to Reconcile Your Accounts in QuickBooks Online
You will need to compare your bank transactions to those entered into QuickBooks to ensure the accounts are balanced and accurate. This includes comparing your checks, savings and credit card accounts each month to keep the financials of your business balanced. Let’s learn how to reconcile in QuickBooks Online:
Step 1: Review your opening balance
If you are reconciling your account for the very first time, you must review the opening balance, as it should match the balance of your real-life bank account with the day you decided to started tracking your transactions in QuickBooks Online.
| Tip: To avoid manual hassle and make the reconciliation easy, connect your bank and credit cards to online banking, which will automatically download transactions and enter your opening balance. Note: Only when the bank account isn’t linked to online banking may you enter a service charge and interest-earned alternatives. |
Step 2: Start a reconciliation
You can begin reconciling once you receive your monthly credit card or bank statement. When reconciling several months, start with your oldest statement and work through each one at a time:
- If your credit card or bank accounts are connected with QuickBooks, download and categorize them.
- Navigate to Settings and select Reconcile. If you are new to QuickBooks and reconciling for the very first time , click on Get Started.
- Choose the account you want to reconcile from Account drop-down. Make sure the account is selected same as in your statement.
| Important note: If you see a message about the previous reconciliation; click on We can help you fix it. You must fit this before starting the reconciliation. |
- Review your Beginning balance. Make sure the beginning balance matches with the one in your bank statements.
- Now, enter your Ending balance and Ending date. You may see the Ending balance as a “new balance” or a “closing balance”, depending on the bank.
- Review the Last statement ending date if you see the option. This is the end date of your last reconciliation, your current bank statement will start after this.
- Once all done, select Start reconciling.
Learn more- QuickBooks Error Code 15276: Updating the Payroll Services
Step 3: Compare your statement with QuickBooks
Now, compare your transactions with your bank statements in QuickBooks. Check each of them one by one. You will need to make sure these statements or transactions have the right dates and transactions in QuickBooks to ensure everything matches.
Proceed with the below steps to match the different types of bank statements:
Reconcile accounts connected to online banking
Since all your transactions are downloaded directly from the bank, account reconciliation is convenient and sometimes even done automatically:
- Initiate with the first transaction on your bank statement.
- Look for the same transaction in the Reconciliation window in QuickBooks.
- Now, compare these two transactions. If they match, select the checkbox next to the amount in QuickBooks. It will be marked as reconciled. To simplify things, added transactions will be matched and categorized automatically by QuickBooks.

- If you have a transaction on your bank statement but can’t find it in QuickBooks, make sure to put the checkmark.
- Compare each of the transactions similarly with the ones in QuickBooks.
| Note: If you are sure that you found a match to the transaction, but there are small variants, don’t worry. Simply select the transaction in QuickBooks to expand the view and select Edit. Make the required changes to the details match your statement. |
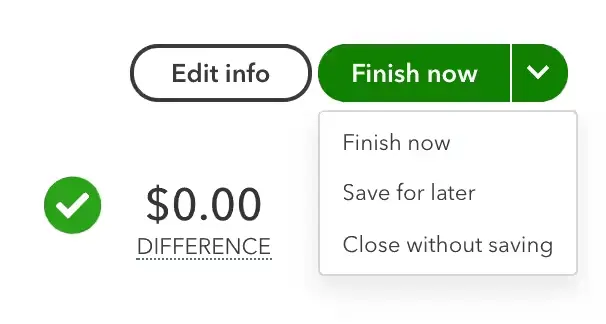
- Once you reach the end, the difference between QuickBooks and your bank transaction should be $0.00. If it is, select Finish now.
Also Read- Fix QuickBooks Payroll Error 30159 With DIY Steps
Reconcile accounts that aren’t connected to online banking
Here’s how to reconcile your account when online banking isn’t connected with QuickBooks:
- Start the reconciliation with the first transaction on your statement.
- Look for the same transaction in the Reconciliation window in QuickBooks.
- Compare these transactions and place a checkmark next to the amount in QuickBooks if they match. This will be marked as a reconciliation.
- If you don’t see a bank transaction on your statement but it is in QuickBooks, make sure not to mark this.
- Compare all the transaction in the bank statement with the one in QuickBooks.
| Tip: Don’t worry if you’re positive you’ve found a match but anything minor, like the payee, is off. To enlarge the view in QuickBooks, choose the transaction. Next, choose Edit. Make the required edits so the details match your statement. |
- After reaching the end, the difference between your bank statement and QuickBooks should be $0.00. If it is, click on Finish now.
Finally, review past reconciliations
Run a reconciliation report to review your work:
- Navigate to Settings and click on Reconcile.
- Select History by account.
- Choose the reconciled account and date range from the drop-down menu. You can also print or export the reconciliation reports if needed to share.
Summary
Whether managing your business accounting manually or using software, reconciliation ensures the accuracy and validity of financial information. In addition, a proper reconciliation process ensures that no unauthorized changes occur to the transactions during processing. We have provided detailed stepwise instructions on how to reconcile in QuickBooks Online. Hopefully, the information is all you need to reconcile your account and ensure the difference is $0.00.
For further assistance, we recommend you connect with QuickBooks professionals. Dial +1(866) 500-0076 and talk to an expert now!
Frequently Asked Questions
No, the automatic reconciliation option in QuickBooks is unavailable. You can link bank or credit card accounts with QuickBooks to download the transactions, but reconciliation must be performed manually.
To start over the reconciliation, you will need to make sure the Ending balance is the same as the opening balance. Once this is done, compare your bank transactions with those in your QuickBooks and mark the checkbox next to the amount. Follow the same process, make sure the difference between QuickBooks and bank statements is $0.00, and select Finish now.
Here’s how you can match transactions in QuickBooks Online:
• Select Transactions and click on Bank Transactions.
• To find the transaction a match, look for the one paired with another transaction.
• If you’re in:
– For the business view, search in the Assigned to column.
– For the accountant view, find it in the Category or matched column.
• Choose your transaction to expand the view.
• Ensure the suggested paired transaction matches the correct one.
• Click Confirm to finish matching.
The reconciliation process ensures that you have track of all changes going out and coming in from your business and that they are accurate. This includes:
• Accessing and comparing deposits between a company’s bank statements and its internal systems of record.
• Normalizing bank statements as needed.
• Formatting data from internal record systems.
• Comparing bank statements and internal records for confirmation.
In QuickBooks, C and R stand for the transaction status as Cleared and Reconciled, respectively. If your transaction is clear and there’s no due, the status will show as C (cleared). Meanwhile, if you have reconciled the transaction after matching it with the bank statement, it will show as R (Reconciled).